
In this tutorial, you’ll deploy OpenClaw on a Raff Ubuntu 24.04 VM, configure it with a model provider, connect it to Telegram, verify that the agent responds, and review the security checks needed before using it with real data.
OpenClaw is an AI agent platform that can run from a Linux server, connect to messaging channels, and respond through configured tools and model providers. Running OpenClaw on a dedicated Raff VM helps keep the agent runtime, configuration files, API credentials, and messaging integrations separate from your personal laptop or day-to-day development machine.
This separation is useful when working with AI agents because tools like OpenClaw may store model provider keys, bot tokens, gateway secrets, sessions, and workspace data. A dedicated VM does not automatically make secrets safe, but it gives you a cleaner environment where you can control access, rotate credentials, and remove the whole setup when testing is complete.
Raff Technologies runs over 10,000 VMs across its compute platform in Vint Hill, Virginia, on AMD EPYC hardware with NVMe storage.
Prerequisites:
- A Raff Ubuntu 24.04 VM
- SSH access with sudo privileges
- A model provider API key, such as an OpenAI API key
- A Telegram account
- A Telegram bot token from BotFather
- Basic familiarity with SSH and Linux terminal commands
This tutorial was tested on a Raff VM with 2 vCPU, 4 GB RAM, running Ubuntu 24.04.4 LTS.
Tested on Raff infrastructure by Aybars Altınyay, platform engineer and technical writer at Raff Technologies.
Step 1 — Create and connect to a Raff Ubuntu 24.04 VM
Create a fresh Raff Linux VM for OpenClaw.
Recommended test configuration:
OS: Ubuntu 24.04
CPU: 2 vCPU
RAM: 4 GB
SSH key: enabled
After the VM is created, copy its public IP address from the Raff dashboard.
Connect from Windows PowerShell:
ssh -i $env:USERPROFILE\.ssh\YOUR_KEY_NAME -o IdentitiesOnly=yes root@your_server_ip
Connect from Linux or macOS:
ssh -i ~/.ssh/YOUR_KEY_NAME root@your_server_ip
Replace:
YOUR_KEY_NAME
your_server_ip
with your actual SSH key filename and Raff VM public IP address.
Verify the operating system and network interface:
lsb_release -ds
uname -r
ip -4 addr show scope global
Expected output includes:
Ubuntu 24.04.4 LTS
eth0
Minor Ubuntu 24.04 point releases are acceptable.
Step 2 — Update Ubuntu and install base packages
Update the server and install the packages needed for the OpenClaw setup.
sudo apt update

sudo env DEBIAN_FRONTEND=noninteractive NEEDRESTART_MODE=a apt upgrade -y \
  -o Dpkg::Options::=--force-confdef \
  -o Dpkg::Options::=--force-confold

sudo apt install -y ca-certificates curl gnupg git ufw build-essential
📌 Note: If Ubuntu asks what to do with a modified
/etc/ssh/sshd_configfile, select keep the local version currently installed. This preserves your current SSH login configuration.
Check whether a reboot is required:
if [ -f /var/run/reboot-required ]; then
  echo "REBOOT_REQUIRED"
else
  echo "NO_REBOOT_REQUIRED"
fi
If the output is REBOOT_REQUIRED, reboot before continuing:
sudo reboot
Reconnect after the VM comes back online, then verify the active kernel:
uname -r
Expected output from the tested VM:
6.8.0-124-generic
Step 3 — Install Node.js 24 and npm
OpenClaw’s Linux setup uses Node.js as the recommended runtime. Add the NodeSource repository for Node.js 24.
sudo apt update
sudo apt install -y ca-certificates curl gnupg

curl -fsSL https://deb.nodesource.com/setup_24.x | sudo bash -

sudo apt install -y nodejs
Verify Node.js and npm:
node -v
npm -v
Expected output from the tested Raff VM:
v24.16.0
11.13.0
Your exact patch versions may be newer.
Step 4 — Install OpenClaw
Install OpenClaw globally with npm:
sudo npm install -g openclaw@latest
Verify the installation:
openclaw --version
Expected output from the tested Raff VM:
OpenClaw 2026.6.5
The exact version may change as OpenClaw releases updates.
Step 5 — Run OpenClaw onboarding
Start the OpenClaw onboarding wizard and install the gateway daemon:
openclaw onboard --install-daemon
During onboarding, use the following choices for a clean first deployment:
Model provider: OpenAI or your preferred supported provider
API key: paste directly into the terminal when prompted
Channel: Telegram (Bot API)
Telegram bot token: paste directly into the terminal when prompted
Web search: skip or choose a provider you already have credentials for
Skills: skip for now
Hooks: skip for now
Tighten ~/.openclaw permissions to 700: yes
Disable unavailable skills if prompted: yes
⚠️ Warning: Do not paste API keys, Telegram bot tokens, gateway secrets, or configuration files into chat, screenshots, tickets, or public repositories. Paste secrets only into the VM terminal when OpenClaw asks for them.
If the onboarding wizard completes successfully, you should see a message similar to:
Onboarding complete.
Refresh shell completion if OpenClaw asks you to:
source ~/.bashrc
Step 6 — Create a Telegram bot token safely
Open Telegram and start a chat with:
@BotFather
Create a new bot:
/newbot
Use a clear test name, for example:
Raff OpenClaw Test
Choose a username that ends with bot, for example:
raff_openclaw_test_bot
BotFather will return a bot token.
⚠️ Warning: Treat the Telegram bot token like a password. Do not screenshot it. Do not paste it into the tutorial. If the token is exposed, revoke it in BotFather and generate a new one.
If you need to update the Telegram token after onboarding, enter it without showing it on screen:
read -s -p "Paste fresh Telegram bot token: " TELEGRAM_BOT_TOKEN
echo
openclaw config set channels.telegram.botToken "$TELEGRAM_BOT_TOKEN"
unset TELEGRAM_BOT_TOKEN
openclaw gateway restart --safe
history -c
history -w
clear
The terminal should show that the Telegram token was updated without displaying the token itself.
Step 7 — Verify OpenClaw status and enable messaging tools
Check OpenClaw status:
openclaw status
Run the doctor check:
openclaw doctor
If openclaw doctor warns that the Telegram channel is routed but the message tool is unavailable, enable the messaging tool profile:
openclaw config set tools.profile messaging
openclaw gateway restart --safe
Run the checks again:
openclaw status
openclaw doctor
Expected healthy indicators include:
OpenClaw installed
Gateway running
Skills status shows no missing requirements
Plugins show no errors
You may still see a security warning that OpenClaw stores secret-bearing configuration in ~/.openclaw/openclaw.json. That warning is important, but it does not block the tutorial test. It means you should protect the VM, restrict file access, avoid screenshots of config files, and rotate exposed credentials.
Step 8 — Open the real Telegram bot
Open the actual bot you created, not BotFather.
You can use this format:
https://t.me/your_bot_username
Click Start, then send:
Say exactly: OpenClaw is running on Raff.
If the bot does not reply, check whether OpenClaw needs Telegram pairing approval:
openclaw pairing list telegram
If a pending code appears, approve it:
openclaw pairing approve telegram CODE_HERE
Then send the Telegram test message again.
Visible state check:
The Telegram bot receives the test message.
OpenClaw responds through the Telegram bot.
The response confirms that OpenClaw is running on Raff.
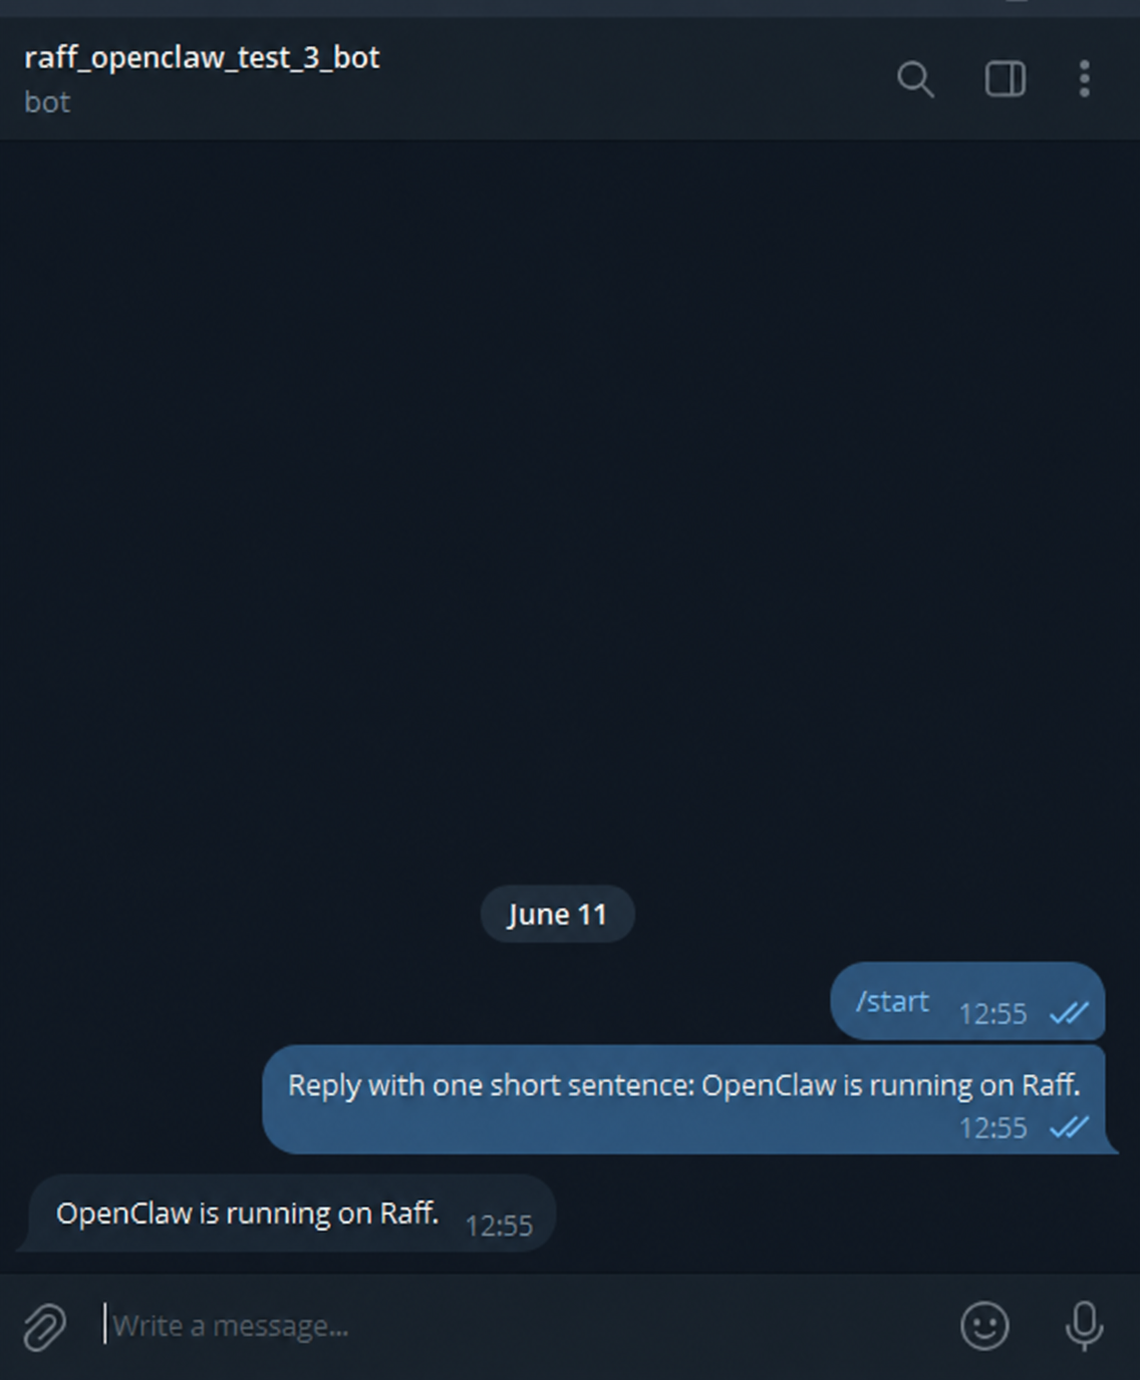
The test is successful when the Telegram bot responds to the prompt without showing errors in the OpenClaw gateway.
Step 9 — Verify the final OpenClaw deployment
Run a final verification sequence on the VM:
echo "Checking Node.js:"
node -v

echo "Checking npm:"
npm -v

echo "Checking OpenClaw:"
openclaw --version

echo "Checking OpenClaw status:"
openclaw status

echo "Checking OpenClaw doctor:"
openclaw doctor
Expected output includes:
v24.x.x
11.x.x
OpenClaw 2026.x.x
Doctor complete
If the doctor output contains warnings about plaintext secret-bearing config, treat that as a security reminder. Do not share ~/.openclaw/openclaw.json, .env files, tokens, or screenshots that include secrets.
The OpenClaw deployment is complete when OpenClaw is installed, onboarding has completed, the gateway runs, Telegram is connected, and the bot can respond to a test message.
Step 10 — Review security practices for OpenClaw on a VM
OpenClaw can store and use sensitive credentials, including model provider API keys, Telegram bot tokens, gateway authentication secrets, session data, and workspace files.
Use these practices before using it with real data:
Use a dedicated Raff VM for the agent runtime.
Do not reuse exposed API keys or Telegram bot tokens.
Rotate any credential that appears in a screenshot or terminal history.
Do not publish OpenClaw config files.
Avoid exposing the OpenClaw gateway publicly.
Use SSH for server access.
Keep UFW enabled.
Delete the VM or clean the config when testing is complete.
Check file permissions:
ls -ld ~/.openclaw
Expected output should show that only the owner can access the directory:
drwx------
If needed, tighten permissions manually:
chmod 700 ~/.openclaw
📌 Note: A dedicated Raff VM is useful because it separates OpenClaw’s tools, sessions, config, and credentials from your personal machine. This makes testing easier to clean up and reduces accidental exposure across unrelated projects.
Cleanup (Optional)
Use this section only if you want to remove the OpenClaw test deployment from the VM.
⚠️ Warning: These commands remove OpenClaw configuration, sessions, local workspace data, and saved credentials from the VM. Do not run them on a production OpenClaw deployment unless you have backed up anything you need.
Stop the gateway if it is running:
openclaw gateway stop 2>/dev/null || true
Uninstall the global OpenClaw package:
sudo npm uninstall -g openclaw
Remove OpenClaw local configuration and data:
rm -rf ~/.openclaw
Clear shell history for this test session:
history -c
history -w
If you used a temporary Telegram bot for testing, revoke or delete it in BotFather.
If you used a temporary model provider API key, revoke it from your provider dashboard.
Verify that OpenClaw is no longer available:
openclaw --version || echo "OpenClaw removed"
Expected output:
OpenClaw removed
Troubleshooting
openclaw: command not found
Cause: OpenClaw was not installed globally, or the npm global binary path is not available in your shell.
Fix:
sudo npm install -g openclaw@latest
openclaw --version
If the command still fails, open a new SSH session or run:
source ~/.bashrc
Telegram token check fails with 404
Cause: The Telegram bot token is invalid, revoked, or copied incorrectly.
Fix:
Create or revoke the token in BotFather, then update OpenClaw safely:
read -s -p "Paste fresh Telegram bot token: " TELEGRAM_BOT_TOKEN
echo
openclaw config set channels.telegram.botToken "$TELEGRAM_BOT_TOKEN"
unset TELEGRAM_BOT_TOKEN
openclaw gateway restart --safe
history -c
history -w
clear
Do not paste the token into chat or screenshots.
The bot does not reply
Cause: You may be messaging BotFather instead of your real bot, the Telegram token may belong to another bot, the gateway may need a restart, or pairing may be pending.
Fix:
Open your real bot URL:
https://t.me/your_bot_username
Send:
/start
Then check pairing:
openclaw pairing list telegram
If a code appears, approve it:
openclaw pairing approve telegram CODE_HERE
Restart the gateway:
openclaw gateway restart --safe
Then send the test message again.
Doctor says the message tool is unavailable
Cause: Telegram is configured, but the active OpenClaw tool profile does not include messaging tools.
Fix:
openclaw config set tools.profile messaging
openclaw gateway restart --safe
openclaw doctor
Then test the Telegram bot again.
Doctor warns that secrets are stored in plaintext config
Cause: OpenClaw configuration can include secret-bearing fields such as API keys and bot tokens.
Fix:
Protect the VM and config directory:
chmod 700 ~/.openclaw
Do not publish:
~/.openclaw/openclaw.json
Telegram bot tokens
Model provider API keys
Gateway auth tokens
Screenshots that include secrets
Rotate any credential that was exposed during testing.
Web search provider warning appears
Cause: A web search provider was selected during onboarding, but no provider API key was configured.
Fix:
This does not block the Telegram test. You can skip web search for the first deployment, or configure a provider later according to your OpenClaw setup.
OpenClaw gateway restart is needed
Cause: Configuration changes such as Telegram token updates or tool profile changes require the gateway to restart.
Fix:
openclaw gateway restart --safe
Then run:
openclaw status
openclaw doctor
Conclusion
You have deployed OpenClaw on a Raff Ubuntu 24.04 VM, installed Node.js 24, completed OpenClaw onboarding, connected a Telegram bot, verified that the agent responds, and reviewed the security steps needed before using it with real data.
A dedicated Raff VM is a practical place to run AI agent tooling because it separates agent configuration, API keys, tokens, sessions, and workspace data from your personal machine. For safer long-term use, keep the VM patched, restrict SSH access, rotate exposed credentials, and avoid publishing OpenClaw config files or secret-bearing screenshots.
If you haven’t deployed your Raff VM yet, you can create one from the Raff Linux VM page.
Next: Install Node.js on Ubuntu 24.04 Related: Secure an Ubuntu 24.04 Server Guide: Set Up UFW Firewall on Ubuntu 24.04