Odoo is an open-source business application suite for CRM, sales, inventory, accounting, websites, manufacturing, and operations. On Ubuntu 24.04, one maintainable self-hosted pattern is Docker Compose with the official Odoo image, PostgreSQL, persistent volumes, and Caddy for HTTPS.
Raff Technologies is the VM platform used by the original tutorial. The saved tested environment remains Raff VM with 2 vCPU, 4 GB DDR5 RAM, 50 GB NVMe storage, Ubuntu 24.04 LTS. This revision re-verifies the deployment guidance against current Odoo documentation and the official Docker image on September 5, 2026 without claiming a new end-to-end machine test.
This guide updates the original Odoo 18 deployment to Odoo 19.0, the current supported on-premise major release. It pins the official Docker image to odoo:19.0-20260817, which is the current dated Odoo 19 image visible on Docker Hub at verification time. Odoo 19 supports PostgreSQL 13 or newer; the official Docker examples continue to use PostgreSQL 15, so this tutorial keeps PostgreSQL 15 as the database major version.
The most important upgrade rule is that a same-major Odoo 19 bugfix/image update is not the same as a major database upgrade. Do not move an existing Odoo 18 database to Odoo 19 by changing only the Docker tag. Odoo documents major-version upgrades as database transformations that require the official upgrade process and, for customized databases, module migration work.
Prerequisites:
- Ubuntu 24.04 with SSH and sudo access
- A domain such as
erp.example.compointing to the VM - Public TCP 80 and 443 available for HTTPS
- A tested recovery path before firewall changes
- A secure off-server destination for Odoo backups
Step 1 — Verify Ubuntu, DNS, resources, and existing listeners
Confirm the operating system and architecture:
cat /etc/os-release
uname -m
Check CPU, memory, and free disk space:
nproc
free -h
df -h /
Set the Odoo hostname and verify DNS:
export ODOO_DOMAIN=erp.example.com

dig +short A "$ODOO_DOMAIN"
dig +short AAAA "$ODOO_DOMAIN"
Publish an AAAA record only when IPv6 really reaches the VM and is protected consistently.
Inspect existing listeners:
sudo ss -tulpn
Ports 80 and 443 should be available for Caddy. Odoo ports 8069/8072 and PostgreSQL 5432 will remain inside the Docker network rather than being published publicly.
Verify: Ubuntu should report 24.04, DNS should resolve to this server, resource headroom should be understood, and no unexpected production service should already occupy TCP 80 or 443.
Step 2 — Install Docker Engine and Docker Compose v2
Update package metadata and install Docker repository prerequisites:
sudo apt update
sudo apt install -y ca-certificates curl gnupg
sudo install -m 0755 -d /etc/apt/keyrings
sudo curl -fsSL https://download.docker.com/linux/ubuntu/gpg \
  -o /etc/apt/keyrings/docker.asc
sudo chmod a+r /etc/apt/keyrings/docker.asc
Add Docker's official Ubuntu repository:
sudo tee /etc/apt/sources.list.d/docker.sources >/dev/null <<EOF
Types: deb
URIs: https://download.docker.com/linux/ubuntu
Suites: $(. /etc/os-release && echo "${UBUNTU_CODENAME:-$VERSION_CODENAME}")
Components: stable
Architectures: $(dpkg --print-architecture)
Signed-By: /etc/apt/keyrings/docker.asc
EOF
Install Docker Engine and Compose:
sudo apt update
sudo apt install -y \
  docker-ce docker-ce-cli containerd.io \
  docker-buildx-plugin docker-compose-plugin
sudo systemctl enable --now docker
Verify the installation:
sudo docker version
docker compose version
sudo docker run --rm hello-world
For a dedicated walkthrough, see Install Docker on Ubuntu 24.04.
Verify: Docker should be active, Compose v2 should respond, and the hello-world container should run successfully.
Step 3 — Prepare the firewall without risking SSH lockout
Open a second SSH session before changing firewall state.
If UFW is already active, verify your real SSH rule and allow web traffic:
sudo ufw status numbered
sudo ufw allow 80/tcp comment 'Odoo HTTP/ACME'
sudo ufw allow 443/tcp comment 'Odoo HTTPS'
If UFW is inactive, do not blindly enable it from a single remote shell. Follow the lockout-safe process in Set Up UFW Firewall on Ubuntu 24.04.
Do not open 8069, 8072, or 5432 publicly for this architecture.
Verify: SSH should remain reachable from the second session, 80/443 should be allowed when UFW is active, and Odoo/PostgreSQL application ports should not have public allow rules.
Step 4 — Create the Odoo directories, database secret, and master password
Create the deployment layout:
sudo mkdir -p /opt/odoo/{config,addons,secrets,backups}
sudo chown -R "$USER":"$USER" /opt/odoo
cd /opt/odoo
chmod 700 secrets backups
Generate a PostgreSQL password and Odoo database-manager master password:
openssl rand -hex 32 > secrets/postgresql_password
openssl rand -hex 32 > .odoo_master_password
chmod 600 secrets/postgresql_password .odoo_master_password
Create the Compose environment file:
cat > .env <<'EOF'
ODOO_DOMAIN=erp.example.com
[email protected]
EOF
chmod 600 .env
Replace the domain and certificate email with your real values.
The Odoo admin_passwd is not an ordinary user password. It protects database-management operations such as create, delete, dump, and restore. Odoo's own production documentation strongly recommends disabling the Database Manager on internet-facing systems after initial provisioning.
Verify: Secret files and .env should be mode 600, the backup/secrets directories should not be group/world accessible, and you should have stored the generated master password in a password manager before continuing.
Step 5 — Create the Odoo 19 and PostgreSQL 15 Compose stack
Create compose.yaml:
cat > compose.yaml <<'EOF'
services:
  db:
    image: postgres:15
    container_name: odoo-db
    restart: unless-stopped
    environment:
      POSTGRES_DB: postgres
      POSTGRES_USER: odoo
      POSTGRES_PASSWORD_FILE: /run/secrets/postgresql_password
      PGDATA: /var/lib/postgresql/data/pgdata
    secrets:
      - postgresql_password
    volumes:
      - odoo_db_data:/var/lib/postgresql/data/pgdata
    networks:
      - odoo_net
    healthcheck:
      test: ["CMD-SHELL", "pg_isready -U odoo -d postgres"]
      interval: 10s
      timeout: 5s
      retries: 10

  odoo:
    image: odoo:19.0-20260817
    container_name: odoo
    restart: unless-stopped
    depends_on:
      db:
        condition: service_healthy
    environment:
      HOST: db
      PORT: "5432"
      USER: odoo
      PASSWORD_FILE: /run/secrets/postgresql_password
    secrets:
      - postgresql_password
    volumes:
      - odoo_web_data:/var/lib/odoo
      - ./config/odoo.conf:/etc/odoo/odoo.conf:ro
      - ./addons:/mnt/extra-addons
    networks:
      - odoo_net

  caddy:
    image: caddy:2
    container_name: odoo-caddy
    restart: unless-stopped
    depends_on:
      - odoo
    ports:
      - "80:80"
      - "443:443"
    environment:
      ODOO_DOMAIN: "${ODOO_DOMAIN}"
      ACME_EMAIL: "${ACME_EMAIL}"
    volumes:
      - ./Caddyfile:/etc/caddy/Caddyfile:ro
      - caddy_data:/data
      - caddy_config:/config
    networks:
      - odoo_net

secrets:
  postgresql_password:
    file: ./secrets/postgresql_password

networks:
  odoo_net:
    driver: bridge

volumes:
  odoo_web_data:
    name: odoo_web_data
  odoo_db_data:
    name: odoo_db_data
  caddy_data:
  caddy_config:
EOF
The official Odoo 19 image supports PASSWORD_FILE, so the PostgreSQL password does not need to be placed directly in Compose YAML. Neither Odoo nor PostgreSQL publishes a host port.
Verify: docker compose config should parse the file, the Odoo image should be pinned to 19.0-20260817, PostgreSQL should be major 15, and only the Caddy service should contain a ports: block.
Step 6 — Configure Odoo proxy mode, workers, database management, and file permissions
Create the initial Odoo configuration using the generated master password:
cd /opt/odoo
ODOO_MASTER_PASSWORD="$(cat .odoo_master_password)"

cat > config/odoo.conf <<EOF
[options]
admin_passwd = ${ODOO_MASTER_PASSWORD}
addons_path = /usr/lib/python3/dist-packages/odoo/addons,/mnt/extra-addons
data_dir = /var/lib/odoo
proxy_mode = True
list_db = True
workers = 2
max_cron_threads = 1
log_level = warn
EOF
The worker count here is a conservative starting point for the saved 2-vCPU/4-GB test profile, not a universal production sizing rule. Odoo's documentation calculates worker requirements from CPU, concurrency, workload mix, and memory consumption; larger installations should size from observed load rather than copying a fixed value.
With multiprocessing enabled, Odoo uses port 8069 for normal HTTP traffic and its gevent port 8072 for WebSocket traffic.
Restrict the config file while keeping it readable by the Odoo user inside the official container. Detect the image's numeric UID/GID rather than assuming them:
ODOO_UID="$(sudo docker run --rm --entrypoint id odoo:19.0-20260817 -u)"
ODOO_GID="$(sudo docker run --rm --entrypoint id odoo:19.0-20260817 -g)"

sudo chown "${ODOO_UID}:${ODOO_GID}" config/odoo.conf
sudo chmod 600 config/odoo.conf
Verify: The config should contain proxy_mode = True, workers = 2, and list_db = True; its mode should be 600; and its owner IDs should match the Odoo image's runtime user.
Step 7 — Configure Caddy for HTTPS and Odoo WebSockets
Create the initial Caddy configuration:
cat > /opt/odoo/Caddyfile <<'EOF'
{
  email {$ACME_EMAIL}
}

{$ODOO_DOMAIN} {
  encode zstd gzip

  header {
    Strict-Transport-Security "max-age=31536000"
    X-Content-Type-Options "nosniff"
    Referrer-Policy "same-origin"
    -Server
  }

  @websocket path /websocket*
  reverse_proxy @websocket odoo:8072 {
    header_up X-Forwarded-Host {host}
    header_up X-Forwarded-Proto {scheme}
    header_up X-Real-IP {remote_host}
  }

  reverse_proxy odoo:8069 {
    header_up X-Forwarded-Host {host}
    header_up X-Forwarded-Proto {scheme}
    header_up X-Real-IP {remote_host}
  }
}
EOF
Odoo 19 documents port 8072 as the WebSocket/gevent port when multiprocessing is enabled; it is not used in the default threaded mode. Odoo also requires proxy_mode when it is intentionally deployed behind a trusted reverse proxy.
Validate the Compose model:
cd /opt/odoo
sudo docker compose config >/dev/null && echo 'Compose config is valid'
Verify: /websocket should route to 8072, ordinary requests should route to 8069, and the Compose configuration should validate successfully.
Step 8 — Start Odoo 19, PostgreSQL, and Caddy and verify the stack
Pull the pinned/current images:
cd /opt/odoo
sudo docker compose pull
Start the stack:
sudo docker compose up -d
Check containers and PostgreSQL readiness:
sudo docker compose ps
sudo docker compose exec -T db pg_isready -U odoo -d postgres
Verify Odoo's major version:
sudo docker compose exec odoo odoo --version
Inspect recent logs:
sudo docker compose logs --tail=100 odoo
sudo docker compose logs --tail=100 caddy
Test HTTPS:
ODOO_DOMAIN=$(sed -n 's/^ODOO_DOMAIN=//p' .env)
curl -I "https://$ODOO_DOMAIN"
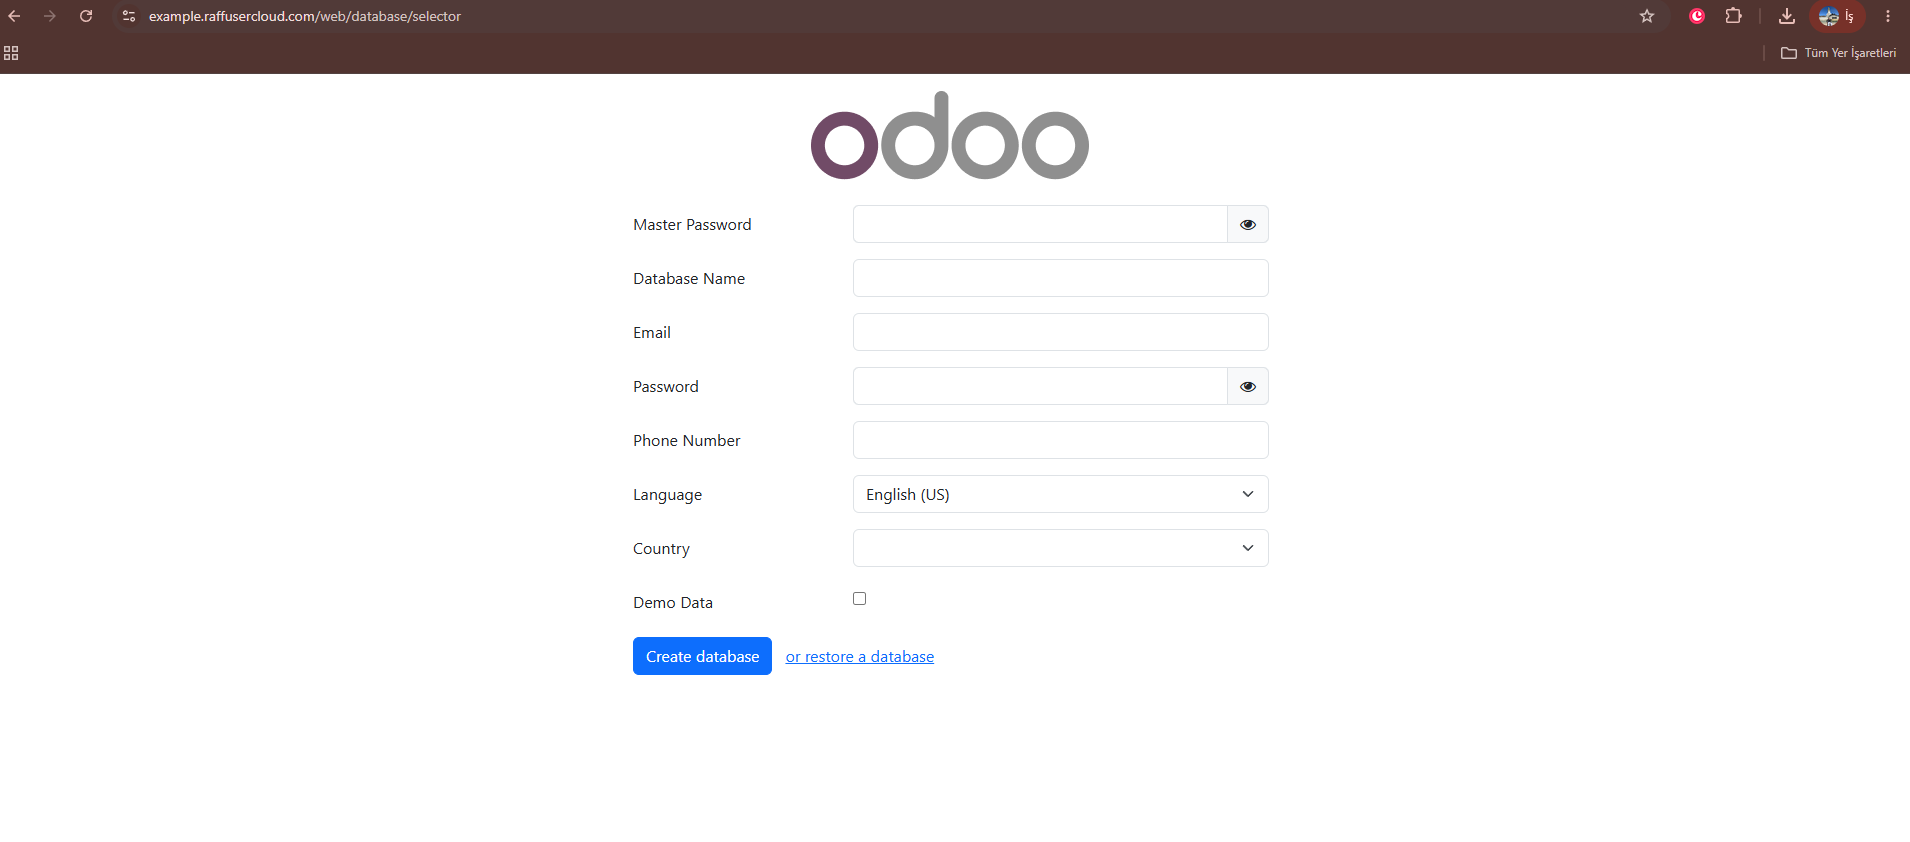
Before the first database exists, the browser should reach Odoo's database setup/selection flow over HTTPS.
Verify: PostgreSQL should accept connections, Odoo should report version 19.0, all three containers should remain running, and the public domain should answer over trusted HTTPS.
Step 9 — Create the first Odoo database through the initial setup screen
Open:
https://erp.example.com
Retrieve the database-manager master password only when needed:
sudo grep '^admin_passwd =' /opt/odoo/config/odoo.conf
Create the first database with a simple production-safe database name such as:
odoo_prod
Use a unique administrator email and strong application password. Leave demo data disabled for a production deployment.
Preserve the existing tutorial screenshots as visual references for the database creation and Apps dashboard flows:
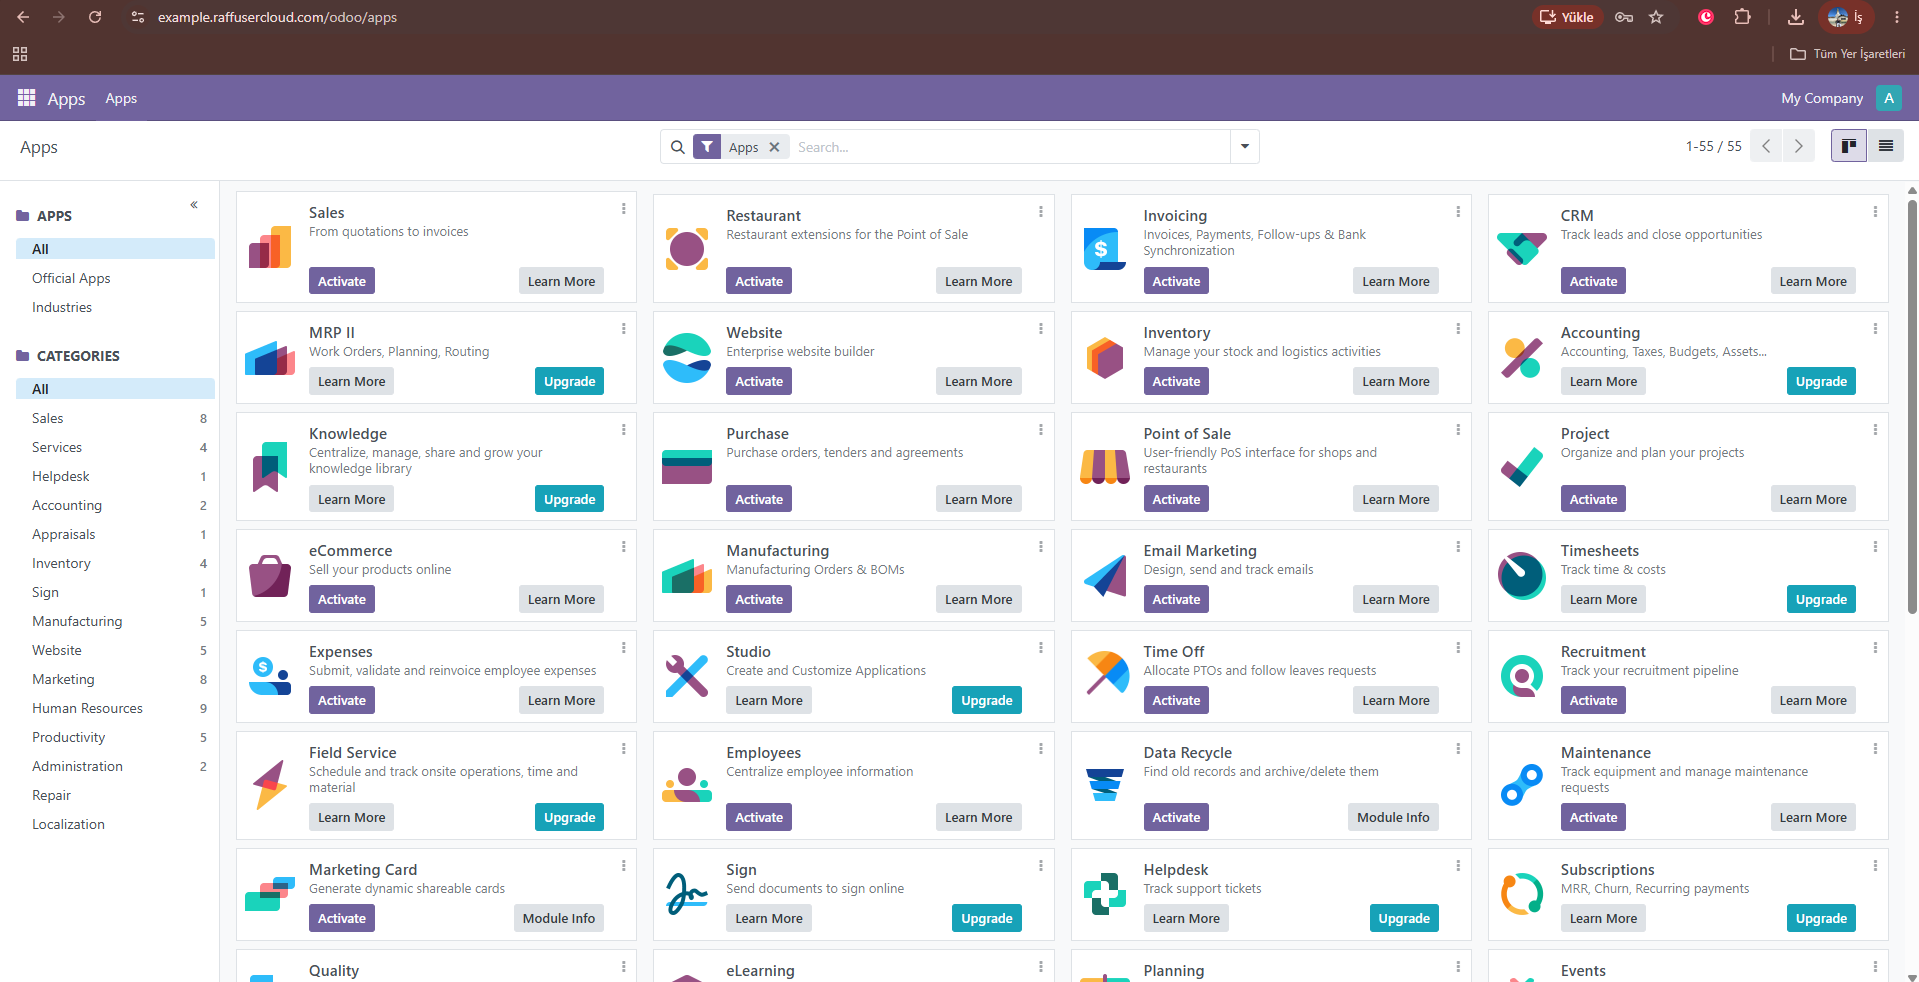
After creation, sign out and back in, then confirm the Apps dashboard loads.