
In this tutorial, you’ll install Nextcloud on a Raff Ubuntu 24.04 VM with Apache, MariaDB, PHP, HTTPS, background jobs, and local caching.
Nextcloud is a self-hosted file sync, sharing, and collaboration platform. This tutorial uses the classic Ubuntu LAMP installation path with Apache, MariaDB, PHP 8.3, and the official Nextcloud archive. Raff Technologies has supported 10,000+ VM deployments across its compute platform, and Raff Linux VMs can be provisioned in 60 seconds with NVMe storage and unmetered bandwidth.
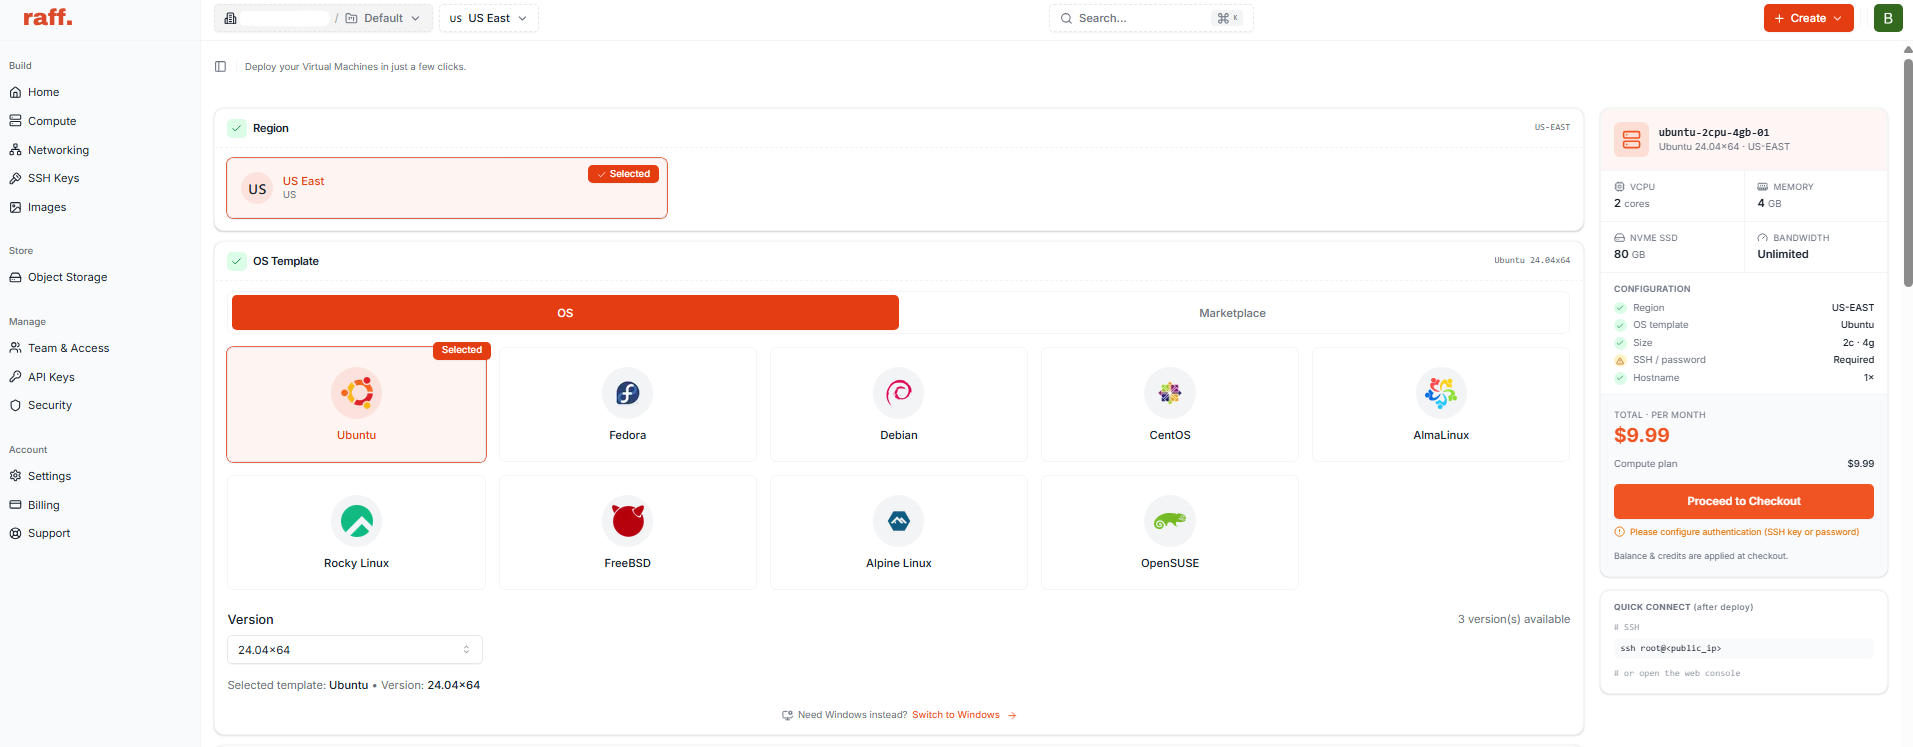
This tutorial was tested on a Raff VM with 2 vCPU, 4 GB DDR5 RAM, 80 GB NVMe storage, running Ubuntu 24.04 LTS.
Tested on Raff infrastructure by Aybars Altınyay, platform engineer at Raff Technologies.
Prerequisites:
- A Raff Ubuntu 24.04 VM
- SSH access with sudo privileges
- A domain or subdomain pointed to your VM’s public IPv4 address
- Ports
80/tcpand443/tcpavailable on the VM - Basic familiarity with Linux terminal commands
For this tutorial, select an Ubuntu 24.04 x64 Raff VM with at least 2 vCPU, 4 GB RAM, and 80 GB NVMe storage. This gives Nextcloud enough room for Apache, MariaDB, PHP, uploads, previews, and background jobs. For larger deployments, review Raff General Purpose VM plans and Raff pricing before choosing your final VM size.
📌 Note: Replace
cloud.your-domain.comthroughout this tutorial with your own domain or subdomain.
Step 1 — Update system packages
Update the Ubuntu package index and install basic tools:
sudo apt update
sudo apt upgrade -y
sudo apt install -y curl wget tar bzip2 unzip nano ufw dnsutils ca-certificates
Verify that package upgrades are complete:
sudo apt list --upgradable
Expected output:
Listing... Done
Step 2 — Install Apache, MariaDB, PHP, and required modules
Install Apache, MariaDB, PHP 8.3, and the PHP modules required by Nextcloud:
sudo apt install -y apache2 mariadb-server \
  libapache2-mod-php8.3 \
  php8.3 php8.3-cli php8.3-common php8.3-mysql php8.3-gd \
  php8.3-curl php8.3-mbstring php8.3-intl php8.3-gmp \
  php8.3-bcmath php8.3-xml php8.3-zip php8.3-imagick \
  php8.3-apcu \
  certbot python3-certbot-apache
Enable Apache and MariaDB:
sudo systemctl enable --now apache2
sudo systemctl enable --now mariadb
Verify the services and PHP version:
systemctl is-active apache2
systemctl is-active mariadb
php -v | head -n 1
Expected output includes:
active
active
PHP 8.3
Step 3 — Configure UFW firewall rules
Allow SSH, HTTP, and HTTPS traffic:
sudo ufw allow 22/tcp
sudo ufw allow 80/tcp
sudo ufw allow 443/tcp
sudo ufw --force enable
Verify the firewall rules:
sudo ufw status numbered
Expected output includes:
22/tcp    ALLOW IN
80/tcp    ALLOW IN
443/tcp   ALLOW IN
Step 4 — Create the Nextcloud MariaDB database
Create the Nextcloud database and database user:
sudo mariadb <<'SQL'
CREATE DATABASE nextcloud CHARACTER SET utf8mb4 COLLATE utf8mb4_general_ci;
CREATE USER 'nextclouduser'@'localhost' IDENTIFIED BY 'ChangeThisStrongDatabasePassword!';
GRANT ALL PRIVILEGES ON nextcloud.* TO 'nextclouduser'@'localhost';
FLUSH PRIVILEGES;
SQL
Verify that the database and user exist:
sudo mariadb -e "SHOW DATABASES LIKE 'nextcloud';"
sudo mariadb -e "SELECT User, Host FROM mysql.user WHERE User = 'nextclouduser';"
Expected output includes:
nextcloud
nextclouduser    localhost
⚠️ Warning: Replace
ChangeThisStrongDatabasePassword!with a unique database password before using this deployment for real data.
Step 5 — Download and verify Nextcloud
Download the current Nextcloud 32 archive and checksum file:
cd /tmp

wget https://download.nextcloud.com/server/releases/latest-32.tar.bz2
wget https://download.nextcloud.com/server/releases/latest-32.tar.bz2.sha256
Verify the archive checksum:
sha256sum -c latest-32.tar.bz2.sha256
Expected output:
latest-32.tar.bz2: OK
Extract the archive and move it into the Apache web directory:
tar -xjf latest-32.tar.bz2
sudo mv nextcloud /var/www/nextcloud
Create a separate data directory outside the web root:
sudo mkdir -p /var/nextcloud-data
sudo chown -R www-data:www-data /var/www/nextcloud /var/nextcloud-data
Verify the directories:
ls -ld /var/www/nextcloud /var/nextcloud-data
Expected output includes:
www-data www-data /var/www/nextcloud
www-data www-data /var/nextcloud-data
Step 6 — Configure PHP for Nextcloud
Update PHP upload, memory, and execution limits:
PHP_INI="/etc/php/8.3/apache2/php.ini"

sudo sed -i 's/^memory_limit = .*/memory_limit = 512M/' "$PHP_INI"
sudo sed -i 's/^upload_max_filesize = .*/upload_max_filesize = 512M/' "$PHP_INI"
sudo sed -i 's/^post_max_size = .*/post_max_size = 512M/' "$PHP_INI"
sudo sed -i 's/^max_execution_time = .*/max_execution_time = 360/' "$PHP_INI"
sudo sed -i 's/^max_input_time = .*/max_input_time = 360/' "$PHP_INI"
Verify the PHP values:
grep -E "^(memory_limit|upload_max_filesize|post_max_size|max_execution_time|max_input_time)" "$PHP_INI"
Expected output includes:
memory_limit = 512M
upload_max_filesize = 512M
post_max_size = 512M
max_execution_time = 360
max_input_time = 360
Restart Apache:
sudo systemctl restart apache2
Verify Apache is active:
systemctl is-active apache2
Expected output:
active
Step 7 — Configure Apache for Nextcloud
Create the Apache virtual host:
sudo nano /etc/apache2/sites-available/nextcloud.conf
Paste this configuration:
<VirtualHost *:80>
    ServerName cloud.your-domain.com
    DocumentRoot /var/www/nextcloud

    <Directory /var/www/nextcloud/>
        Require all granted
        AllowOverride All
        Options FollowSymLinks MultiViews

        <IfModule mod_dav.c>
            Dav off
        </IfModule>
    </Directory>

    SetEnv HOME /var/www/nextcloud
    SetEnv HTTP_HOME /var/www/nextcloud

    ErrorLog ${APACHE_LOG_DIR}/nextcloud_error.log
    CustomLog ${APACHE_LOG_DIR}/nextcloud_access.log combined
</VirtualHost>
Enable the site and required Apache modules:
sudo a2ensite nextcloud.conf
sudo a2dissite 000-default.conf
sudo a2enmod rewrite headers env dir mime ssl setenvif
Validate Apache configuration:
sudo apache2ctl configtest
Expected output:
Syntax OK
Reload Apache:
sudo systemctl reload apache2
Verify the HTTP response:
curl -I http://cloud.your-domain.com
Expected output includes 200, 302, or 303.
Step 8 — Enable HTTPS with Certbot
Run Certbot for your domain:
sudo certbot --apache \
  -d cloud.your-domain.com \
  --redirect \
  --agree-tos \
  --no-eff-email \
  -m [email protected]
Replace [email protected] with an email address you control.
Verify HTTPS:
curl -I https://cloud.your-domain.com
Expected output includes either:
HTTP/2 200
or:
HTTP/1.1 200 OK
Verify automatic certificate renewal:
sudo certbot renew --dry-run
Expected output includes:
Congratulations, all simulated renewals succeeded
Step 9 — Complete the Nextcloud web setup
Open your Nextcloud domain in a browser:
https://cloud.your-domain.com
The Nextcloud setup page appears.
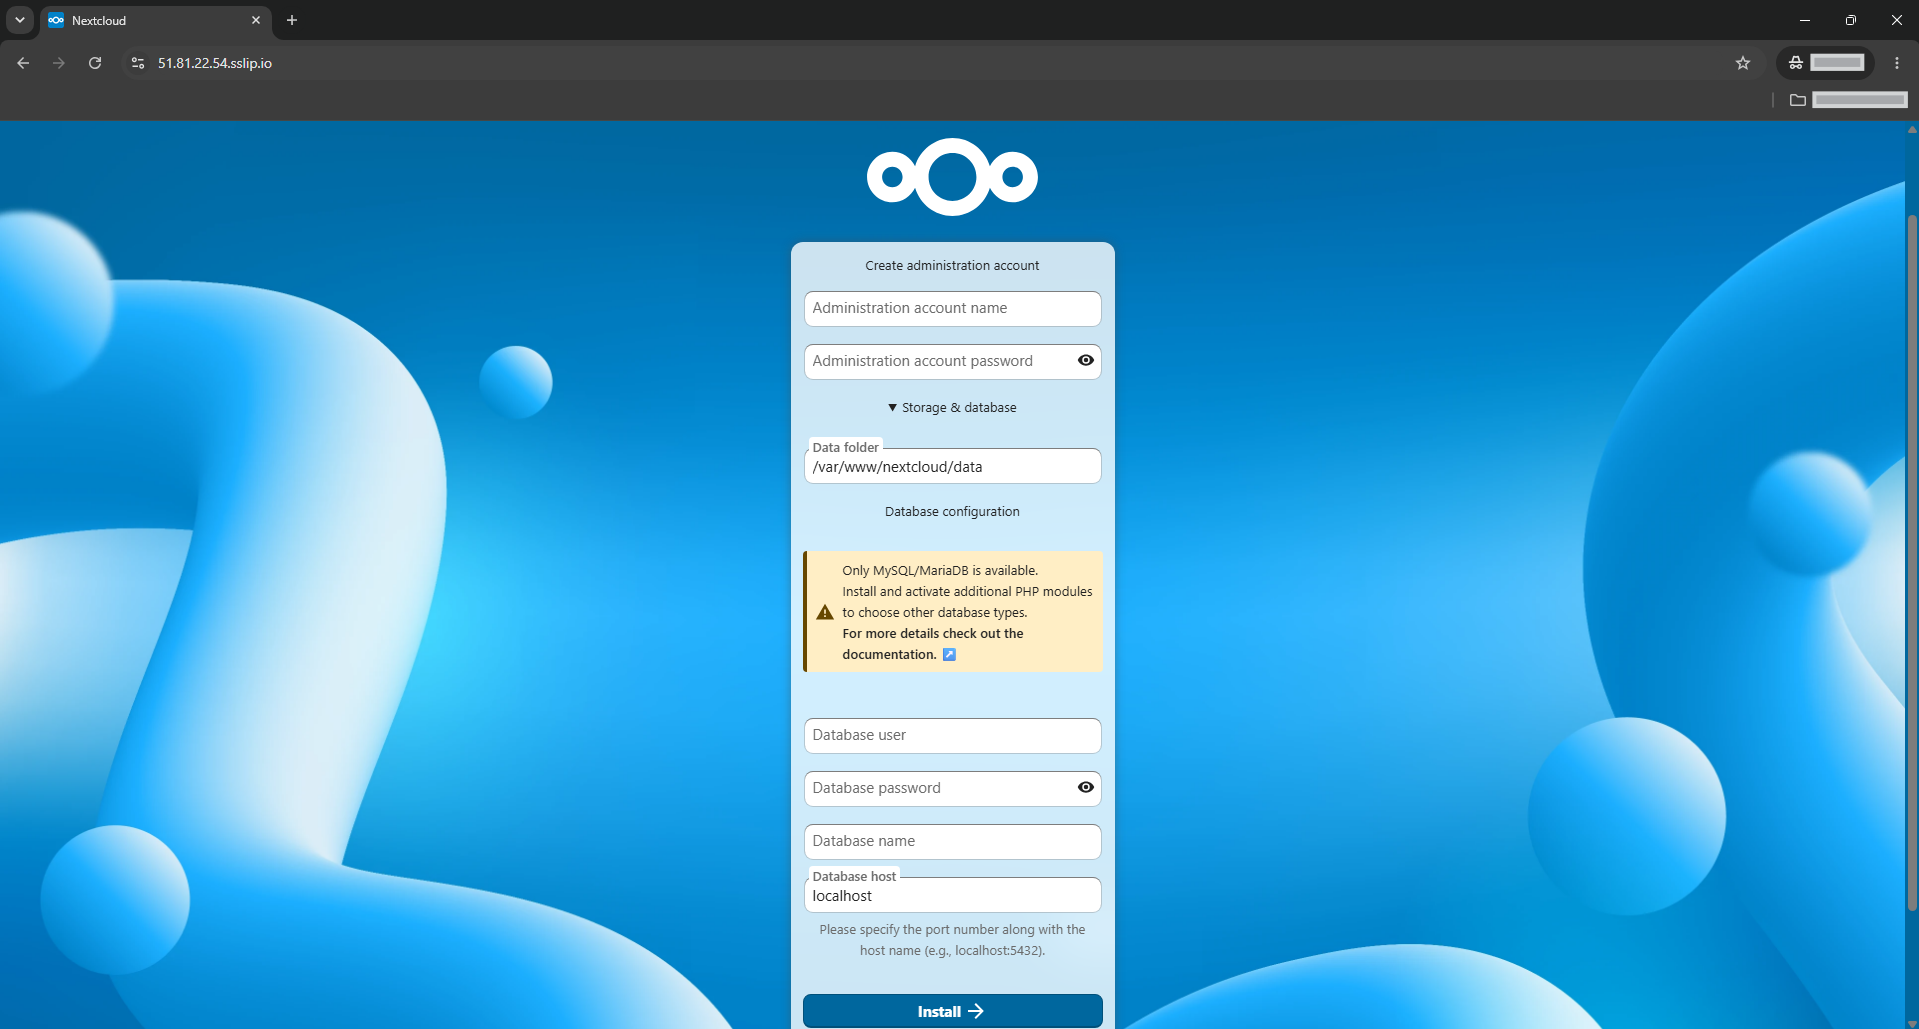
Use these values:
Administration account name: raffadmin
Administration account password: your strong admin password

Data folder: /var/nextcloud-data

Database user: nextclouduser
Database password: ChangeThisStrongDatabasePassword!
Database name: nextcloud
Database host: localhost
Click Install.
After installation finishes, verify that the dashboard loads.
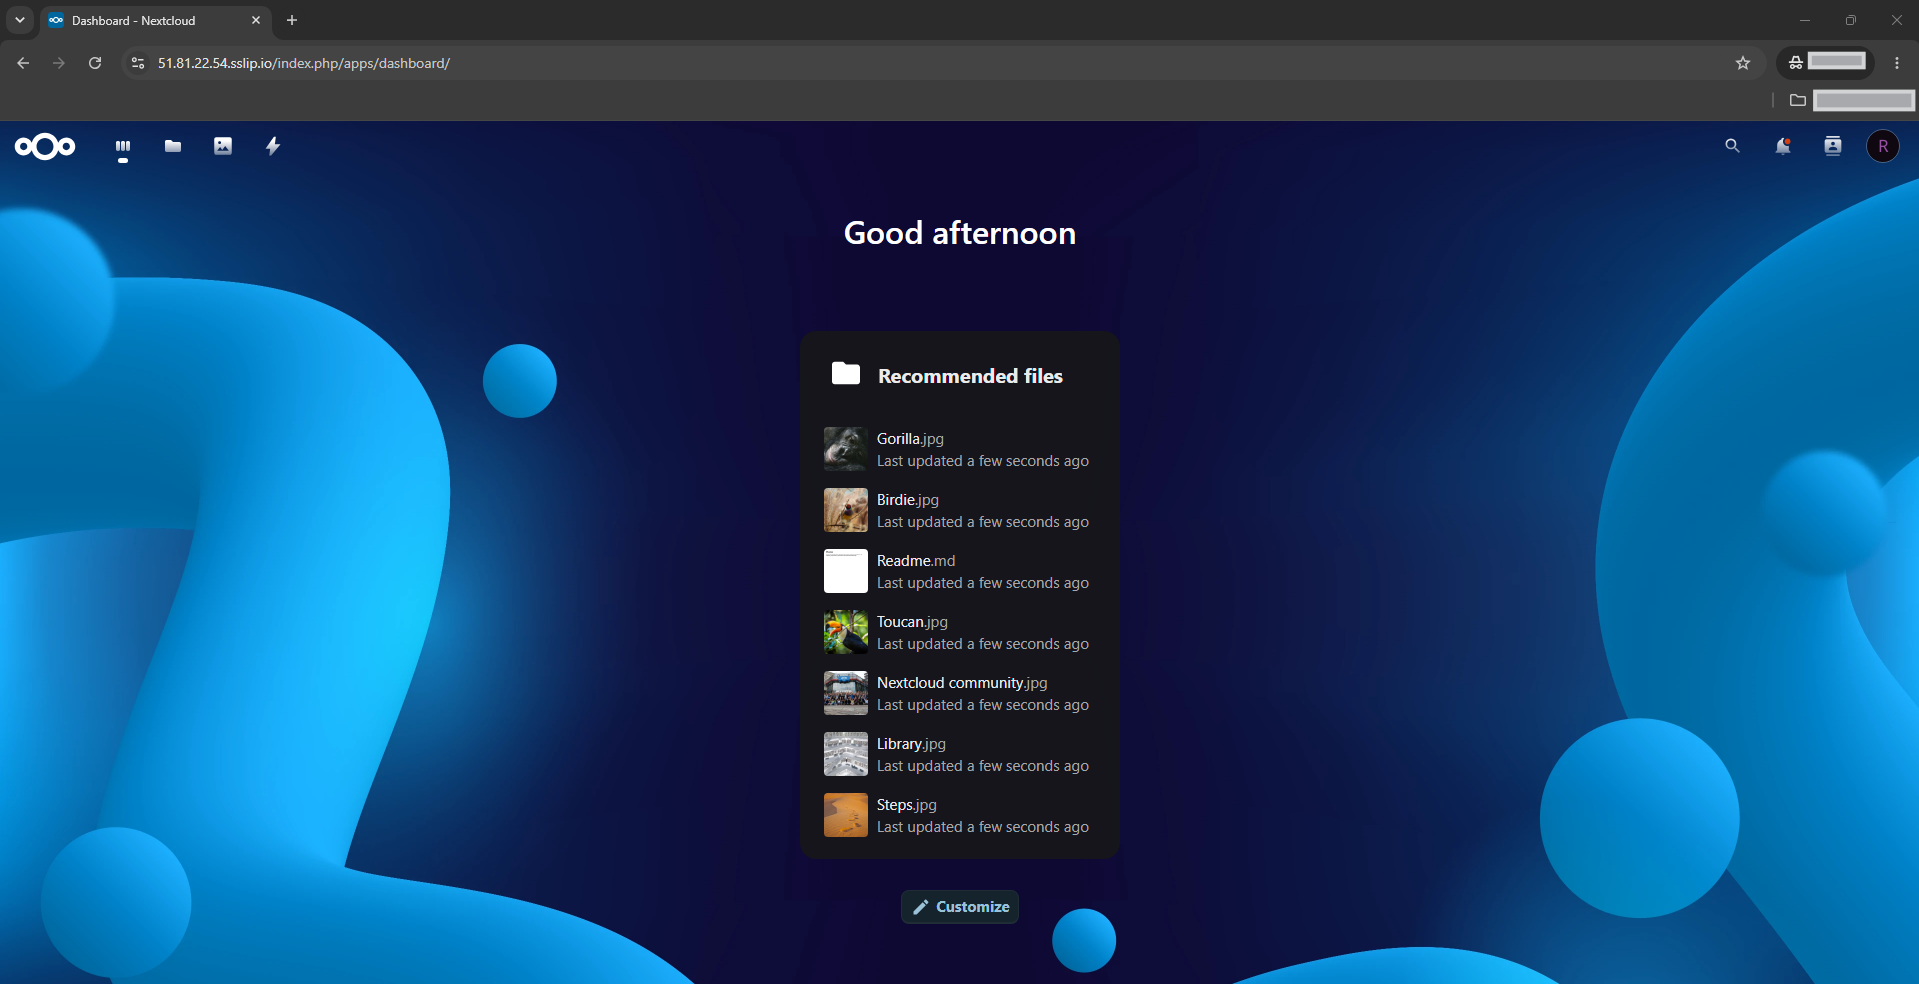
Visible state check: the Nextcloud dashboard loads over HTTPS after the first login.
Step 10 — Configure background jobs and APCu caching
Create the Nextcloud cron job:
cat <<'EOF' | sudo tee /etc/cron.d/nextcloud
*/5 * * * * www-data php -f /var/www/nextcloud/cron.php
EOF
Set background jobs to cron:
sudo -u www-data php /var/www/nextcloud/occ background:cron
Enable APCu for CLI operations:
cat <<'EOF' | sudo tee /etc/php/8.3/cli/conf.d/99-nextcloud-apcu.ini
apc.enable_cli=1
EOF
Configure APCu as the local memory cache:
sudo -u www-data php /var/www/nextcloud/occ config:system:set memcache.local --value='\OC\Memcache\APCu'
Set a maintenance window start hour:
sudo -u www-data php /var/www/nextcloud/occ config:system:set maintenance_window_start --type=integer --value=1
Restart Apache:
sudo systemctl restart apache2
Verify Nextcloud status and cache configuration:
sudo -u www-data php /var/www/nextcloud/occ status
sudo -u www-data php /var/www/nextcloud/occ config:system:get memcache.local
Expected output includes:
installed: true
\OC\Memcache\APCu
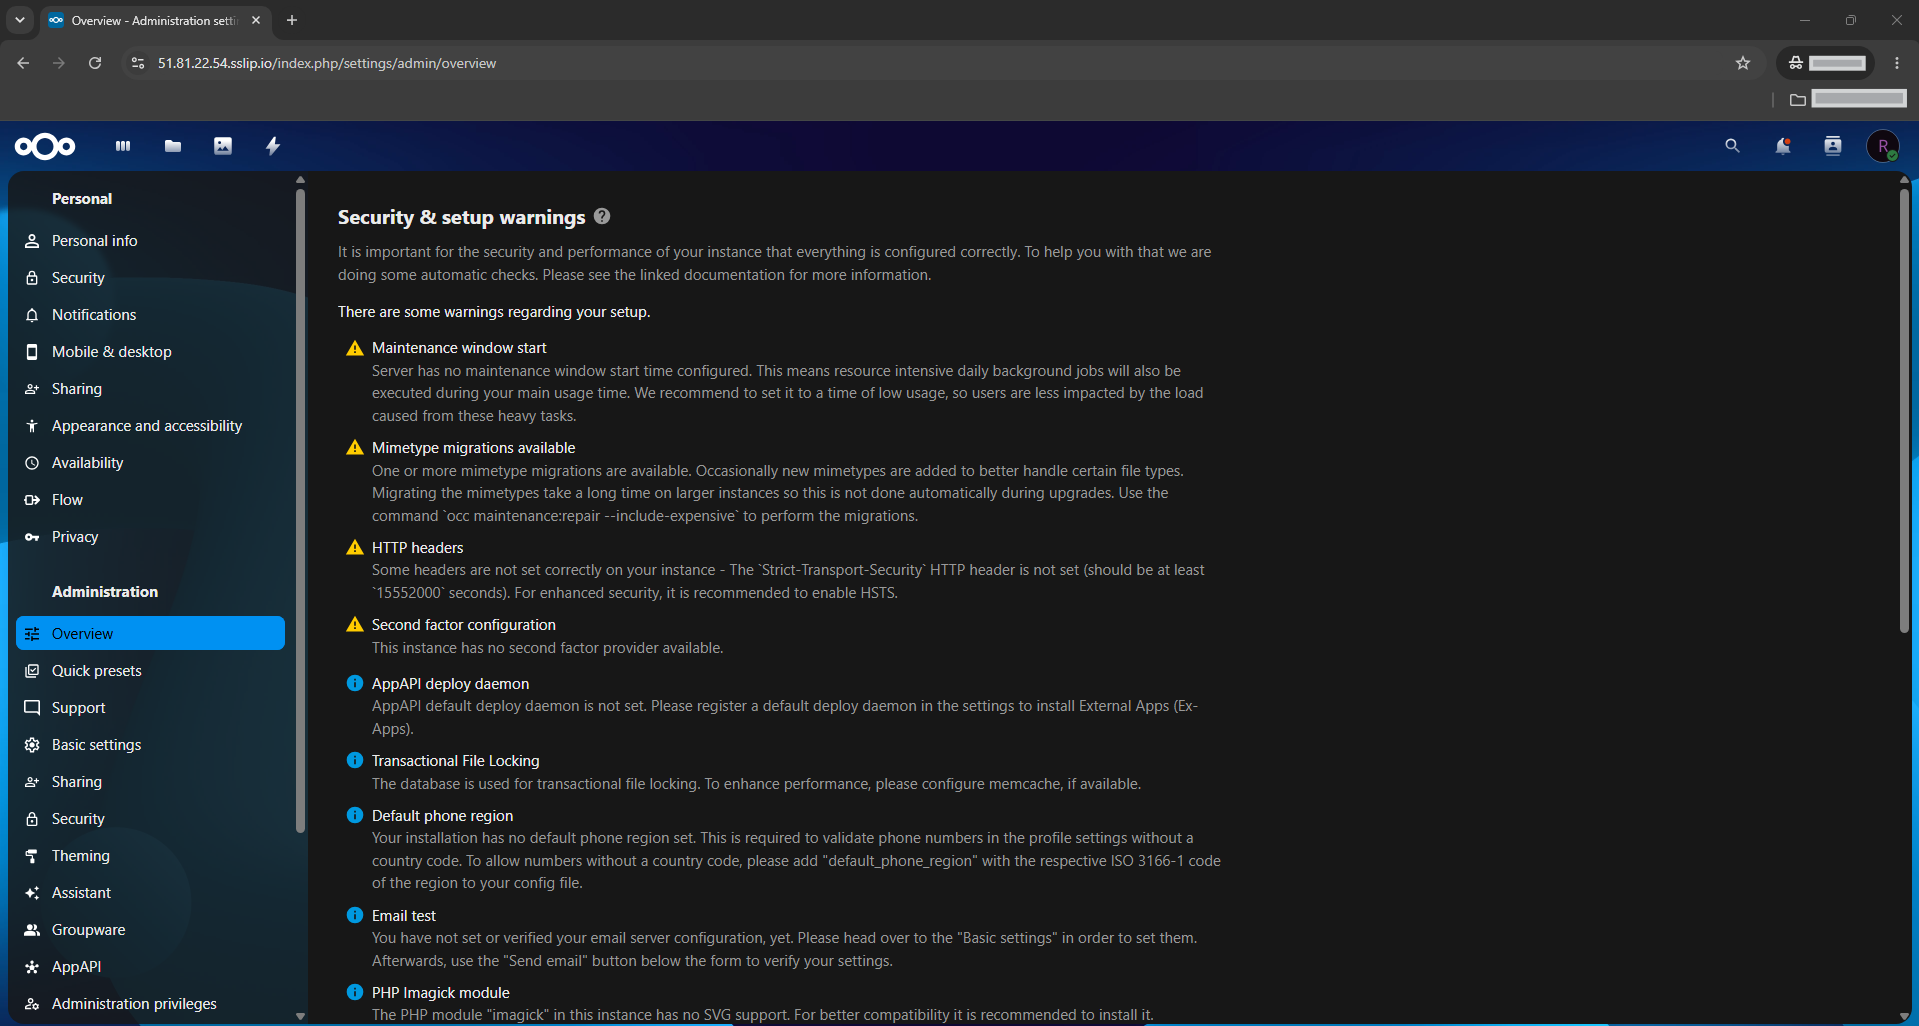
Step 11 — Verify Nextcloud end to end
Open the Nextcloud admin overview page:
Profile icon → Administration settings → Overview
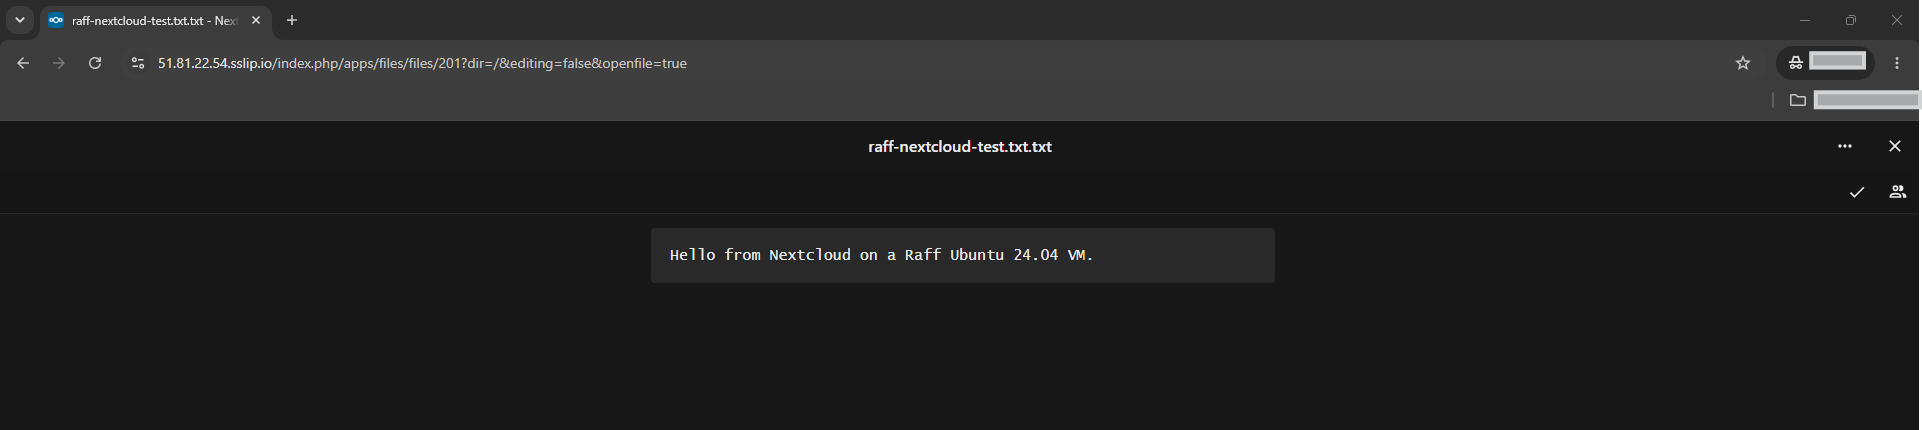
Open the Files app and upload a small test file named:
raff-nextcloud-test.txt
Suggested file content:
Hello from Nextcloud on a Raff Ubuntu 24.04 VM.
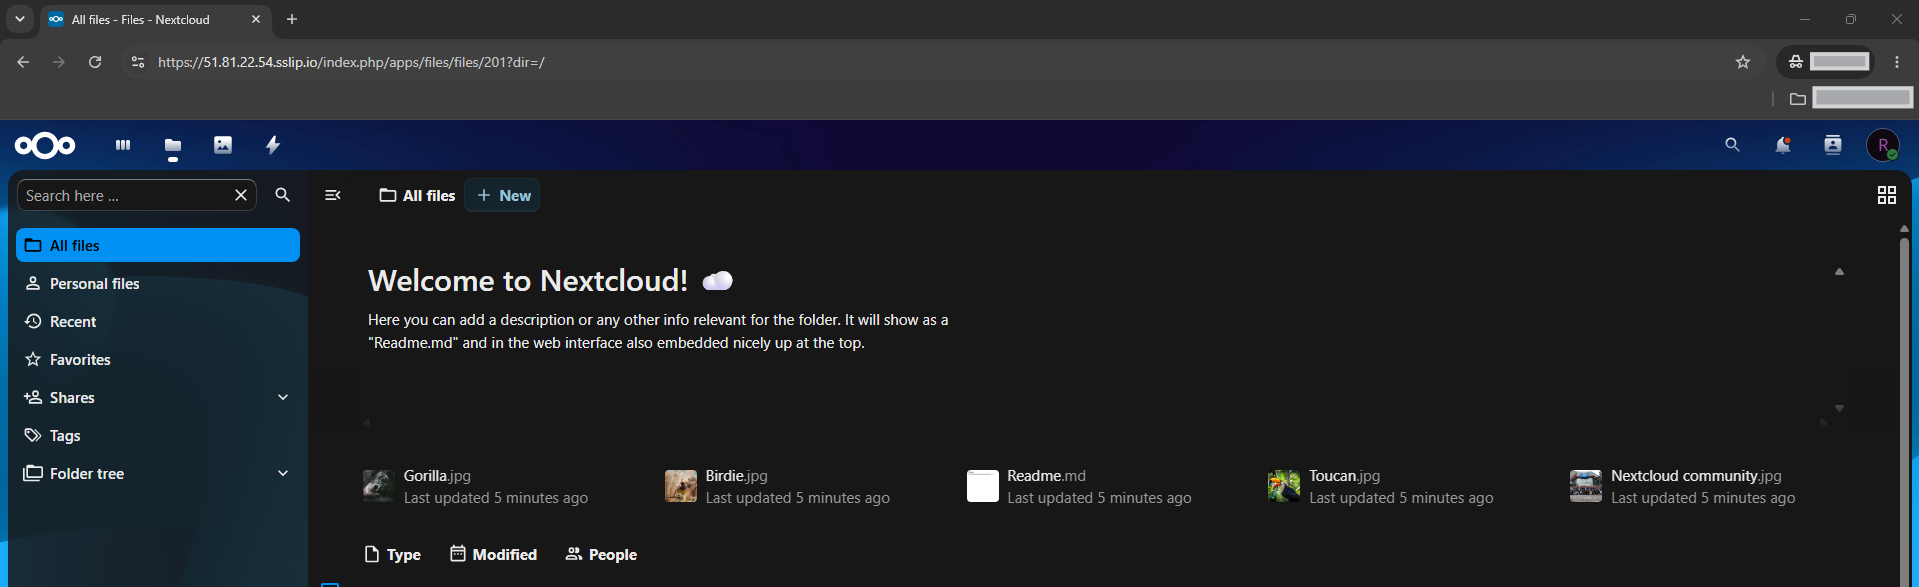
After upload, verify that the file appears in the Files app.
Click the browser security icon next to the address bar and confirm that the connection is secure.
Verify the server state from the VM:
systemctl is-active apache2
systemctl is-active mariadb
sudo -u www-data php /var/www/nextcloud/occ status
curl -I https://cloud.your-domain.com
sudo ufw status numbered
End-to-end verification is complete when:
- Apache is active
- MariaDB is active
- Nextcloud reports
installed: true - The dashboard loads over HTTPS
- The admin overview page opens
- A test file uploads successfully
- The browser shows a secure HTTPS connection
- Ports
80and443are allowed in UFW
Cleanup (Optional)
Use this section only when you want to remove Nextcloud, its database, data directory, Apache site, TLS certificate, cron job, and packages from the VM.
⚠️ Warning: The following commands permanently delete Nextcloud files, users, database records, uploaded files, app data, and local configuration. Back up anything you need before proceeding.
Put Nextcloud into maintenance mode if it is still installed:
sudo -u www-data php /var/www/nextcloud/occ maintenance:mode --on
Drop the Nextcloud database and user:
sudo mariadb <<'SQL'
DROP DATABASE IF EXISTS nextcloud;
DROP USER IF EXISTS 'nextclouduser'@'localhost';
FLUSH PRIVILEGES;
SQL
Remove the Nextcloud cron job:
sudo rm -f /etc/cron.d/nextcloud
Remove the Apache site:
sudo a2dissite nextcloud.conf
sudo rm -f /etc/apache2/sites-available/nextcloud.conf
sudo a2ensite 000-default.conf
sudo apache2ctl configtest
sudo systemctl reload apache2
Delete the Certbot certificate:
sudo certbot delete --cert-name cloud.your-domain.com
Remove Nextcloud files and data:
sudo rm -rf /var/www/nextcloud
sudo rm -rf /var/nextcloud-data
Remove packages if the VM was dedicated to this tutorial:
sudo apt remove --purge apache2 mariadb-server certbot python3-certbot-apache \
  libapache2-mod-php8.3 \
  php8.3 php8.3-cli php8.3-common php8.3-mysql php8.3-gd \
  php8.3-curl php8.3-mbstring php8.3-intl php8.3-gmp \
  php8.3-bcmath php8.3-xml php8.3-zip php8.3-imagick \
  php8.3-apcu -y

sudo apt autoremove -y
Remove web firewall rules only if this VM no longer serves websites:
sudo ufw delete allow 80/tcp
sudo ufw delete allow 443/tcp
sudo ufw status numbered
Verify that Nextcloud is removed:
ls -ld /var/www/nextcloud /var/nextcloud-data
sudo mariadb -e "SHOW DATABASES LIKE 'nextcloud';"
Expected result: the directories and database are gone.
Troubleshooting
Nextcloud says database access is denied
Cause: The Nextcloud admin username was entered as the database username, or the MariaDB user/password does not match the web setup form.
Fix:
Use these database fields in the setup page:
Database user: nextclouduser
Database password: ChangeThisStrongDatabasePassword!
Database name: nextcloud
Database host: localhost
Verify the database user:
sudo mariadb -e "SELECT User, Host FROM mysql.user WHERE User = 'nextclouduser';"
Expected output:
nextclouduser localhost
Reset the database user if needed:
sudo mariadb <<'SQL'
CREATE DATABASE IF NOT EXISTS nextcloud CHARACTER SET utf8mb4 COLLATE utf8mb4_general_ci;
CREATE USER IF NOT EXISTS 'nextclouduser'@'localhost' IDENTIFIED BY 'ChangeThisStrongDatabasePassword!';
ALTER USER 'nextclouduser'@'localhost' IDENTIFIED BY 'ChangeThisStrongDatabasePassword!';
GRANT ALL PRIVILEGES ON nextcloud.* TO 'nextclouduser'@'localhost';
FLUSH PRIVILEGES;
SQL
Refresh the setup page and try again.
The Nextcloud page does not load
Cause: Apache is stopped, the site is not enabled, DNS is wrong, or the Apache configuration has an error.
Fix:
systemctl status apache2 --no-pager
sudo apache2ctl configtest
sudo a2query -s nextcloud
dig +short cloud.your-domain.com
curl -I http://cloud.your-domain.com
Expected checks:
Apache is active
Syntax OK
nextcloud site is enabled
DNS returns the VM public IPv4 address
HTTP returns 200, 302, or 303
Certbot fails to issue HTTPS
Cause: DNS does not point to the VM, ports 80 and 443 are blocked, or Apache is not reachable over HTTP.
Fix:
dig +short cloud.your-domain.com
sudo ufw status numbered
curl -I http://cloud.your-domain.com
sudo journalctl -u apache2 --no-pager -n 80
Expected checks:
DNS returns the VM public IPv4 address
80/tcp is allowed
443/tcp is allowed
Apache responds on HTTP
Run Certbot again after DNS and firewall checks pass:
sudo certbot --apache \
  -d cloud.your-domain.com \
  --redirect \
  --agree-tos \
  --no-eff-email \
  -m [email protected]
Nextcloud shows an untrusted domain error
Cause: The domain was not added to Nextcloud’s trusted domains list.
Fix:
sudo -u www-data php /var/www/nextcloud/occ config:system:set trusted_domains 1 --value=cloud.your-domain.com
Verify:
sudo -u www-data php /var/www/nextcloud/occ config:system:get trusted_domains
Expected output includes your domain.
File uploads fail or stop early
Cause: PHP upload limits are too low, Apache was not restarted, or the data directory permissions are wrong.
Fix:
PHP_INI="/etc/php/8.3/apache2/php.ini"

grep -E "^(memory_limit|upload_max_filesize|post_max_size|max_execution_time|max_input_time)" "$PHP_INI"

sudo chown -R www-data:www-data /var/www/nextcloud /var/nextcloud-data
sudo systemctl restart apache2
Expected PHP values:
memory_limit = 512M
upload_max_filesize = 512M
post_max_size = 512M
max_execution_time = 360
max_input_time = 360
Admin overview warns about background jobs
Cause: Background jobs are still set to AJAX or the cron job has not run yet.
Fix:
sudo -u www-data php /var/www/nextcloud/occ background:cron

cat <<'EOF' | sudo tee /etc/cron.d/nextcloud
*/5 * * * * www-data php -f /var/www/nextcloud/cron.php
EOF

sudo -u www-data php /var/www/nextcloud/occ status
Expected output includes:
installed: true
Wait five minutes, then refresh the admin overview page.
Conclusion and next steps
You now have Nextcloud installed on a Raff Ubuntu 24.04 VM with Apache, MariaDB, PHP 8.3, HTTPS, cron background jobs, APCu caching, and a verified file upload. If you have not deployed your Raff VM yet, you can spin one up in 60 seconds with a Raff Linux VM.
Next: How to Secure Your Ubuntu 24.04 Server
Related: Cloud Server Backup Strategies