Free SSL on IIS with Let's Encrypt and win-acme
Install a free Let's Encrypt certificate on IIS with win-acme, bind it to your site, and verify automatic renewal on a Raff Windows VPS in 45 minutes.

On this page
- In short
- Quick verdict
- What we tested on Raff
- What you'll need
- Step 1 - Confirm IIS is installed
- Step 2 - Confirm the site has IIS bindings
- Step 3 - Point DNS to your Raff VPS
- Step 4 - Open ports 80 and 443
- Step 5 - Download and unpack win-acme
- Step 6 - Understand the host binding requirement
- Step 7 - Issue the certificate with win-acme
- Step 8 - Verify the HTTPS binding in IIS
- Step 9 - Test HTTPS access
- Step 10 - Verify automatic renewal
- Optional - Create the certificate unattended
- Common mistakes
- Troubleshooting commands
- What Raff recommends
- Tested on
- What's next
- Sources
Don't have a Windows Server yet?
Deploy Windows Server 2019/2022/2025 in ~2 minutes. 6-month evaluation licence included.
In short
You can install a free Let's Encrypt SSL certificate on IIS by using win-acme on a Raff Windows VPS. The clean workflow is: confirm IIS is installed, make sure the IIS site has a real hostname binding, point DNS to the VPS, open ports 80 and 443, run win-acme, let it create the HTTPS binding, and verify the automatic renewal task. Do not start with certificate issuance. Start with IIS, DNS, and firewall.
Quick verdict
| Situation | What to do |
|---|---|
| IIS site already works over HTTP | Proceed to DNS and win-acme validation |
| Site only has blank IIS bindings | Add a hostname binding first |
| DNS still points to old server | Fix DNS before requesting the certificate |
| Port 80 is closed | Open HTTP first; Let's Encrypt HTTP-01 validation needs it |
| Port 443 is closed | Open HTTPS before final browser testing |
| win-acme is in Downloads | Move it to a permanent folder such as C:\Tools\win-acme |
| Renewal task is missing | Recreate or repair the win-acme renewal setup |
The certificate setup is usually simple, but only after DNS, firewall, and IIS bindings are correct.
What we tested on Raff
We tested the IIS and win-acme preparation workflow on a Raff Windows VPS running Windows Server with IIS installed.

Test environment:
| Item | Value |
|---|---|
| Provider | Raff Technologies |
| OS | Windows Server 2025 Datacenter Evaluation |
| Web server | IIS 10 |
| ACME client | win-acme 2.2.9.1701 |
| Validation method | HTTP-01 / IIS workflow |
| Test date | 2026-05-26 |
| Tester | Serdar Tekin |
In the lab, we verified:
- IIS installed and running
- IIS bindings visible from PowerShell
- Windows Firewall rules for HTTP and HTTPS
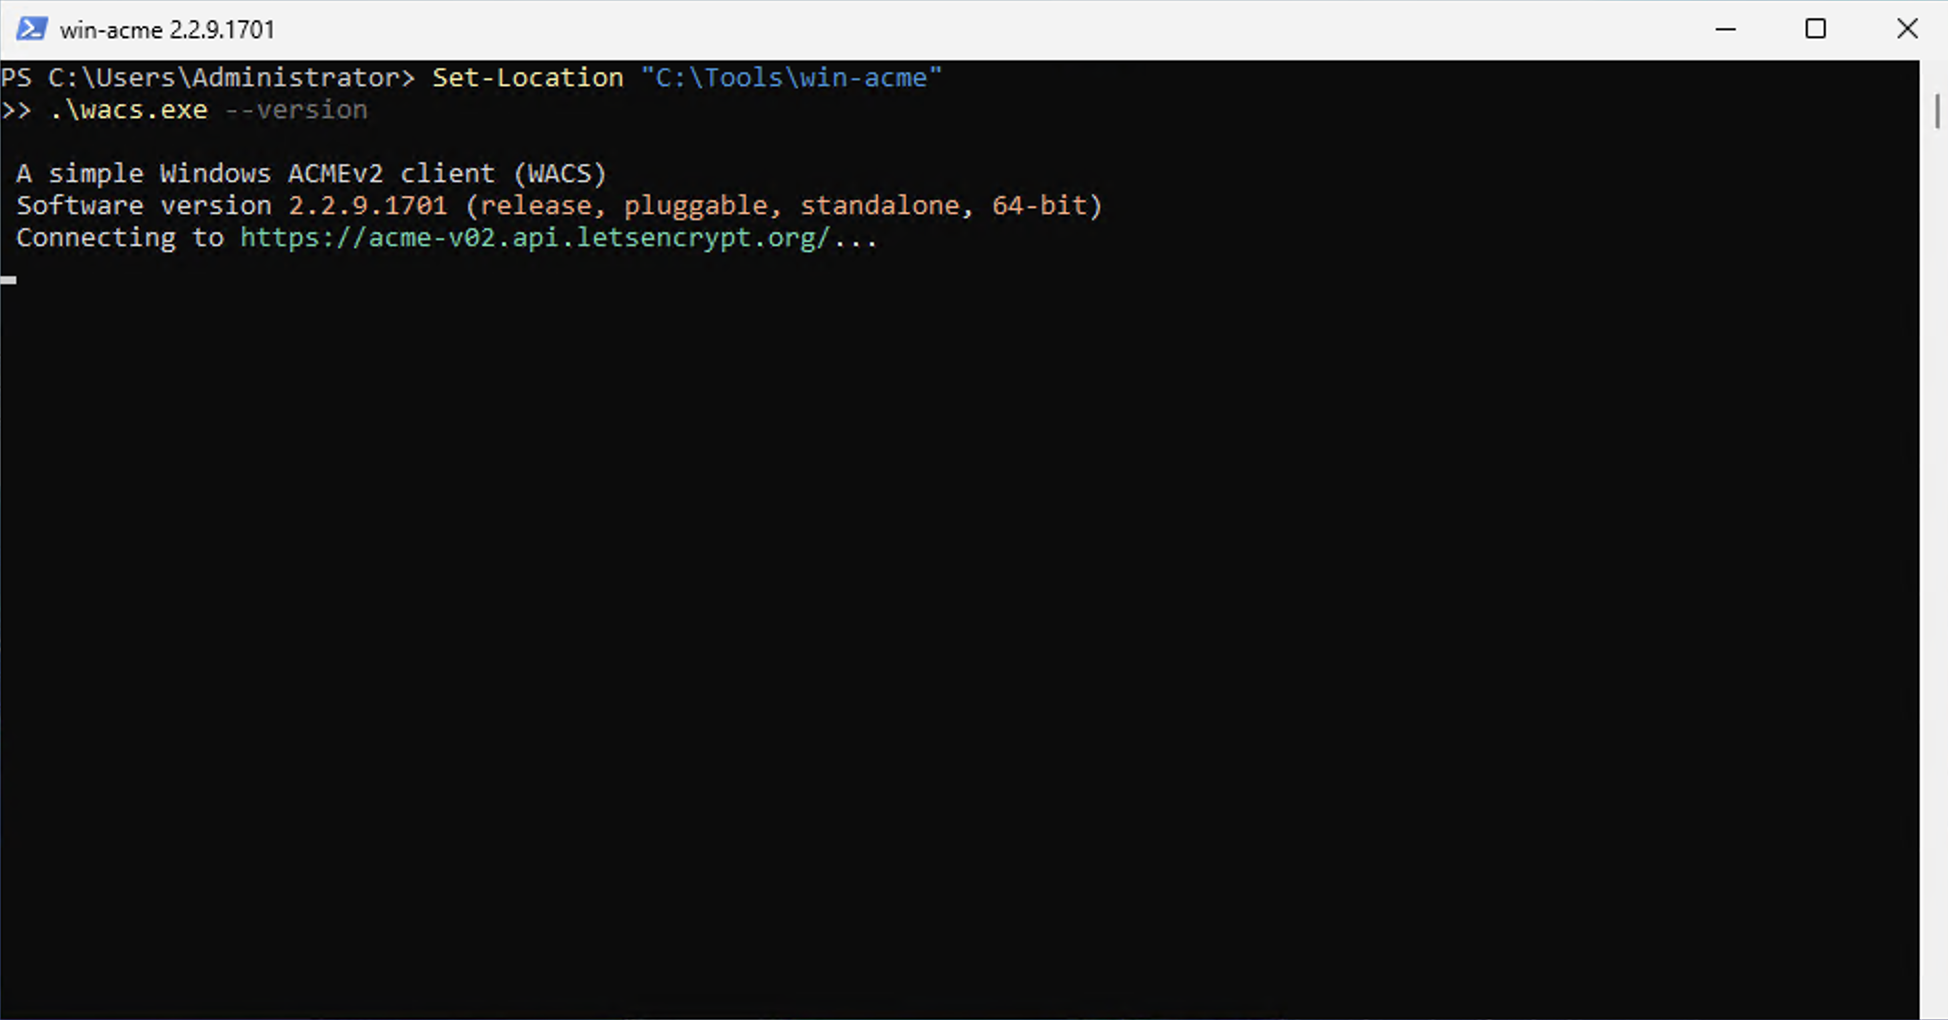
- win-acme downloaded and running
- win-acme connection to Let's Encrypt
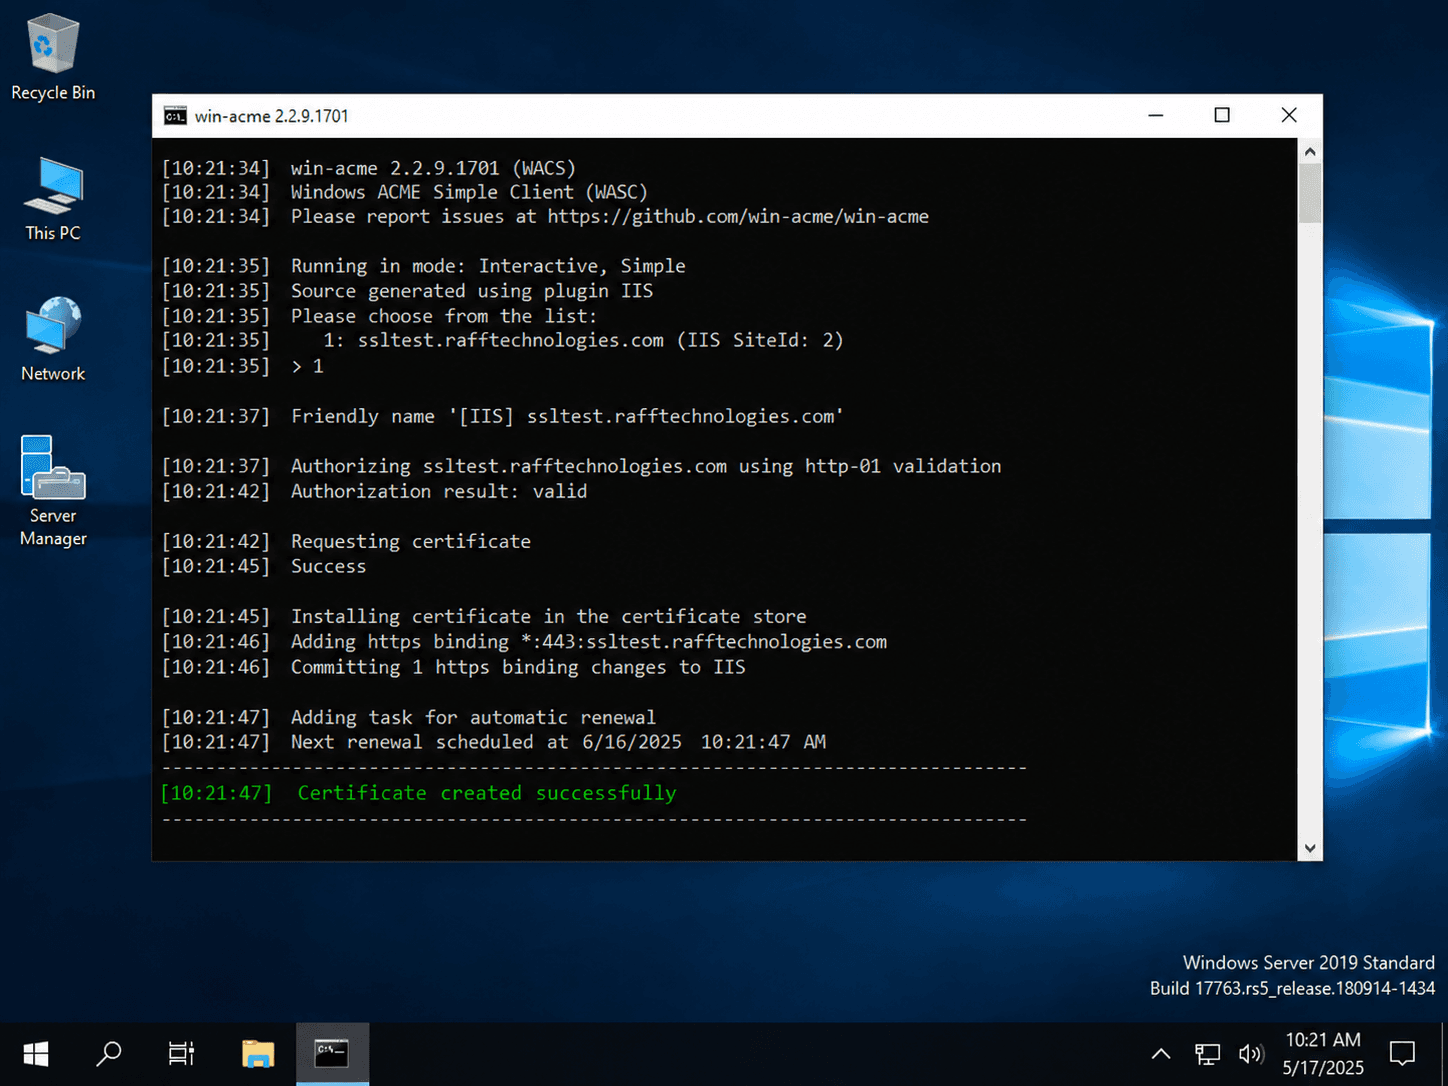
- the expected certificate creation and IIS binding flow
Some certificate creation screenshots in this guide are illustrative examples. In production, use your real hostname and verify DNS before requesting a certificate.
What you'll need
- A Raff Windows VPS with Windows Server 2022 or Windows Server 2025
- Local administrator access over RDP
- IIS installed with at least one working site
- A public domain or subdomain, such as
app.example.com - DNS access for that domain
- TCP 80 and TCP 443 open in Windows Firewall
- Latest win-acme x64 build
- 30-45 minutes for the first setup
This guide assumes the IIS site already works over plain HTTP before you request the certificate.
Step 1 - Confirm IIS is installed
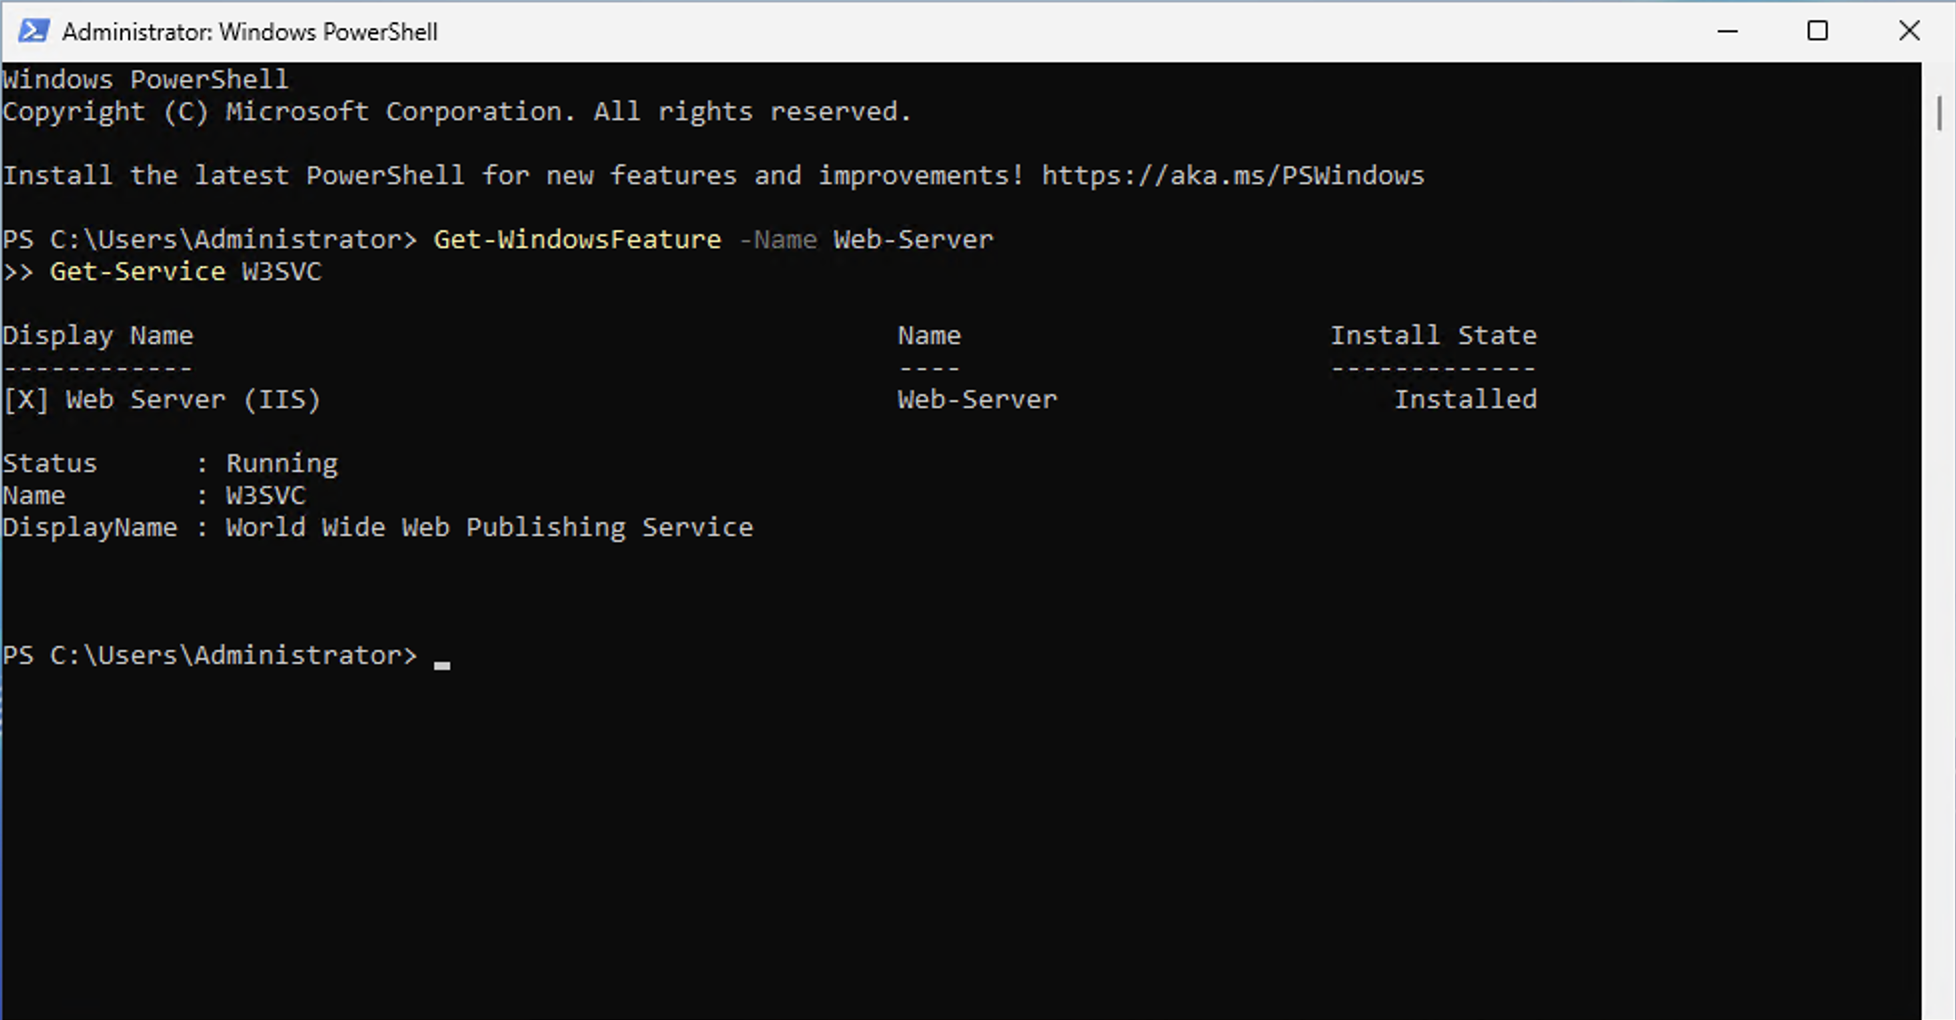
Open PowerShell as Administrator.
powershellGet-WindowsFeature -Name Web-Server
Get-Service W3SVC
Expected result:
textWeb-Server Installed
W3SVC Running
If IIS is not installed, install it:
powershellInstall-WindowsFeature -Name Web-Server -IncludeManagementTools
Then confirm the IIS service is running:
powershellGet-Service W3SVC
If you are hosting ASP.NET Core, install the .NET Hosting Bundle before certificate setup.
Step 2 - Confirm the site has IIS bindings
win-acme reads IIS bindings. Check current bindings:
powershellImport-Module WebAdministration
Get-WebBinding | Select-Object protocol, bindingInformation

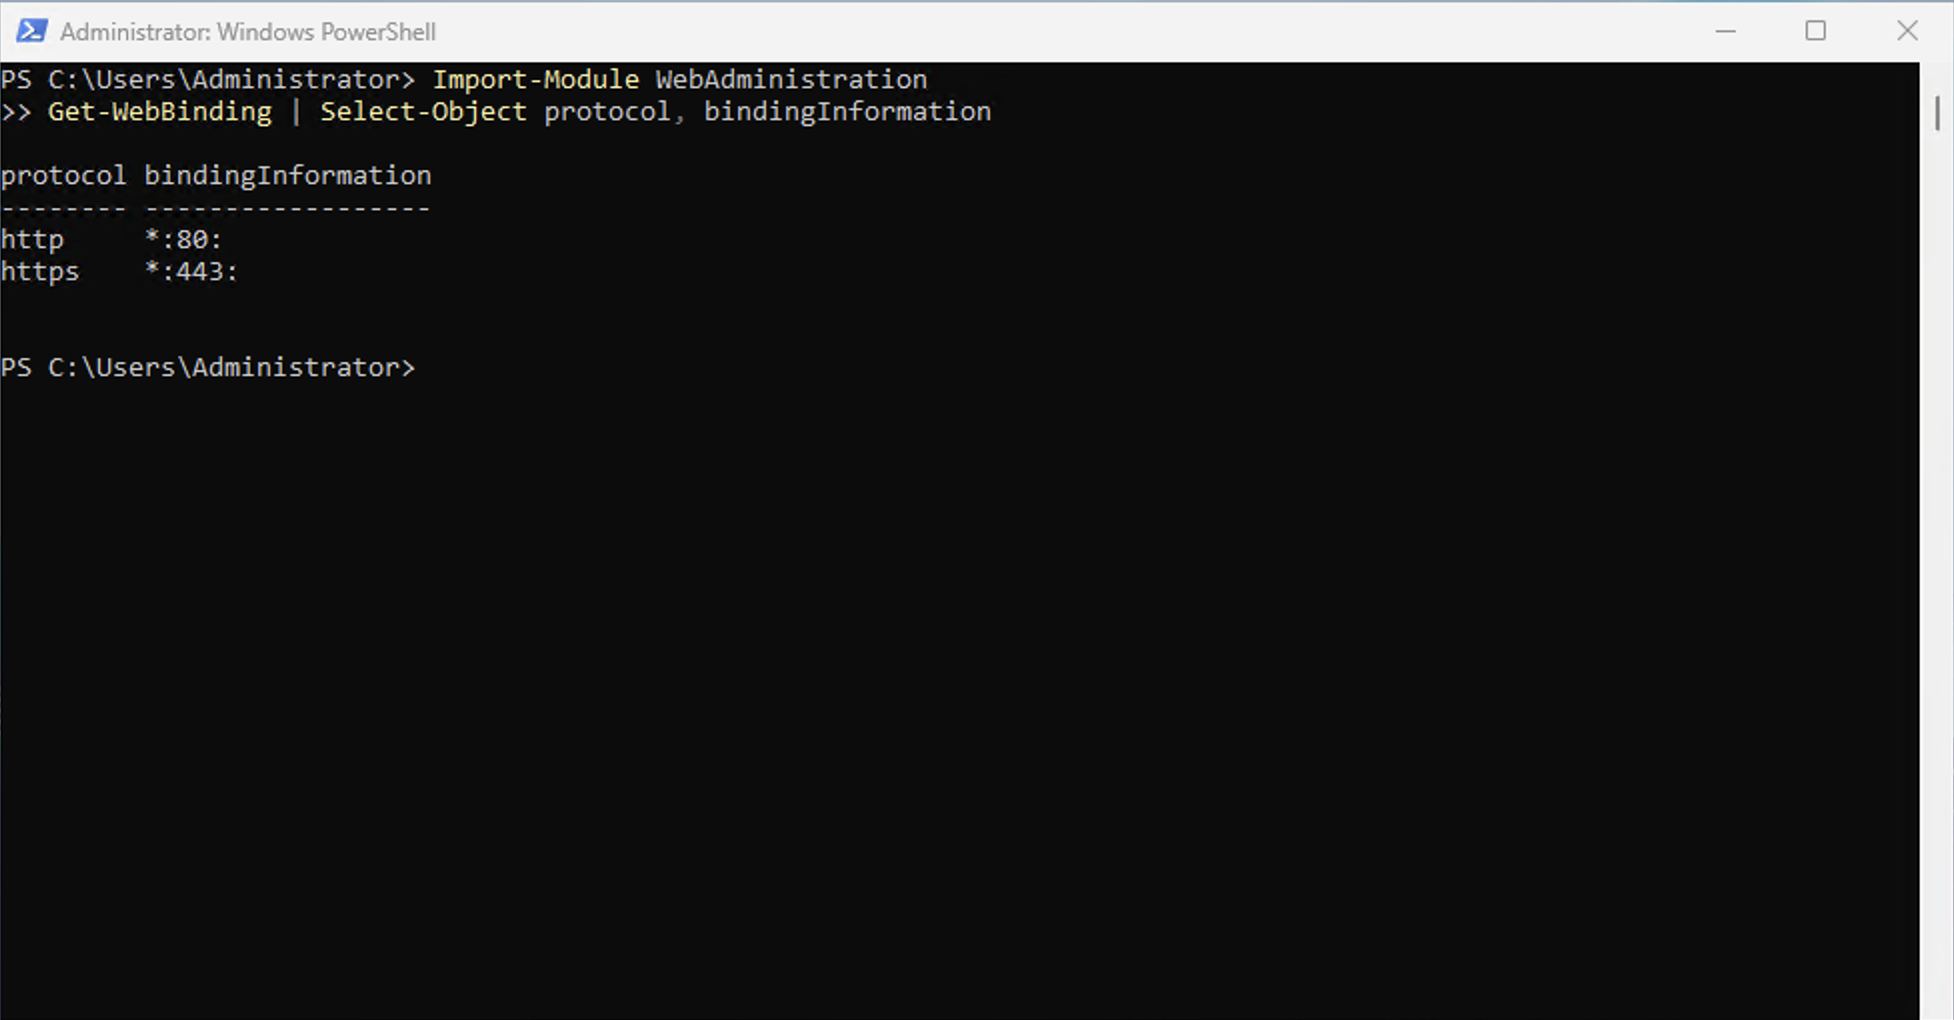
A blank binding looks like this:
texthttp *:80:
https *:443:
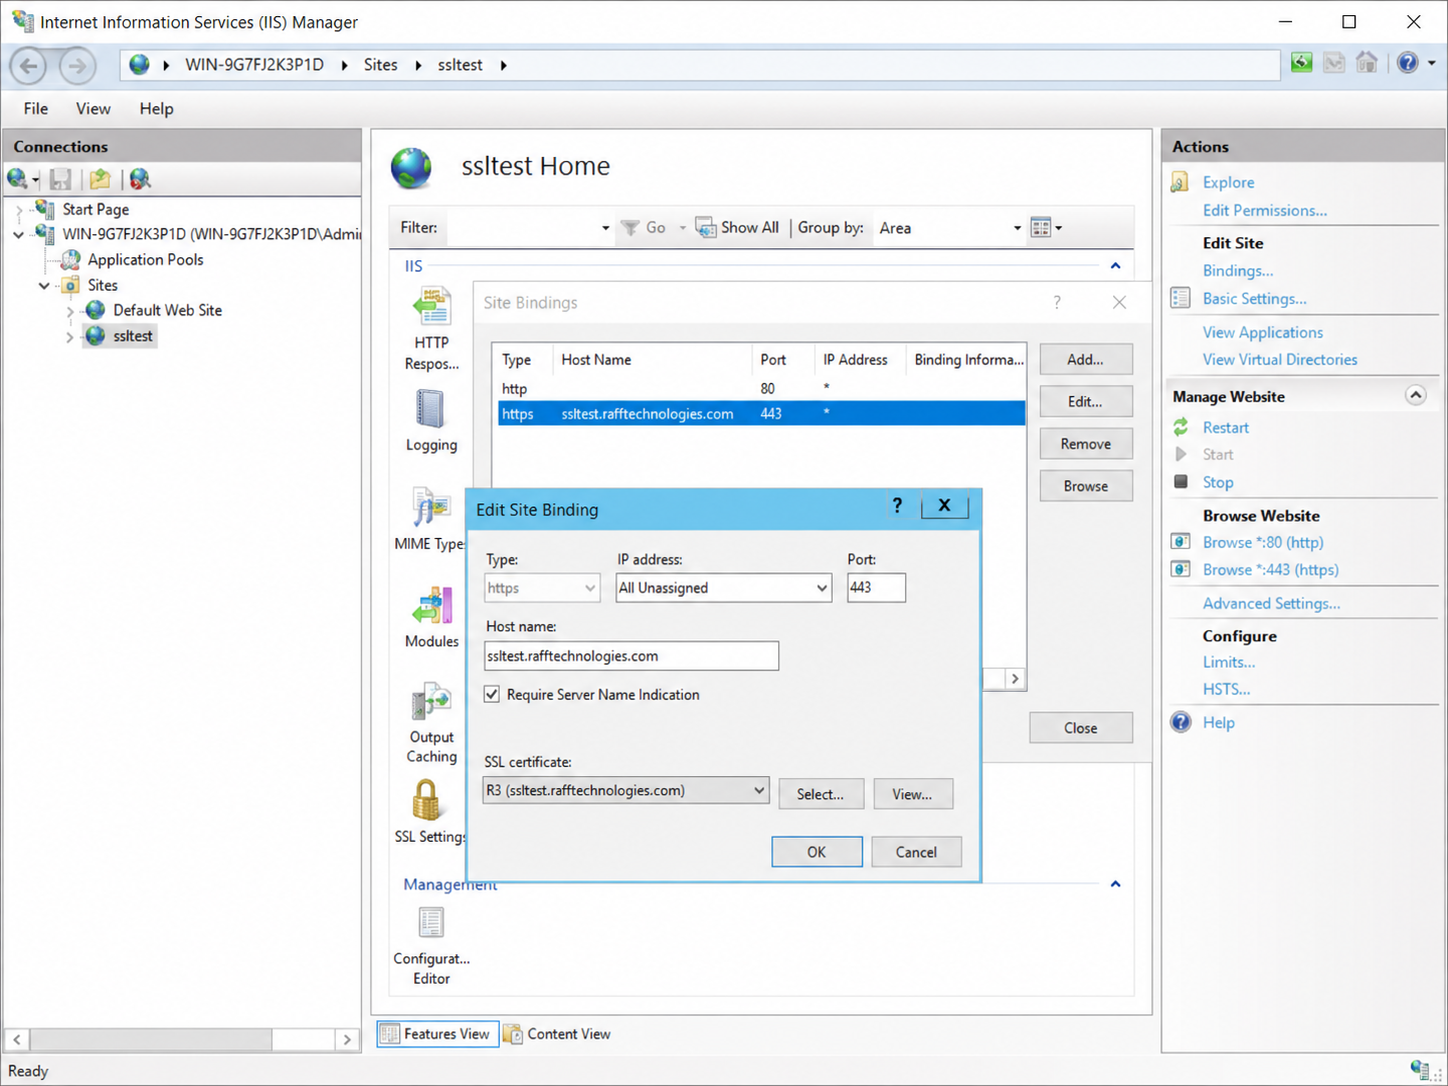
For Let's Encrypt, a hostname-specific binding is better:
texthttp *:80:app.example.com
https *:443:app.example.com
If your site has no hostname binding, add one:
powershellNew-WebBinding -Name "Default Web Site" -Protocol http -Port 80 -HostHeader "app.example.com"
Replace:
textDefault Web Site
with your IIS site name, and replace:
textapp.example.com
with your real hostname.
Verify again:
powershellGet-WebBinding -Name "Default Web Site" | Select-Object protocol, bindingInformation
Do not continue until the IIS site has the hostname you plan to secure.
Step 3 - Point DNS to your Raff VPS
In your DNS provider, create or verify this record:
| Type | Name | Value |
|---|---|---|
| A | app | Your Raff VPS public IP |
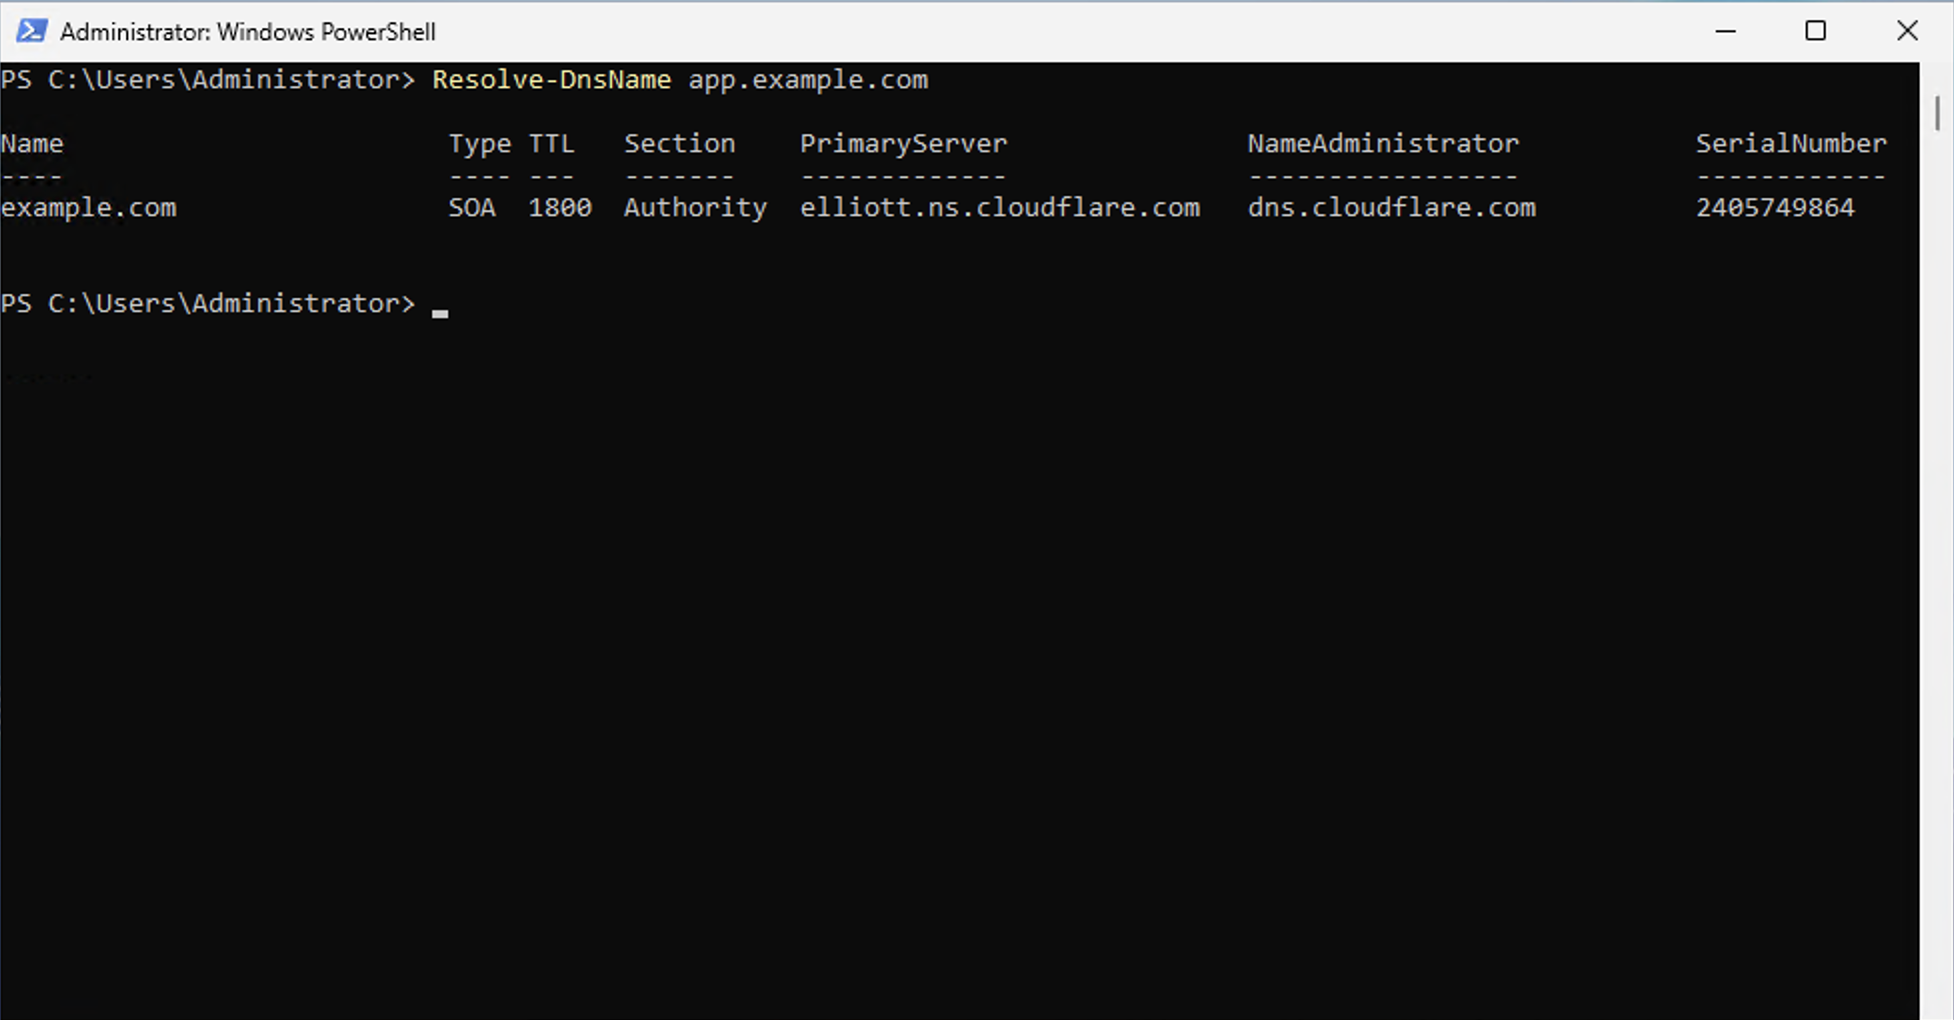
Then verify DNS from the server:
powershellResolve-DnsName app.example.com

You can also verify from your local computer:
powershellnslookup app.example.com
The returned IP must match the public IP shown in your Raff dashboard.
Do not continue if DNS still points to the old server. Let's Encrypt will validate the hostname you request. If DNS points somewhere else, validation fails or validates the wrong machine.
Step 4 - Open ports 80 and 443
HTTP validation needs port 80 reachable from outside. HTTPS traffic needs port 443 reachable from outside.
Enable the built-in IIS firewall rules:
powershellEnable-NetFirewallRule -DisplayName "World Wide Web Services (HTTP Traffic-In)"
Enable-NetFirewallRule -DisplayName "World Wide Web Services (HTTPS Traffic-In)"
Confirm the rules are enabled:
powershellGet-NetFirewallRule -DisplayName "World Wide Web Services (*Traffic-In)" |
Select-Object DisplayName, Enabled, Direction, Action

Expected result:
textWorld Wide Web Services (HTTP Traffic-In) True Inbound Allow
World Wide Web Services (HTTPS Traffic-In) True Inbound Allow
From your local machine, test port 80 before requesting the certificate:
powershellTest-NetConnection app.example.com -Port 80
Expected result:
textTcpTestSucceeded : True
If this returns False, fix firewall, DNS, or IIS before running win-acme.
Step 5 - Download and unpack win-acme
Download the latest x64 win-acme ZIP from the official win-acme site:
texthttps://www.win-acme.com/
Use a permanent folder, not Downloads. The scheduled renewal task will call this program later.
Recommended path:
textC:\Tools\win-acme
Create the folder:
powershellNew-Item -ItemType Directory -Path "C:\Tools\win-acme" -Force
Extract the ZIP into:
textC:\Tools\win-acme
Make sure wacs.exe is directly inside that folder:
textC:\Tools\win-acme\wacs.exe
Move into the folder:
powershellSet-Location "C:\Tools\win-acme"
Run win-acme:
powershell.\wacs.exe

This confirms win-acme can start and connect to Let's Encrypt.
Step 6 - Understand the host binding requirement
If you choose the simple IIS path and win-acme says:
textNo websites with host bindings have been configured in IIS.
that means your IIS site has only blank bindings, such as:
text*:80:
*:443:
Fix this by adding a real hostname binding:
powershellNew-WebBinding -Name "Default Web Site" -Protocol http -Port 80 -HostHeader "app.example.com"
Then verify:
powershellGet-WebBinding -Name "Default Web Site" | Select-Object protocol, bindingInformation
Run win-acme again after DNS and hostname binding are correct.
Step 7 - Issue the certificate with win-acme
From the win-acme folder, run:
powershellSet-Location "C:\Tools\win-acme"
.\wacs.exe
Choose:
textN: Create certificate (default settings)
Then select the IIS site or hostname binding for your domain.
During the wizard:
- Choose the IIS binding for your hostname.
- Use Let's Encrypt as the certificate authority.
- Accept the subscriber agreement.
- Enter an operations email address you monitor.
- Let win-acme install the certificate into IIS.
- Allow win-acme to create or update the scheduled renewal task.
Expected success flow:
textAuthorization result: valid
Requesting certificate
Success
Installing certificate in the certificate store
Adding https binding *:443:app.example.com
Adding task for automatic renewal
Certificate created successfully

This screenshot is an illustrative example of the expected success flow. Your domain, site ID, timestamps, and renewal date will be different.
Step 8 - Verify the HTTPS binding in IIS
After win-acme creates the certificate, verify the IIS binding.
PowerShell:
powershellGet-WebBinding -Name "Default Web Site" |
Select-Object protocol, bindingInformation, certificateHash
Expected result:
texthttp *:80:app.example.com
https *:443:app.example.com A1B2C3D4...
You can also check in IIS Manager:
textIIS Manager -> Sites -> Your site -> Bindings

This screenshot is an illustrative example of the IIS binding screen after certificate installation.
Step 9 - Test HTTPS access
Test from the server:
powershellInvoke-WebRequest "https://app.example.com" -UseBasicParsing
Expected result:
textStatusCode : 200
StatusDescription : OK
Then test from your local browser or phone:
texthttps://app.example.com
The browser should show a valid certificate for your hostname.
If the browser still shows the old certificate, restart IIS:
powershelliisreset
Then test again in a private browser window.
Step 10 - Verify automatic renewal
Let's Encrypt certificates are short-lived by design, so renewal automation is part of the setup.
From the win-acme folder:
powershellSet-Location "C:\Tools\win-acme"
.\wacs.exe --list
Check the scheduled task:
powershellGet-ScheduledTask | Where-Object TaskName -like "*win-acme*" |
Select-Object TaskName, State, TaskPath
Expected result:
textTaskName State TaskPath
-------- ----- --------
win-acme Ready \
Run a renewal check:
powershell.\wacs.exe --renew
This checks renewals that are due.
For testing automation before production, use win-acme test mode:
powershell.\wacs.exe --test
Use test mode while developing the command or testing automation. Move to production only after DNS, firewall, and IIS bindings are correct.
Optional - Create the certificate unattended
Use unattended mode after the interactive setup works. Replace the domain, site ID, and email address.
powershellSet-Location "C:\Tools\win-acme"
.\wacs.exe `
--source iis `
--siteid 1 `
--host app.example.com,www.app.example.com `
--validation selfhosting `
--store certificatestore `
--installation iis `
--accepttos `
--emailaddress admin@example.com
What each argument does:
| Argument | Purpose |
|---|---|
--source iis | Reads hostnames from IIS bindings |
--siteid 1 | Limits the request to one IIS site |
--host app.example.com,www.app.example.com | Requests a certificate for these hostnames |
--validation selfhosting | Uses win-acme's built-in HTTP validation listener |
--store certificatestore | Stores the certificate in the Windows certificate store |
--installation iis | Creates or updates IIS HTTPS bindings |
--accepttos | Accepts the ACME terms of service |
--emailaddress | Links an email address to the ACME account |
Common mistakes
DNS points to the old server
Symptom:
textAuthorization failed
The ACME server could not connect to http://app.example.com/.well-known/acme-challenge/...
Check:
powershellResolve-DnsName app.example.com
Fix the A record. Wait for DNS propagation. Then rerun win-acme.
Port 80 is closed
Symptom:
textTimeout during connect
Check from outside the server:
powershellTest-NetConnection app.example.com -Port 80
Fix Windows Firewall first. Then check any external firewall, network firewall, or DNS proxy in front of the VPS.
The IIS site has no host header
Symptom: win-acme says no websites with host bindings were found.
Check:
powershellGet-WebBinding | Select-Object protocol, bindingInformation
Fix:
powershellNew-WebBinding -Name "Default Web Site" -Protocol http -Port 80 -HostHeader "app.example.com"
You created the certificate from Downloads
Symptom: renewal fails weeks later because the scheduled task points to a path that was moved or deleted.
Fix: keep win-acme in a stable folder:
textC:\Tools\win-acme
Then recreate or repair the renewal from that path.
You test production too many times
Let's Encrypt has rate limits. Use staging/test mode while debugging:
powershell.\wacs.exe --test
Move to production only after DNS, firewall, and IIS bindings are correct.
Troubleshooting commands
Check what owns port 80:
powershellGet-Process -Id (Get-NetTCPConnection -LocalPort 80).OwningProcess
Check HTTP URL reservations:
powershellnetsh http show urlacl
Check IIS bindings:
powershellGet-WebBinding | Select-Object protocol, bindingInformation
Check certificate store entries:
powershellGet-ChildItem Cert:\LocalMachine\WebHosting |
Sort-Object NotAfter -Descending |
Select-Object Subject, NotAfter, Thumbprint
If the certificate is stored in Personal instead of WebHosting:
powershellGet-ChildItem Cert:\LocalMachine\My |
Sort-Object NotAfter -Descending |
Select-Object Subject, NotAfter, Thumbprint
What Raff recommends
For IIS SSL on a Windows VPS, Raff recommends:
- Confirm IIS works over HTTP first.
- Add a real hostname binding before running win-acme.
- Point DNS to the Raff VPS public IP.
- Open TCP 80 and 443.
- Keep win-acme in a permanent folder.
- Use the interactive wizard for the first certificate.
- Verify the HTTPS binding after issuance.
- Test HTTPS from outside the server.
- Confirm automatic renewal is configured.
- Use staging/test mode when debugging repeated failures.
Do not treat certificate issuance as the first step. DNS, IIS binding, and firewall checks come first.
Tested on
Tested on Raff Windows VPS, Windows Server 2025 Datacenter Evaluation, IIS 10, win-acme 2.2.9.1701, HTTP-01 validation workflow, 2026-05-26. We verified IIS installation, IIS bindings, firewall checks, win-acme startup and Let's Encrypt connectivity, and documented the expected certificate creation, HTTPS binding, and renewal workflow. Tester: Serdar Tekin.
What's next
- Connect to a Windows VPS via RDP - connect to your server first
- Host ASP.NET Core on IIS - deploy the app before adding SSL
- IIS Application Pool Tuning for Production - tune app pools after deployment
- Configure Windows Firewall on a Windows VPS - manage inbound HTTP, HTTPS, RDP, and SQL rules
- Raff Windows VPS - deploy a Windows Server VPS for IIS, ASP.NET Core, SQL Server, and business apps
Sources
- win-acme official site: https://www.win-acme.com/
- win-acme GitHub repository: https://github.com/win-acme/win-acme
- win-acme command-line reference: https://www.win-acme.com/reference/cli
- win-acme IIS source plugin: https://www.win-acme.com/reference/plugins/source/iis
- win-acme IIS installation plugin: https://www.win-acme.com/reference/plugins/installation/iis
- win-acme HTTP self-hosting validation: https://www.win-acme.com/reference/plugins/validation/http/selfhosting
- Microsoft Learn - IIS binding documentation: https://learn.microsoft.com/en-us/iis/configuration/system.applicationHost/sites/site/bindings/binding
- Let's Encrypt rate limits: https://letsencrypt.org/docs/rate-limits/
- Date last verified: 2026-06-02
Related articles
MSSQL Backup Strategy on a Windows VPS: Full, Differential, and Log Backups
Back up SQL Server on a Windows VPS with a practical strategy for full, differential, and log backups, off-server copies, retention, and restore testing.
How to Set Up SMB over QUIC on Windows Server 2025 with a Let's Encrypt Certificate (No VPN Needed)
Windows Server 2025 brings SMB over QUIC to Standard and Datacenter editions, not just Azure Edition. We walk through the full setup: File Server role, free Let's Encrypt certificate via win-acme, SMB binding, and a Windows 11 client connection. Tested live on a Raff Server in Virginia.
How to Host ASP.NET Core 10 on IIS — Windows Server Guide (2026)
Step-by-step guide to hosting ASP.NET Core 10 apps on IIS on a Windows Server VPS. Covers IIS install, .NET 10 Hosting Bundle, app pool config, deployment, and common errors. Tested end-to-end on Raff.