QuickBooks Desktop multi-user mode on a Windows Server VPS can work well for small accounting teams, but it must be treated as a customer-managed self-hosted setup, not as managed QuickBooks hosting.
The clean workflow is:
Choose a supported Windows Server version
Install QuickBooks Desktop
Enable Host Multi-User Access
Open QuickBooks Database Server Manager
Scan the company file folder
Verify the .ND file and QBDSM service
Create Windows users
Grant folder permissions
Plan RDS CALs
Test with real QuickBooks users
Back up the company file
The most important detail:
Installing QuickBooks is not enough. You must enable multi-user hosting and scan the company file folder with QuickBooks Database Server Manager.
Raff provides the Windows VPS infrastructure layer. You bring your own QuickBooks Desktop license, manage the QuickBooks application, configure users, and remain responsible for Intuit licensing, application support, backups, and data integrity.
Important support and licensing note
Before using QuickBooks Desktop on any VPS, verify your QuickBooks license terms, Intuit support status, and hosting requirements.
Intuit's QuickBooks Desktop 2024 system requirements list supported Windows Server versions such as Windows Server 2022, 2019, and 2016. The same page also says QuickBooks requires Windows to be used natively and that virtual environments are not supported.
That means a VPS deployment should be positioned carefully:
This is a self-managed Windows Server deployment.
Raff is not an Intuit Authorized Hosting Provider.
Raff does not resell QuickBooks licenses.
Raff does not provide QuickBooks application support.
If you need Intuit-authorized commercial QuickBooks hosting, use Intuit's authorized hosting program or an Intuit-authorized provider.
If you choose a self-managed Raff Windows VPS, treat it like a Windows Server you control: install your licensed software, manage your company files, configure security, and test your QuickBooks workflow before production use.
Quick verdict
| Situation | Recommendation |
|---|---|
| Existing QuickBooks Desktop users who need remote access | Windows Server VPS can be a practical self-managed option |
| New QuickBooks deployment in 2026 | Evaluate QuickBooks Desktop Enterprise or QuickBooks Online first |
| QuickBooks Pro/Premier existing subscription | Use only if your license/support path still fits |
| QuickBooks Desktop Enterprise | Best Desktop fit for serious multi-user use |
| Need Intuit-authorized hosting | Use an Intuit-authorized hosting provider |
| Need full customer-controlled Windows Server | Raff Windows VPS can fit |
| Need multiple daily RDP users | Plan RDS Session Host and RDS CALs |
| Need only 1-2 admins testing | Admin RDP may be enough for lab/testing |
| Need production accounting access | Backups, permissions, RDS licensing, and restore tests are required |
Simple rule:
QuickBooks license = right to use QuickBooks.
RDS CAL = right to connect to an RDS Session Host.
Windows VPS = infrastructure.
Backups = your recovery path.
How Raff fits QuickBooks self-hosting
Raff gives you a Windows Server VPS with Administrator access, RDP access, NVMe storage, and control over what you install.
That can be useful for teams that want:
- remote access to a Windows Server;
- customer-controlled infrastructure;
- QuickBooks Desktop installed on a centralized server;
- RDP-based access for accounting users;
- self-managed backups and permissions;
- a simpler alternative to running QuickBooks on an office PC.
But Raff is not a managed QuickBooks host.
Raff does not:
- sell QuickBooks licenses;
- activate QuickBooks for you;
- provide Intuit support;
- repair corrupted company files;
- act as an Intuit Authorized Hosting Provider;
- replace your accountant, QuickBooks admin, or Intuit support channel.
This article explains the Windows Server infrastructure setup.
You are responsible for confirming QuickBooks licensing, vendor support, and production suitability.
Who this guide is for
This guide is for:
- accounting firms using QuickBooks Desktop;
- SMBs that already depend on QuickBooks Desktop;
- MSPs helping clients centralize Windows business apps;
- teams moving QuickBooks from an office server to a cloud Windows VPS;
- QuickBooks Desktop Enterprise users who want remote RDP access;
- technical admins who understand RDS, backups, and Windows permissions.
This guide is not for:
- users who want fully managed QuickBooks hosting;
- teams that want Intuit to support the hosting environment end to end;
- users who do not have a valid QuickBooks Desktop license;
- buyers who should be on QuickBooks Online instead;
- teams that cannot manage backups or server security.
What you will build
The target setup looks like this:
Remote users
  ↓
RDP / RDS Session Host
  ↓
Windows Server VPS
  ├── QuickBooks Desktop installed
  ├── QuickBooks Database Server Manager
  ├── Company file folder
  ├── SMB share
  ├── .ND network descriptor file
  ├── Windows users and permissions
  └── Backups / snapshots
For most small deployments, all users RDP into the same Windows Server and open the company file locally on that server.
That is different from having QuickBooks client software on remote desktops connecting across the internet to a database server. For a VPS-based accounting workflow, RDP is usually simpler and safer.
What you'll need
Prepare:
- a Raff Windows VPS or similar Windows Server VPS;
- Windows Server version supported by your QuickBooks version;
- local Administrator access over RDP;
- valid QuickBooks Desktop license;
- QuickBooks installer from Intuit or your product account;
- company file backup;
- RDS CAL planning if multiple users connect;
- Windows user accounts for staff;
- folder permission plan;
- backup and restore plan;
- 60-90 minutes for first setup and testing.
Windows Server version: usually choose 2022
For QuickBooks Desktop 2024, Intuit lists Windows Server 2022, Windows Server 2019, and Windows Server 2016 as supported database server operating systems.
Windows Server 2025 is not listed on that QuickBooks Desktop 2024 system requirements page.
So the practical recommendation is:
Use Windows Server 2022 unless Intuit documentation for your QuickBooks version confirms a newer Windows Server version.
This is important because QuickBooks is not a generic app.
Accounting software depends on:
- database service behavior;
- Windows file permissions;
- SMB sharing;
- printer behavior;
- PDF tools;
- Outlook/Office integration;
- payroll/bank feed support;
- Intuit updates;
- vendor support.
Do not choose Windows Server 2025 just because it is newer.
Choose the newest Windows Server version your QuickBooks version actually supports.
QuickBooks Desktop product direction
QuickBooks Desktop is no longer the default path for every new business.
For many new businesses, Intuit pushes users toward QuickBooks Online. QuickBooks Desktop Enterprise remains the Desktop product line for businesses that need the Desktop model.
Before setting up QuickBooks Desktop on a Windows VPS, ask:
- Are we already committed to QuickBooks Desktop?
- Do we need Desktop-specific features?
- Do we need Enterprise?
- Are users trained on Desktop?
- Are add-ons compatible with Desktop?
- Do we need an authorized hosting provider?
- Would QuickBooks Online be simpler?
- How long do we plan to stay on Desktop?
A VPS deployment makes sense when Desktop is still the right product for the business.
It should not be used to avoid evaluating the future product path.
Sizing the Windows VPS
QuickBooks Desktop multi-user performance depends heavily on RAM, storage, and how users connect.
Intuit's QuickBooks Desktop 2024 requirements list server RAM guidance for multi-user environments:
| Concurrent users | Server RAM guidance |
|---|---|
| 1-5 users | 8 GB |
| 10 users | 12 GB |
| 15 users | 16 GB |
| 20+ users | 20+ GB |
For a Windows VPS, use this as a minimum planning baseline.
A practical sizing guide:
| Use case | Suggested starting point |
|---|---|
| 1-3 light users | 4 vCPU / 8 GB RAM |
| 5 users | 4 vCPU / 8-16 GB RAM |
| 6-10 users | 8 vCPU / 16 GB RAM |
| 11-15 users | 8 vCPU / 16-32 GB RAM |
| 16-20+ users | 8+ vCPU / 32+ GB RAM |
| Heavy reports / large company file | Size after testing |
| Multiple apps on same RDS host | Add extra RAM headroom |
Do not size only by user count.
Also consider:
- company file size;
- report frequency;
- number of open apps per RDP session;
- Microsoft 365 Apps or Outlook on the same server;
- antivirus/EDR overhead;
- printers and PDF tools;
- backups;
- whether users leave sessions open all day.
Storage should be SSD/NVMe.
QuickBooks company files are sensitive to disk performance, and slow storage creates a poor experience for everyone.
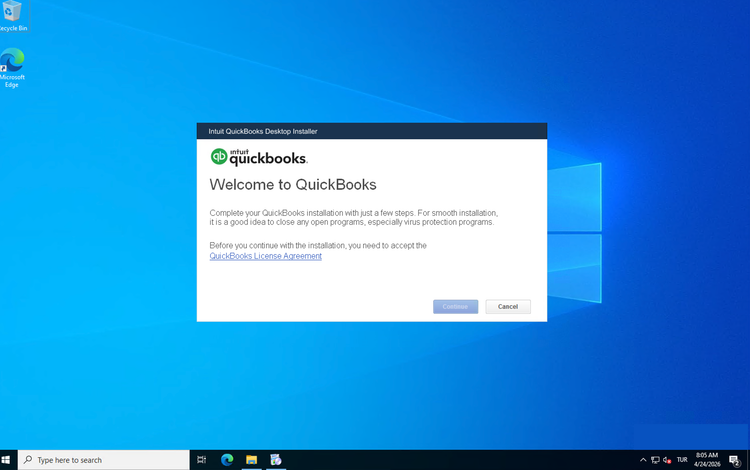
Step 1 — Install QuickBooks Desktop
Download the installer from Intuit or your QuickBooks product portal.
Run it on the Windows Server VPS as Administrator.
Follow the normal QuickBooks installer flow:
- Accept the license agreement.
- Choose the install type recommended for your deployment.
- Use the default install path unless you have a reason to change it.
- Finish installation.
- Reboot if prompted.
For an RDP-based self-hosted setup, install QuickBooks on the server where users will sign in.
After installation, you may see several QuickBooks-related services, but the multi-user database service may not be fully ready until hosting is enabled.
Do not stop here.
Step 2 — Enable Host Multi-User Access
This is the step many deployments miss.
Open QuickBooks Desktop on the server.
Then:
File
  → Utilities
  → Host Multi-User Access
QuickBooks displays a confirmation prompt.
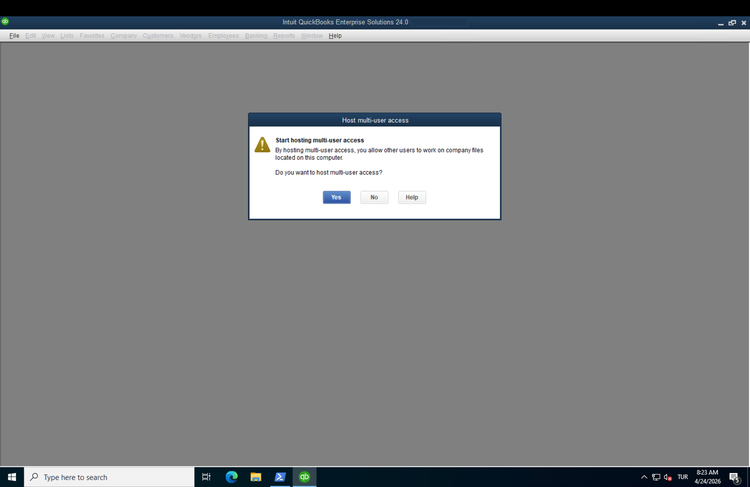
Click Yes.
QuickBooks then enables hosting and prepares QuickBooks Database Server Manager for multi-user access.
You may see a second confirmation that the folder still needs to be scanned with Database Server Manager.
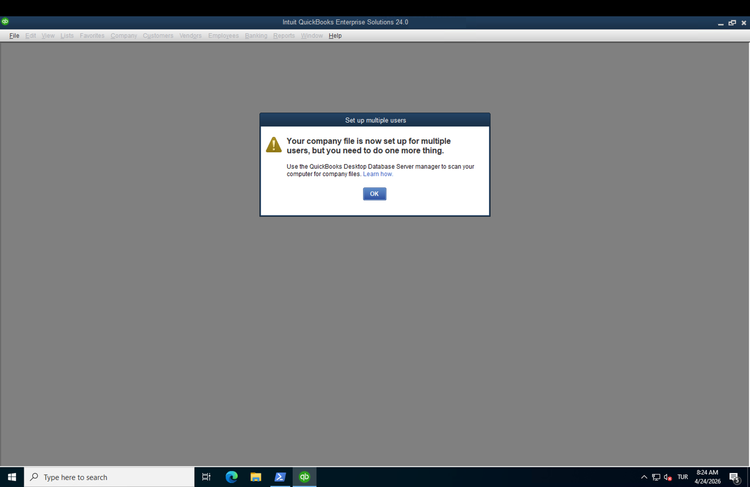
Click OK.
Then verify QuickBooks services:
Get-Service | Where-Object {$_.Name -like "*Quick*" -or $_.Name -like "*QB*"} |
    Format-Table Name, Status, StartType -AutoSize
You should see the QuickBooks database service for your version.
For QuickBooks Desktop 2024, the service name may be:
QuickBooksDB34
The number changes by QuickBooks year.
If you use a different QuickBooks version, do not hardcode QuickBooksDB34.
Check the real service name on your server.
For a dedicated QuickBooks server, set the database service to start automatically:
Set-Service -Name "QuickBooksDB34" -StartupType Automatic
Replace QuickBooksDB34 with your actual service name if different.
Step 3 — Understand what hosting changes
When Host Multi-User Access is enabled, QuickBooks may change several things:
- starts or registers QuickBooks Database Server Manager;
- enables database service access;
- creates or updates firewall rules;
- prepares QuickBooks to host company files;
- allows company files to be scanned;
- can create or update Windows file sharing;
- creates
.NDfiles during scanning.
Important:
Multi-user mode is not only an app setting.
It also involves Windows services, firewall rules, SMB sharing, and file permissions.
For audits, document:
- company file folder path;
- SMB share name;
- NTFS permissions;
- QuickBooks database service name;
- dynamic port shown in Port Monitor;
- firewall rules;
- backup path;
- users with access.
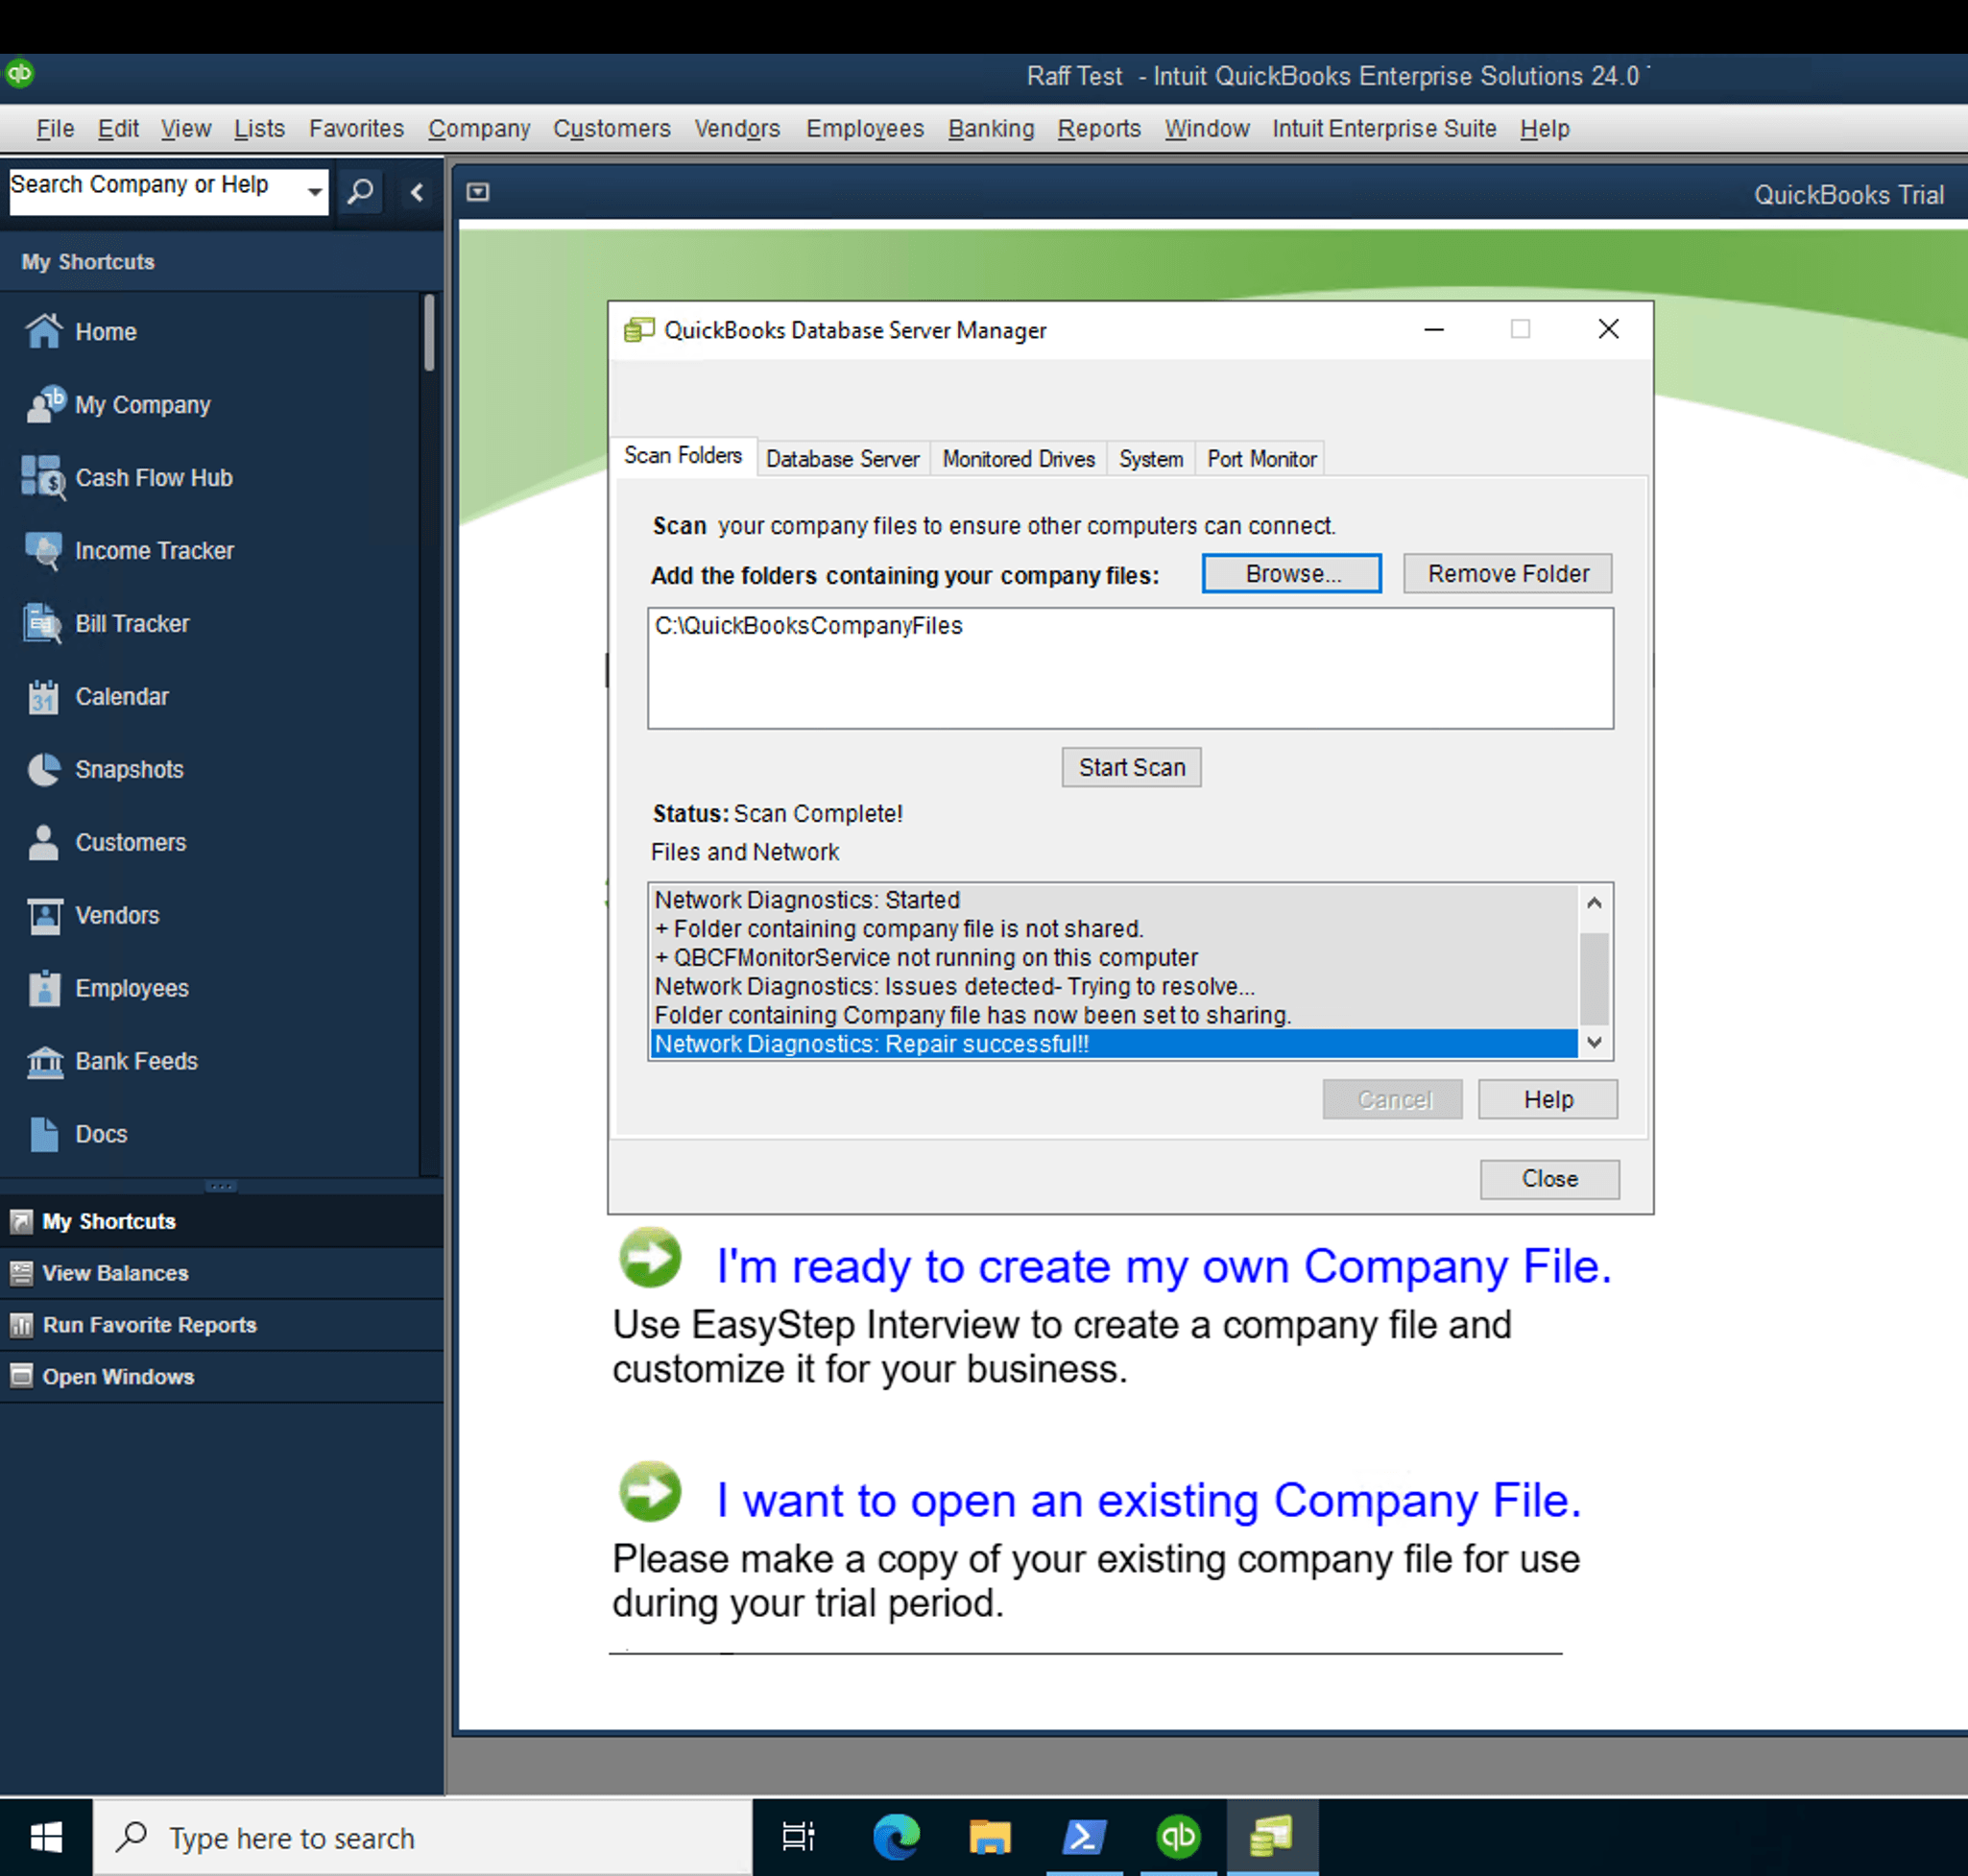
Step 4 — Open QuickBooks Database Server Manager
Open QuickBooks Database Server Manager from the Start menu.
Go to the Port Monitor tab.
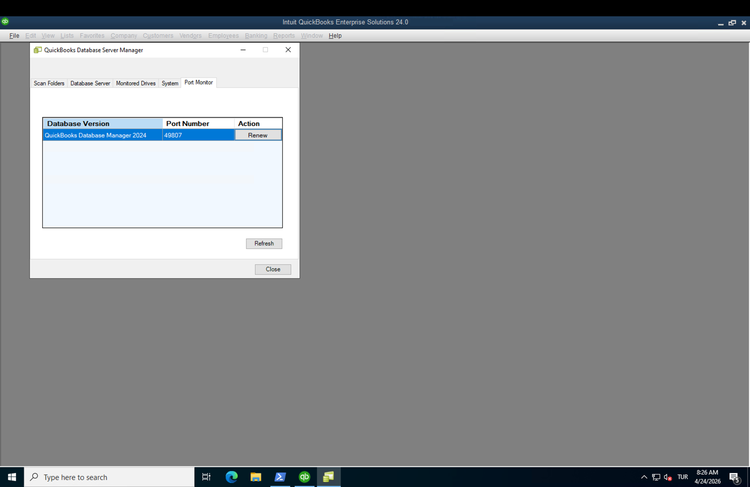
Use this screen to identify the port QuickBooks is actually using.
Do not rely blindly on old blog posts or static port ranges.
QuickBooks versions can use version-specific or dynamically assigned ports.
Your server may not use the same port as another guide.
Document the port from your own QBDSM Port Monitor.
If needed, use the Renew option in QBDSM to regenerate the port.
Step 5 — Create a company file folder
Create a dedicated folder for company files.
Recommended:
New-Item -ItemType Directory -Path "C:\QuickBooksCompanyFiles" -Force
Store .QBW files there.
Avoid scattering company files across:
- Desktop;
- Downloads;
- user profile folders;
- random shared folders;
- temporary paths.
A clear folder path makes permissions, backups, scans, and support much easier.
Step 6 — Scan the company file folder
In QuickBooks Database Server Manager, go to the Scan Folders tab.
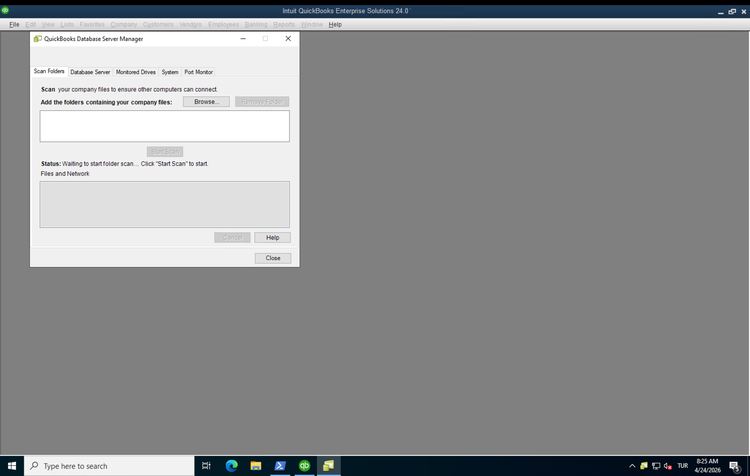
Then:
- Click Browse.
- Select:
C:\QuickBooksCompanyFiles
- Click OK.
- Click Start Scan.
QBDSM scans the folder and prepares company files for multi-user access.
A successful scan may show network diagnostics repair status.

After scan, QuickBooks should create an .ND file next to each .QBW company file.
Example:
YourCompany.QBW
YourCompany.QBW.ND
Check it:
Get-ChildItem "C:\QuickBooksCompanyFiles" -Filter "*.ND"
You can inspect the file:
Get-Content "C:\QuickBooksCompanyFiles\YourCompany.QBW.ND"
Look for:
ServerMode=1
That confirms the file is marked for multi-user server mode.
Do not share .ND files publicly without removing server IP or hostname details.
Step 7 — Review SMB sharing and permissions
QBDSM may create or update a Windows SMB share for the company file folder.
Check shares:
Get-SmbShare
Check share permissions:
Get-SmbShareAccess -Name "QuickBooksCompanyFiles"
If your share has a different name, use that name.
For most RDP-based deployments where users sign into the same server, you can keep access narrow.
The safest model:
- only QuickBooks users can access the folder;
- only admins can change permissions;
- users are not local administrators;
- backups run with a dedicated admin/service account;
- SMB is not exposed publicly;
- company files are not stored in personal user profiles.
QuickBooks access depends on both:
NTFS permissions
+
QuickBooks internal user permissions
A Windows user with file access is not automatically a QuickBooks admin.
Step 8 — Create Windows users for accounting staff
Each person should have their own Windows login.
Do not share one Windows account across the team.
Create a local user:
$password = Read-Host "Password for new user" -AsSecureString

New-LocalUser `
    -Name "jane.doe" `
    -Password $password `
    -FullName "Jane Doe" `
    -Description "QuickBooks user"
Grant RDP access:
Add-LocalGroupMember -Group "Remote Desktop Users" -Member "jane.doe"
Grant access to the company file folder:
$Path = "C:\QuickBooksCompanyFiles"
$User = "jane.doe"

$Acl = Get-Acl $Path
$Rule = New-Object System.Security.AccessControl.FileSystemAccessRule(
    $User,
    "Modify",
    "ContainerInherit,ObjectInherit",
    "None",
    "Allow"
)
$Acl.SetAccessRule($Rule)
Set-Acl -Path $Path -AclObject $Acl
Use Modify instead of FullControl unless the user genuinely needs permission to change folder security.
For domain environments, use domain groups instead:
QB-Users
QB-Admins
Then assign permissions to groups, not individuals.
Step 9 — Create QuickBooks internal users
Windows users and QuickBooks users are separate.
Inside QuickBooks:
Company
  → Users
  → Set Up Users and Roles
Create a QuickBooks user for each accountant.
Assign only the roles they need.
Examples:
- Full Access for the QuickBooks admin;
- Accounts Payable;
- Accounts Receivable;
- Payroll;
- Reporting;
- Inventory;
- External Accountant.
Do not give everyone QuickBooks admin rights.
For auditability, each person should have:
One Windows user
+
One QuickBooks user
Avoid shared QuickBooks logins.