run your softwareintermediate22 min read·Updated May 23, 2026

How to Set Up SMB over QUIC on Windows Server 2025 with a Let's Encrypt Certificate (No VPN Needed)

Windows Server 2025 brings SMB over QUIC to Standard and Datacenter editions, not just Azure Edition. We walk through the full setup: File Server role, free Let's Encrypt certificate via win-acme, SMB binding, and a Windows 11 client connection. Tested live on a Raff Server in Virginia.

Windows Server 2025 terminal showing win-acme issuing a Let's Encrypt certificate for SMB over QUIC, with Task Scheduler renewal registered.
On this page

Don't have a Windows Server yet?

Deploy Windows Server 2019/2022/2025 in ~2 minutes. 6-month evaluation licence included.

Deploy Windows now

In short

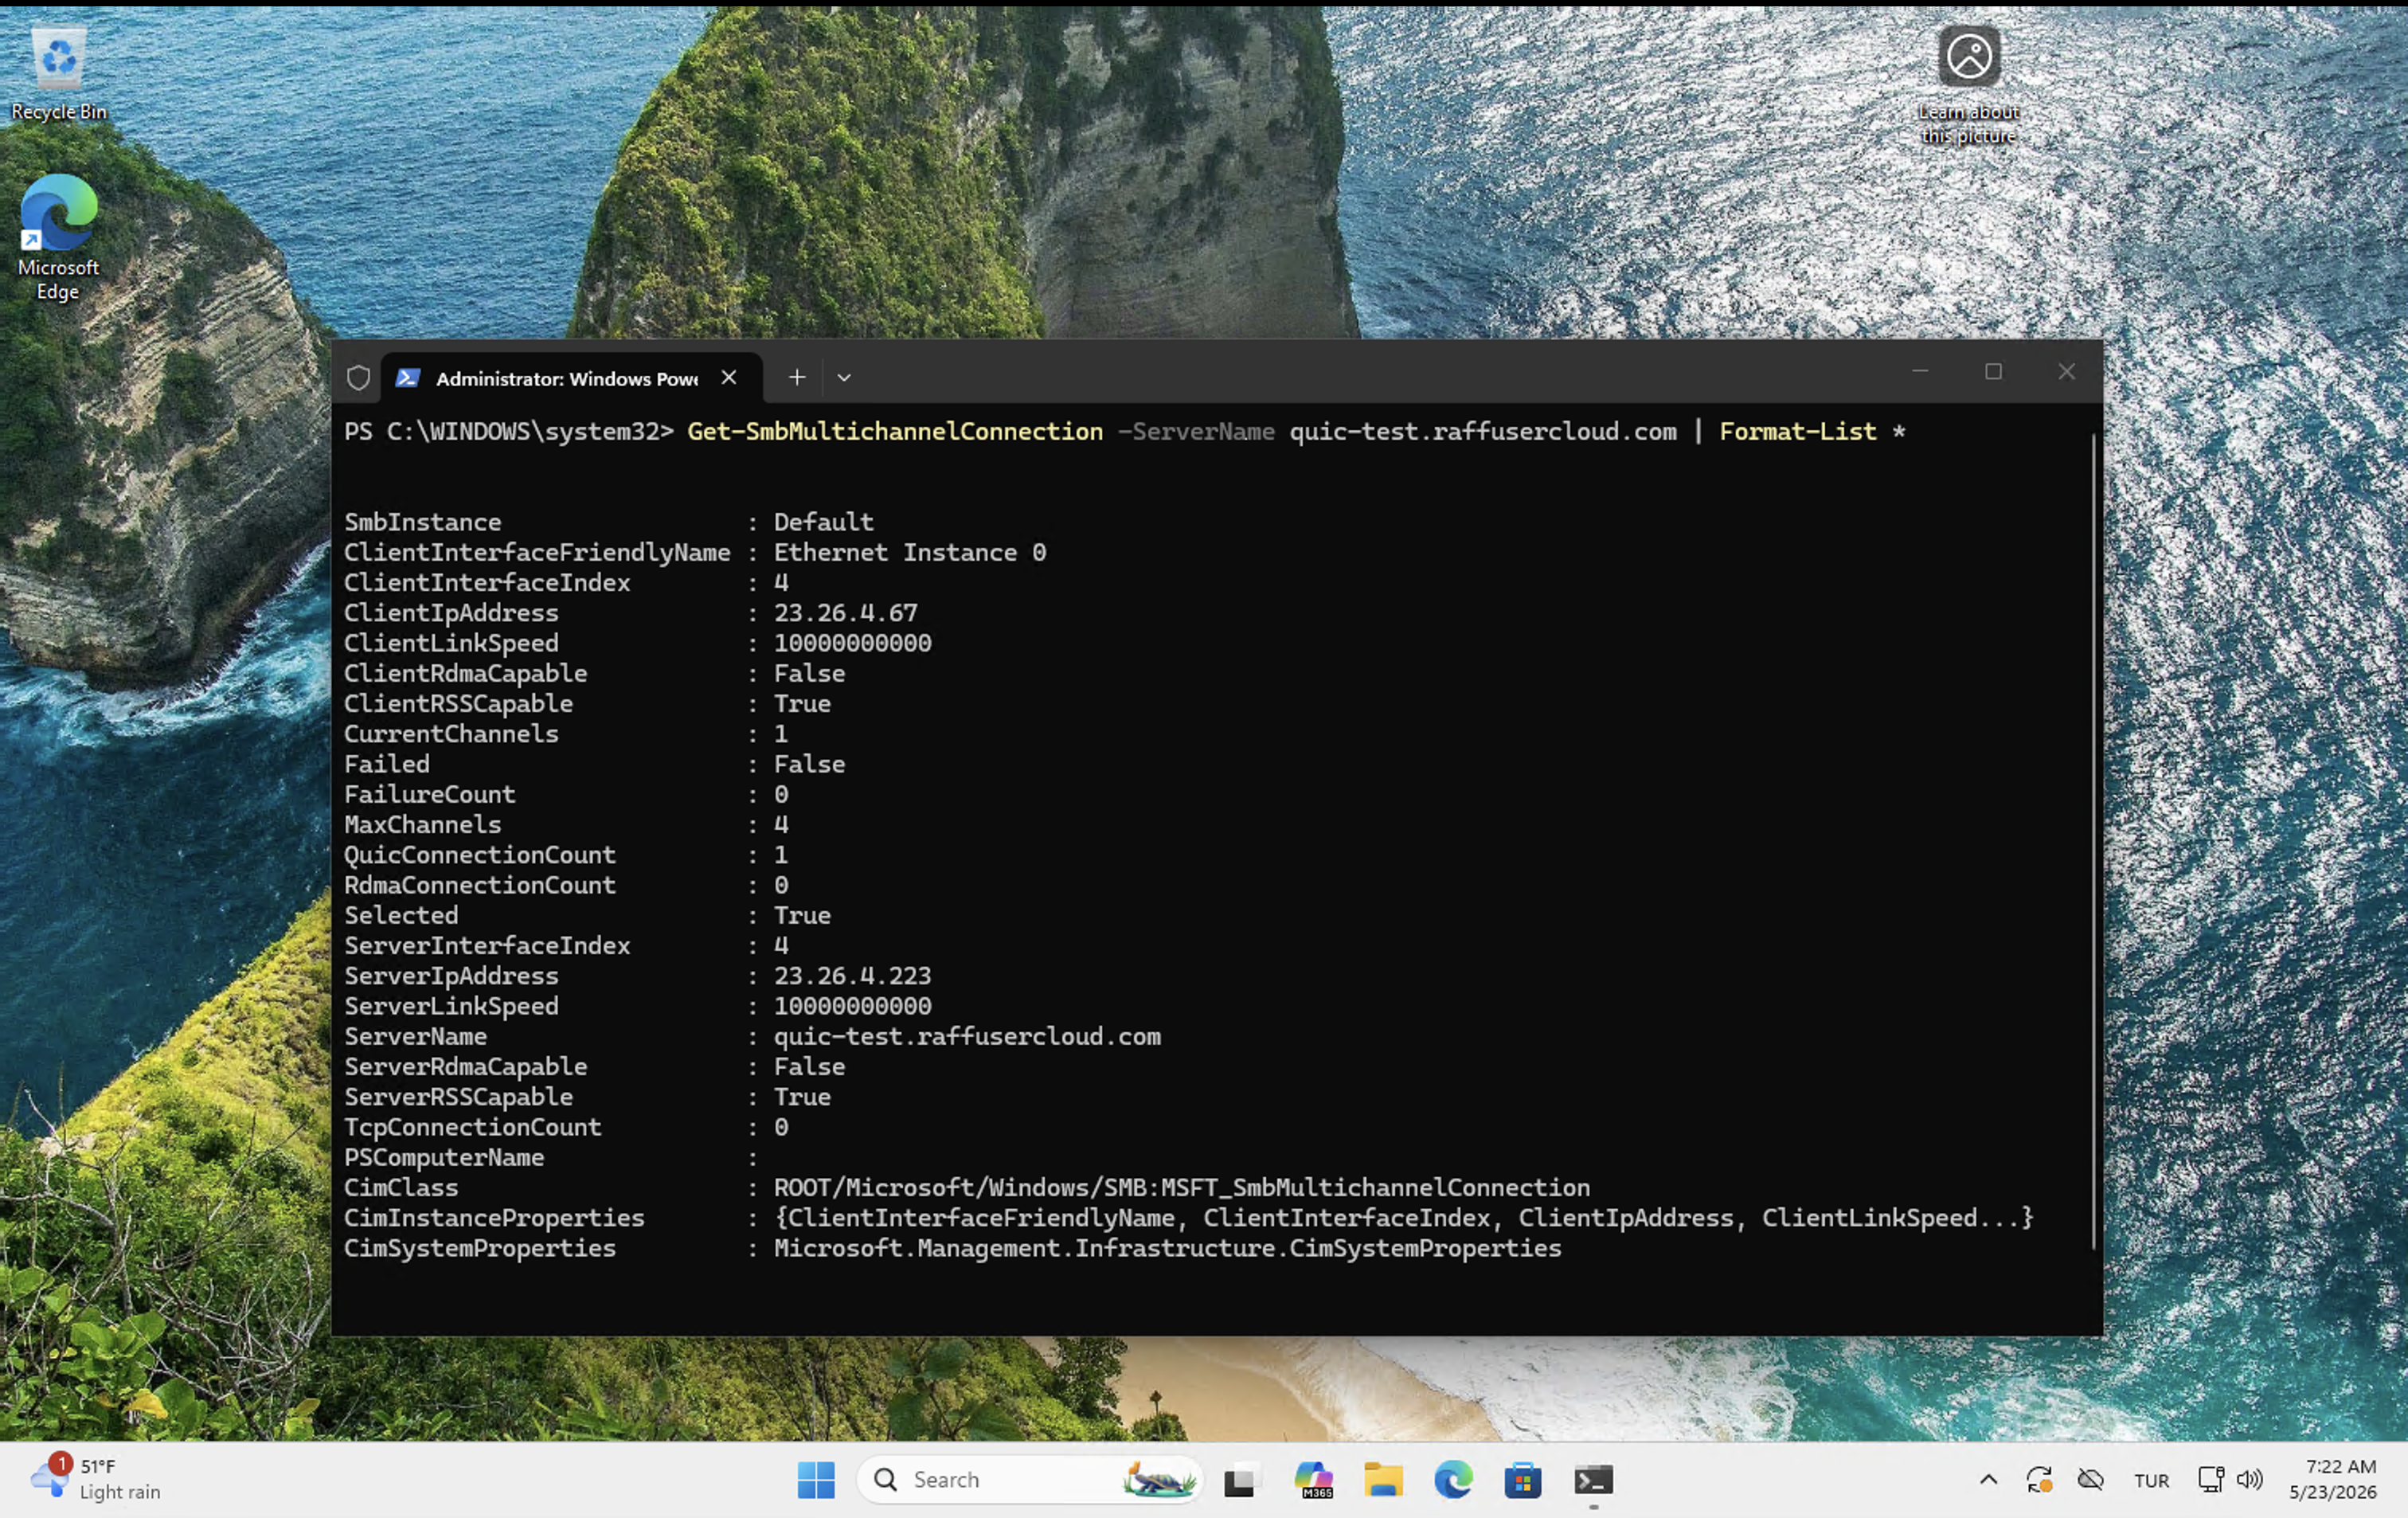
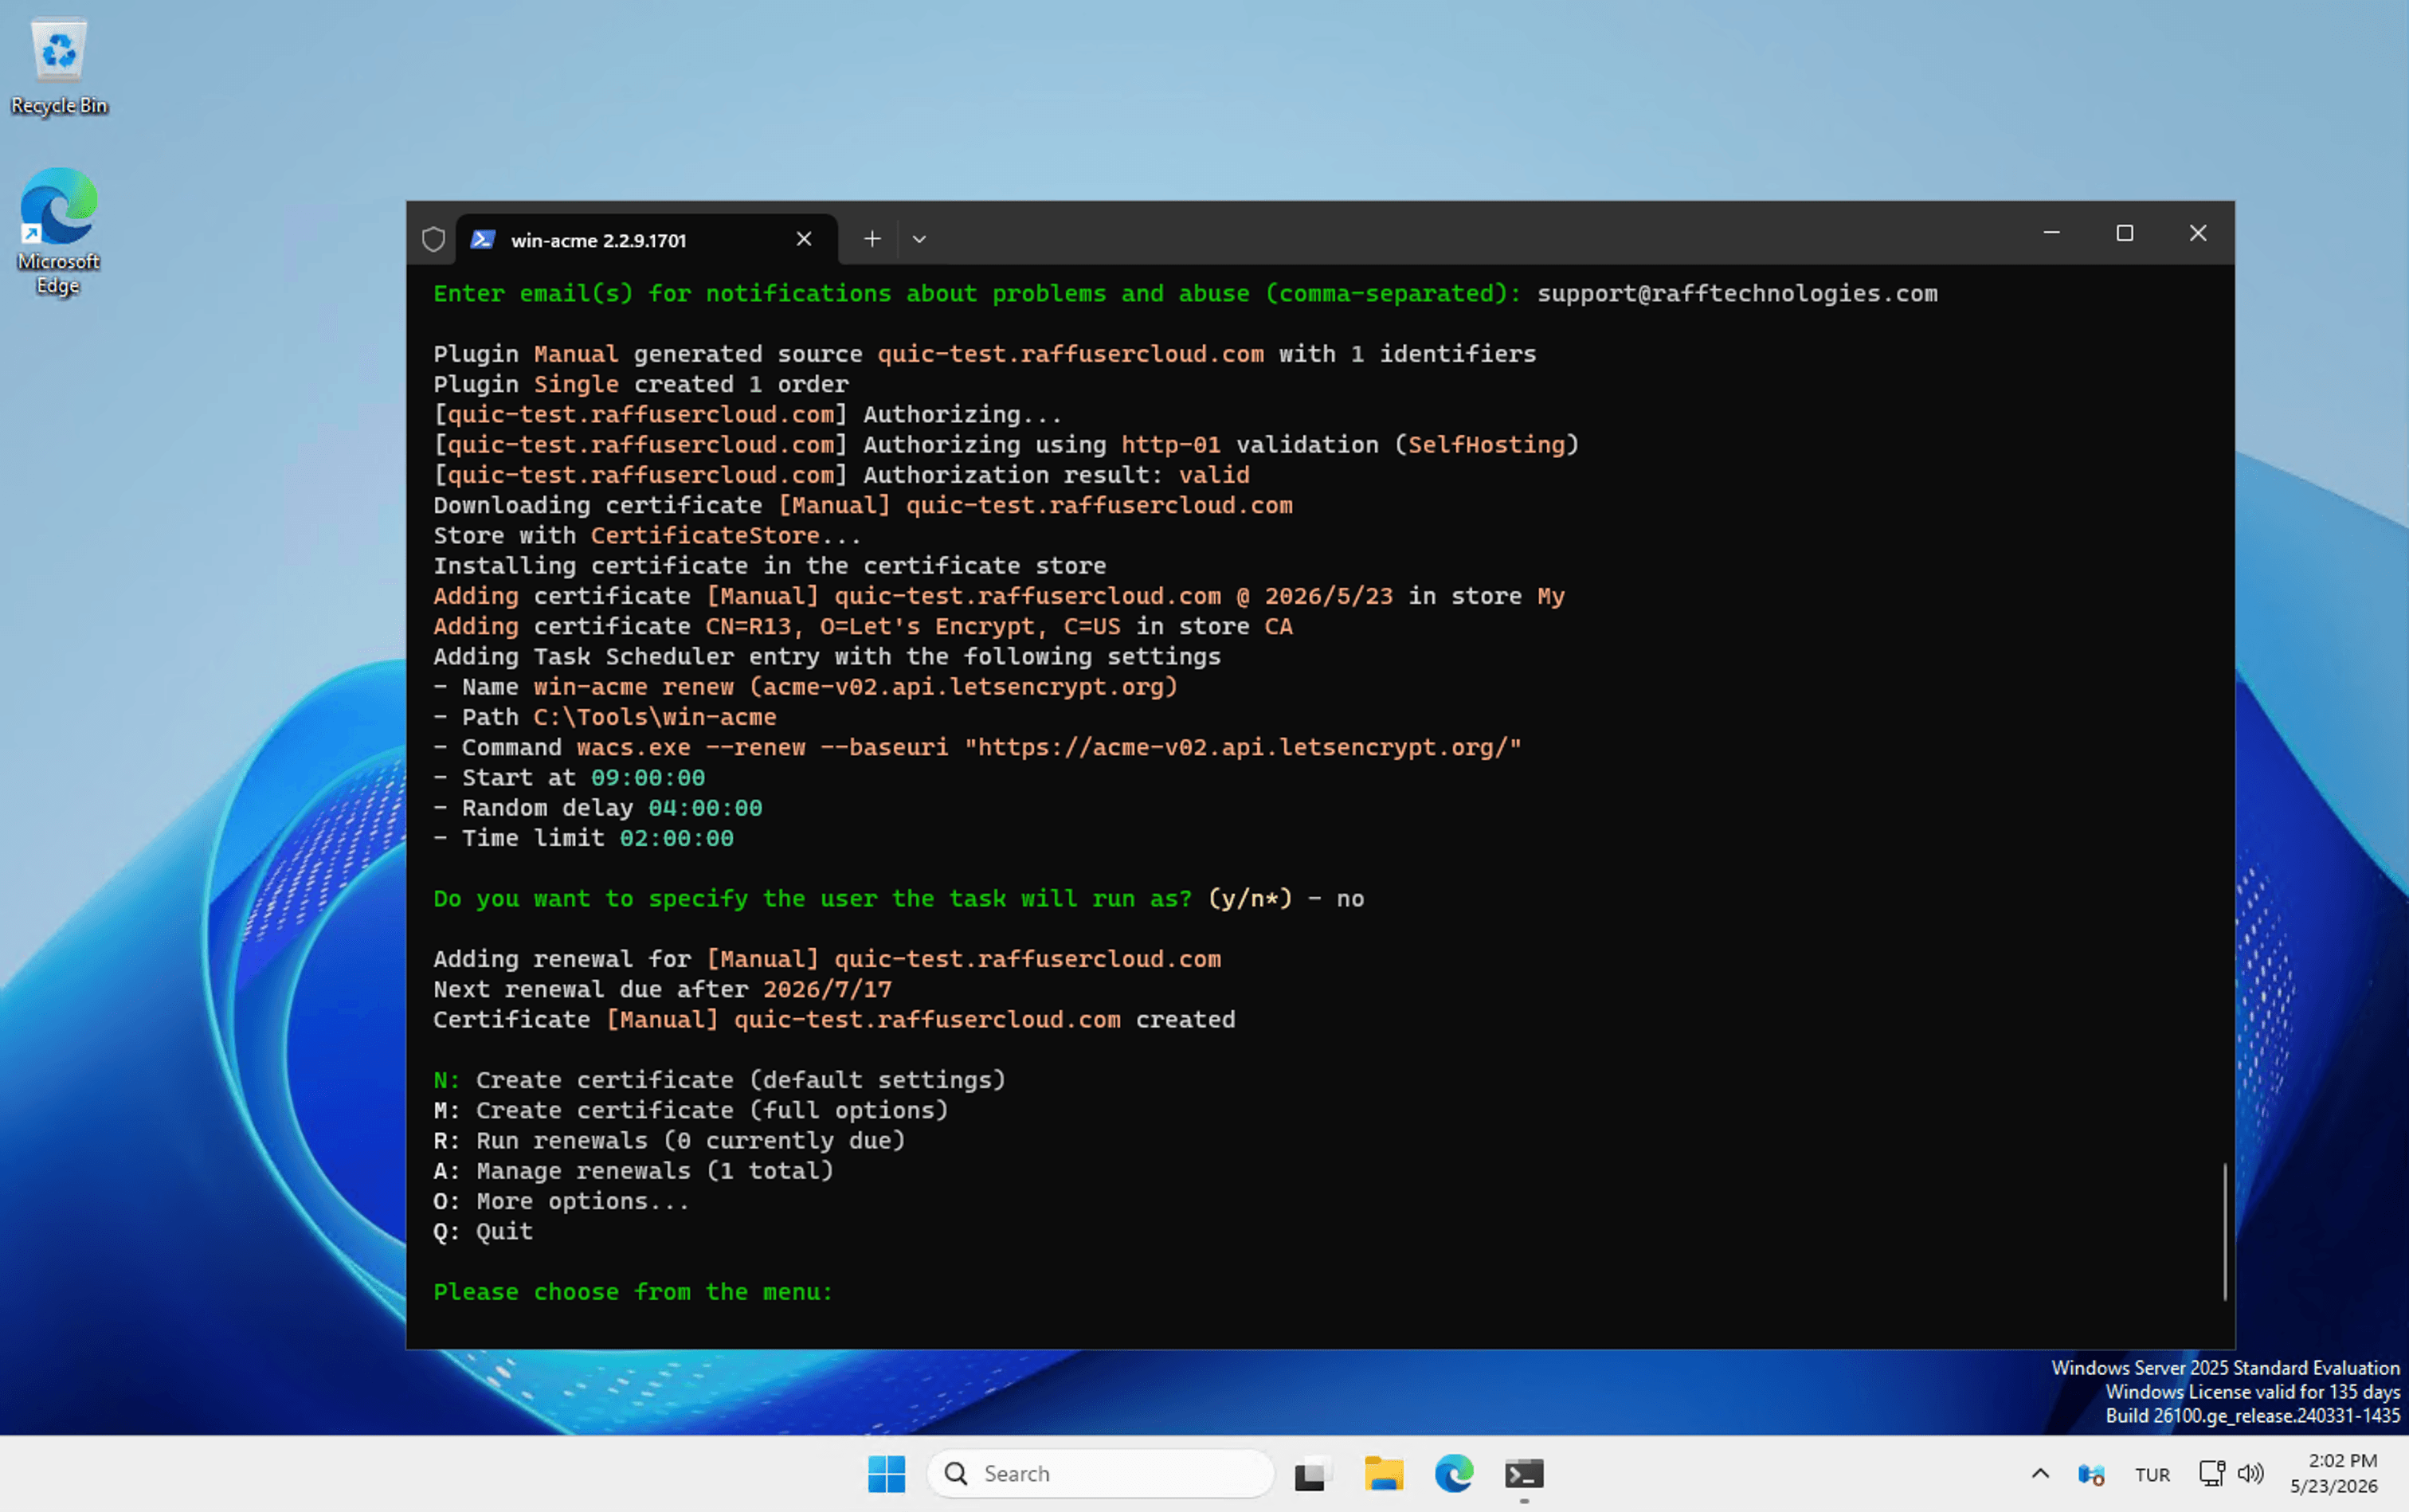
SMB over QUIC lets you publish a Windows file share directly to the internet on UDP port 443, wrapped in TLS 1.3, with no VPN. In Windows Server 2025 this feature is available in the Standard, Datacenter, and Azure editions, not just Azure Edition like it was in Server 2022. The setup takes seven steps: install the File Server role, open UDP 443, issue a free Let's Encrypt certificate with win-acme, bind it to SMB, create a share, connect from a Windows 11 client with /TRANSPORT:QUIC, and verify the transport. Whole flow runs in about 30 minutes on a fresh Server 2025 install. We tested it live on a Raff Windows Server in Vint Hill, Virginia and have the QuicConnectionCount=1, TcpConnectionCount=0 output to prove it.

Who this guide is for

You want remote workers, branch offices, or contractors to mount a Windows file share over the open internet without standing up a VPN. Common scenarios:

  • A 5 to 50 person SMB whose remote employees need a shared drive and you don't want to manage Wireguard or OpenVPN configs
  • An MSP serving small businesses with distributed teams, where each client gets its own SMB-over-QUIC file server instead of a VPN appliance
  • A digital agency or studio whose contractors need access to project folders but you don't want to issue VPN credentials and revoke them every contract end
  • A small dev team that needs a network drive accessible from coffee shops, home offices, and on-the-road laptops with the same UNC path everywhere

If you have strong identity infrastructure already (Entra ID joined laptops, Conditional Access, Intune-managed devices), SMB over QUIC slots in cleanly. If you have none of that, the security boundary is your share permissions plus the strength of the local user passwords on the file server, so think about that before going to production.

This guide does not cover Active Directory Domain Services. We run a workgroup scenario with local Windows user accounts because that matches how most small Raff Server tenants deploy. AD-joined SMB over QUIC works the same way at the protocol level, just with Kerberos inside the QUIC tunnel instead of NTLM.

What you'll need

  • A Raff Windows Server 2025 with a public IP. This guide tested on the Production plan ($35.99, 4 vCPU / 8 GB RAM / 120 GB NVMe), which is the right size for a file server with up to 50 active users and a few hundred GB of shared data. Smaller workloads run fine on the Small Business plan ($19.99). Heavy multi-share deployments with large datasets step up to Heavy Workload ($63.99) or Enterprise ($127.99) for the extra storage and RAM.
  • Local administrator access to the Raff Server via RDP.
  • A registered DNS A record pointing to your server's public IP. Examples in this article use quic-test.raffusercloud.com. You'll use your own FQDN like files.example.com. The Let's Encrypt certificate is issued against this FQDN, so it must resolve publicly before you run win-acme.
  • Port 80 inbound temporarily to your server's public IP (for the Let's Encrypt HTTP-01 challenge during cert issuance). You can close it again after.
  • Port UDP 443 inbound permanently to your server's public IP (this is the SMB over QUIC transport).
  • A Windows 11 client (any edition, 24H2 or newer) to test the connection from. We'll come back to this in the "Common misconception" section because it's the single biggest source of bad information online.
  • Estimated time: 30 to 45 minutes end-to-end on a fresh VM.

What changed in Windows Server 2025

Three things that matter, if you're coming from older guides written for Server 2022:

  1. SMB over QUIC is no longer Azure-only. In Server 2022 you needed Azure Edition (which only ran on Azure Stack HCI or in Azure), so for most self-hosters this feature didn't exist. Server 2025 Standard and Datacenter both ship with it. You can run it on any commodity VPS like a Raff Windows Server.
  2. EnableSMBQUIC defaults to True on a fresh Server 2025 install. You don't need to enable an optional feature, install a role module specifically for QUIC, or flip any global setting. The File Server role plus a bound certificate is the only configuration needed.
  3. Windows Admin Center (WAC) configuration for SMB over QUIC is not supported on Server 2025 at the time of writing. PowerShell is the only way to configure it. Microsoft's docs confirm this; if you find an older WAC walkthrough, ignore it and use the PowerShell commands in this guide.

About the examples

We tested every command in this guide on a live Raff Windows Server. Specifics:

  • Hostname: us-host-723754
  • Public IP: 23.26.4.223
  • FQDN for the cert: quic-test.raffusercloud.com
  • Edition shown in outputs: Windows Server 2025 Standard Evaluation
  • Build: 26100 (Server 2025 RTM)

[!NOTE] Why our screenshots show "Evaluation" Our test VM shows Windows Server 2025 Standard Evaluation in command outputs because we provisioned with the eval image for documentation work. When you order Windows Server 2025 from your Raff dashboard, you have two options. Licensed image: VM ships fully activated, no expiry, ready for production. Evaluation image: free 180-day trial, useful for testing and lab. Activates with a real key any time. SMB over QUIC works identically on both. Pick eval to test, pick licensed when you go to production.

A common misconception: Windows 11 edition requirements

Older guides written in 2022 and 2023 tell you that the SMB over QUIC client requires Windows 11 Enterprise, Education, or Pro for Workstations. This was true at launch.

It is no longer true. Starting with Windows 11 24H2, the SMB over QUIC client ships in every edition including Pro and Home. Microsoft's current SMB over QUIC documentation explicitly lists Windows 11 (all editions, 24H2 or newer) as supported clients. If you're running Win11 24H2 or 25H2 Pro on your daily-driver laptop, you're good. You do not need to upgrade to Enterprise.

What this means in practice: your remote employees on regular Win11 Pro laptops can connect to your SMB over QUIC server without any edition upgrade. The reader of an older guide who thinks "we'd need to buy E5 licenses for everyone" is looking at outdated information.

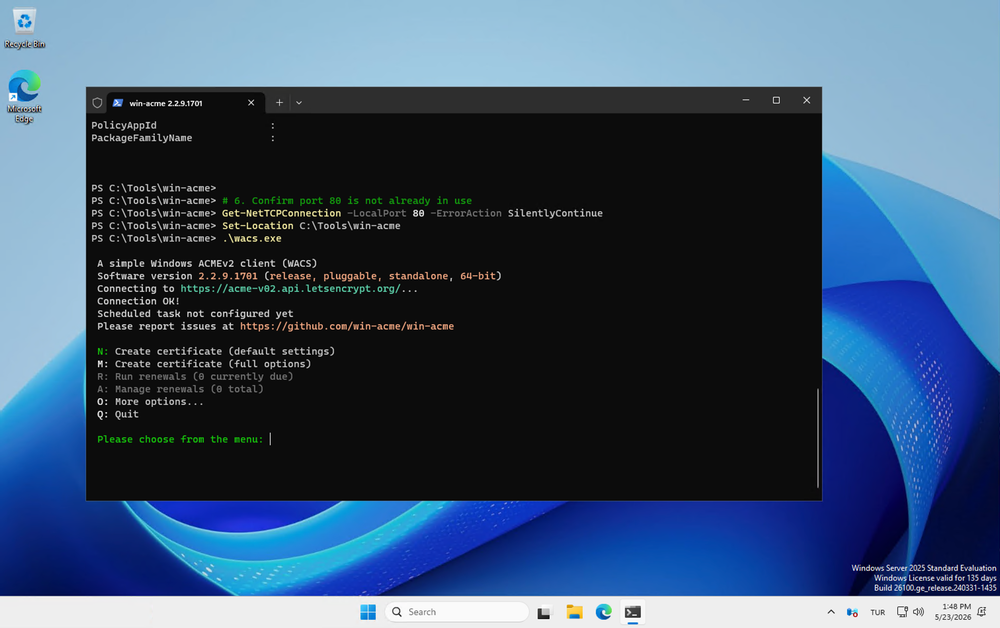
Step 1: Install the File Server role

RDP into your Raff Windows Server, open PowerShell as administrator, and run:

powershellInstall-WindowsFeature -Name FS-FileServer -IncludeManagementTools

Expected output:

Success Restart Needed Exit Code      Feature Result
------- -------------- ---------      --------------
True    No             Success        {File Server}

RestartNeeded: No is what you want. Server 2025 installs File Server cleanly with no reboot.

Verify SMB server config defaults:

powershellGet-SmbServerConfiguration | Select-Object EnableSMB1Protocol, EnableSMB2Protocol, EnableSMBQUIC, EncryptData, RestrictNamedPipeAccessViaQuic

You should see:

EnableSMB1Protocol            : False
EnableSMB2Protocol            : True
EnableSMBQUIC                 : True
EncryptData                   : False
RestrictNamedPipeAccessViaQuic: True

A few things worth knowing here.

EnableSMB1Protocol: False is correct. SMB1 has been deprecated since 2017 and is a security risk. Leave it off.

EnableSMBQUIC: True means the SMB server is already willing to accept QUIC connections once you bind a certificate to it. No additional flag to flip.

EncryptData: False looks alarming but is correct for QUIC. This flag controls SMB-level encryption for legacy SMB over TCP. SMB over QUIC encrypts at the QUIC/TLS 1.3 transport layer, so SMB-level encryption is redundant. The TLS 1.3 tunnel encrypts everything end to end already, including the auth handshake.

RestrictNamedPipeAccessViaQuic: True is a security default. Named pipes (used by remote management protocols like the Server Manager remote APIs) are blocked over QUIC by default. Don't change this unless you have a specific reason; if a remote admin tool fails to connect over QUIC, that's the reason, and the right answer is usually to admin over the local network or a separate RDP session, not to relax this restriction.

Now create a folder to share:

powershellNew-Item -Path "C:\QuicShare" -ItemType Directory -Force
"This file lives on the Raff Server. Reachable over SMB+QUIC." | Out-File "C:\QuicShare\readme.txt" -Encoding UTF8

Step 2: Open UDP 443 in the firewall

This is the step where almost every online guide gets the protocol wrong. SMB over QUIC uses UDP 443, not TCP 443. If you accidentally open TCP 443 thinking that's how QUIC works (because TLS is usually associated with TCP), nothing will work and the error you get back is unhelpful.

powershellNew-NetFirewallRule -DisplayName "SMB over QUIC (UDP 443)" `
    -Direction Inbound `
    -Protocol UDP `
    -LocalPort 443 `
    -Action Allow `
    -Profile Any

Verify:

powershellGet-NetFirewallRule -DisplayName "SMB over QUIC (UDP 443)" | Format-List DisplayName, Enabled, Direction, Action

You should see Enabled: True, Direction: Inbound, Action: Allow.

Now temporarily open TCP 80 for the Let's Encrypt HTTP-01 challenge in the next step:

powershellNew-NetFirewallRule -DisplayName "Lets Encrypt HTTP-01 (TCP 80)" `
    -Direction Inbound `
    -Protocol TCP `
    -LocalPort 80 `
    -Action Allow `
    -Profile Any

We'll close this back down once the certificate is issued and renewals are scheduled via Task Scheduler (which can survive without port 80 once the initial cert is in place, provided you set up DNS-01 challenges later, which we cover at the end). For now, open it.

Step 3: Get a Let's Encrypt certificate with win-acme

This is the step where you'll find the most outdated and frankly wrong information online. Several popular guides explicitly state that "Let's Encrypt will not work for SMB over QUIC." That is incorrect. Let's Encrypt issues domain-validated (DV) certificates that include the FQDN in the Subject Alternative Name field, which is exactly what SMB over QUIC requires. We tested it end to end. It works.

We use win-acme (sometimes called "wacs"), which is the most popular ACME client for Windows. It's a single executable, no installer, no service to register, and it sets up its own scheduled task for automatic renewal.

Download win-acme

powershellNew-Item -Path "C:\Tools\win-acme" -ItemType Directory -Force
cd C:\Tools\win-acme

# Download the latest x64 pluggable build (check github.com/win-acme/win-acme/releases for current URL)
Invoke-WebRequest -Uri "https://github.com/win-acme/win-acme/releases/download/v2.2.9.1701/win-acme.v2.2.9.1701.x64.pluggable.zip" `
    -OutFile "win-acme.zip"

Expand-Archive -Path "win-acme.zip" -DestinationPath . -Force
Remove-Item "win-acme.zip"

# Confirm
Get-ChildItem | Format-Table Name, Length, LastWriteTime

You should see wacs.exe and supporting DLLs. The version we tested with is 2.2.9.1701, published May 22, 2024. Newer versions may have shipped by the time you read this; the menu wording may shift slightly, but the option content is the same.

Run the wizard

Make sure DNS for your FQDN resolves to your public IP before you start. Test from a different machine:

powershellResolve-DnsName quic-test.raffusercloud.com

You should see your server's public IP. If it doesn't resolve yet, wait for DNS to propagate. Let's Encrypt's validator will try to fetch a file from your FQDN over HTTP, and if DNS doesn't point at your server, the validation fails.

Now start the wizard:

powershell.\wacs.exe

You'll see the win-acme welcome banner and a menu:

Win-acme 2.2.9.1701 main menu running on Windows Server 2025, showing certificate creation options including Create certificate default settings, full options, run renewals, manage renewals, and more options

Walk through it like this (read each prompt; menus shift between versions):

  1. Main menu: press M for Create certificate (full options). The N shortcut for "default settings" tries to bind to IIS, which we don't have.
  2. Source plugin: choose Manual input (in 2.2.9.1701 this is option 2). Type your FQDN: quic-test.raffusercloud.com. Press Enter to accept the auto-generated friendly name.
  3. Single or multiple certificates: choose Single certificate. We're only issuing one.
  4. Validation method: choose Serve verification files from memory (option 2 in 2.2.9.1701). This tells win-acme to spin up its own tiny HTTP server on port 80 just long enough to answer the Let's Encrypt challenge, then shut it down. No IIS required. This is why we opened TCP 80 in Step 2.
  5. Private key type: RSA key (option 2 in 2.2.9.1701). The menu order swapped between versions; if you see 1: EC, 2: RSA, type 2. RSA 2048+ is what the SMB stack expects.
  6. Certificate store: Windows Certificate Store (Local Computer) (option 4 in 2.2.9.1701). SMB reads its certificates from Cert:\LocalMachine\My, which is exactly where this option places it.
  7. Store name: [My] General computer store (for Exchange/RDS) (option 1). Same store name SMB looks in.
  8. Additional storage steps: No (additional) store steps. The cert is already where we need it.
  9. Installation steps: No (additional) installation steps. We bind to SMB manually in the next step rather than letting win-acme guess.
  10. Terms of service: type yes if this is the first time you've run win-acme on this server.
  11. Notification email: enter a real monitored email. Let's Encrypt sends expiry warnings here.

Wait about 30 seconds. If everything is configured right, you'll see win-acme run through:

[quic-test.raffusercloud.com] Authorizing using http-01 validation (SelfHosting)
[quic-test.raffusercloud.com] Authorization result: valid
Downloading certificate [Manual] quic-test.raffusercloud.com
Adding certificate [Manual] quic-test.raffusercloud.com @ 2026/5/23 in store My
Adding certificate CN=R13, O=Let's Encrypt, C=US in store CA
Adding Task Scheduler entry with the following settings
* Name win-acme renew (acme-v02.api.letsencrypt.org)
* Path C:\Tools\win-acme
* Command wacs.exe --renew --baseuri "https://acme-v02.api.letsencrypt.org/"
* Start at 09:00:00
* Random delay 04:00:00
* Time limit 02:00:00
Adding renewal for [Manual] quic-test.raffusercloud.com
Next renewal due after 2026/7/17
Certificate [Manual] quic-test.raffusercloud.com created

Two certificates land in your store:

  • Your leaf cert in LocalMachine\My with CN=quic-test.raffusercloud.com
  • The Let's Encrypt R13 intermediate cert in LocalMachine\CA, which is the issuing chain certificate

When you see "Next renewal due after" with a date about 55 days out, the renewal task is registered. Type Q to quit the wizard.

Grab the thumbprint

We need the cert's thumbprint for the next step. Get it with:

powershellGet-ChildItem Cert:\LocalMachine\My | Where-Object { $_.Subject -like "*quic-test*" } | Format-List Subject, Thumbprint, NotBefore, NotAfter, Issuer, HasPrivateKey

Expected (your thumbprint will be different):

Subject       : CN=quic-test.raffusercloud.com
Thumbprint    : BAADC217737B98A8A5D493DB0569C8C1C8C4FFC6
NotBefore     : 5/23/2026 1:00:13 PM
NotAfter      : 8/21/2026 1:00:12 PM
Issuer        : CN=R13, O=Let's Encrypt, C=US
HasPrivateKey : True

HasPrivateKey: True is critical. If it's False, the cert won't work for SMB (you can't establish a TLS handshake without a private key on the server side). Re-run the wizard if you see False.

Also verify the renewal task is queued:

powershellGet-ScheduledTask | Where-Object { $_.TaskName -like "*win-acme*" } | Select-Object TaskName, State

You should see State: Ready.

Save your thumbprint string for the next step.

Step 4: Bind the certificate to SMB

This is the step that turns "a certificate sitting in a store" into "SMB is now listening over QUIC for this FQDN."

powershellNew-SmbServerCertificateMapping `
    -Name "quic-test.raffusercloud.com" `
    -Thumbprint "BAADC217737B98A8A5D493DB0569C8C1C8C4FFC6" `
    -StoreName "My" `
    -Type QUIC `
    -Flags None

Replace the FQDN and thumbprint with your own values.

Verify:

powershellGet-SmbServerCertificateMapping | Format-List Name, Thumbprint, StoreName, Type, Flags

Expected:

Name       : quic-test.raffusercloud.com
Thumbprint : BAADC217737B98A8A5D493DB0569C8C1C8C4FFC6
StoreName  : My
Type       : QUIC
Flags      : None

Type: QUIC is the key field. That's the explicit binding telling Windows that this cert is for SMB over QUIC specifically. (You can have separate certs for different purposes on the same server: one for SMB+QUIC, one for IIS HTTPS, one for RDS, all in the same LocalMachine\My store. The Type field disambiguates.)

Step 5: Create a file share

Since we're not running an Active Directory domain in this scenario, we'll create a local Windows user for SMB access. In a real deployment you'd create one local user per remote employee, with strong passwords stored in your password manager.

powershell# Create a local user
$password = ConvertTo-SecureString "RaffQuicTest2026" -AsPlainText -Force
New-LocalUser `
    -Name "raffsmbuser" `
    -Password $password `
    -FullName "Raff SMB Test User" `
    -Description "SMB over QUIC test user" `
    -PasswordNeverExpires

# Add to the Users group (network logon requires this)
Add-LocalGroupMember -Group "Users" -Member "raffsmbuser"

# Create the share, granting Full access to raffsmbuser
New-SmbShare `
    -Name "QuicShare" `
    -Path "C:\QuicShare" `
    -Description "SMB over QUIC test share" `
    -FullAccess "raffsmbuser"

# Confirm
Get-SmbShare -Name "QuicShare" | Format-List Name, Path, Description, EncryptData
Get-SmbShareAccess -Name "QuicShare"

The expected Get-SmbShareAccess output:

Name      ScopeName AccountName                AccessControlType AccessRight
----      --------- -----------                ----------------- -----------
QuicShare *         US-HOST-723754\raffsmbuser Allow             Full

raffsmbuser is your scoped local user, prefixed with the server's hostname. This is what the client will authenticate as.

For real production, you would also want to set NTFS permissions on C:\QuicShare itself, not just the SMB share permissions. The effective access is the intersection of share permissions and NTFS permissions. Share-only "Full" with NTFS-only "Read" gives you Read. For test purposes the default NTFS inheritance is fine, but lock it down properly before going live.

Use a strong password

RaffQuicTest2026 is fine for a one-day test, but it's terrible for production. Use a 20+ character random password from a password manager. Server 2025 has an SMB authentication rate limiter that throttles repeated failed logins automatically, which mitigates brute force, but you should never count on that as your only line of defense.

Step 6: Connect from a Windows 11 client

On your Windows 11 client (24H2 or newer, any edition), open PowerShell as administrator and run:

powershellnet use Z: \\quic-test.raffusercloud.com\QuicShare /TRANSPORT:QUIC /USER:raffsmbuser RaffQuicTest2026

Replace the FQDN, username, and password with your own. Expected:

The command completed successfully.

You now have a mapped drive Z: that is, under the hood, running over QUIC on UDP 443 with TLS 1.3 encryption. Your share permissions and authentication are working through the encrypted tunnel.

Step 7: Verify the transport is actually QUIC

This is the proof step. Just because net use returned "command completed successfully" doesn't mean the transport is actually QUIC; under odd configurations SMB might silently fall back to TCP. We need to confirm.

Get-SmbConnection does not reliably show transport on Server 2025 + Win11 25H2 yet (the TransportName property is missing in some builds). The better diagnostic is Get-SmbMultichannelConnection:

powershellGet-SmbMultichannelConnection -ServerName quic-test.raffusercloud.com | Format-List *

Look for these three lines in the output:

QuicConnectionCount         : 1
TcpConnectionCount          : 0
Selected                    : True

Get-SmbMultichannelConnection PowerShell output showing QuicConnectionCount equals 1, TcpConnectionCount equals 0, and Selected equals True, confirming SMB is running exclusively over QUIC UDP 443 with zero TCP fallback

That's conclusive. One active QUIC connection, zero TCP connections, channel selected. SMB is running exclusively over UDP 443, not falling back to TCP 445. This is the screenshot worth capturing for your operational records.

Sanity check: read and write a file

powershell# List the share, you should see readme.txt from earlier
dir Z:\

# Write a test file from the client
"Hello from Win11 client over QUIC, $(Get-Date)" | Out-File Z:\client-write-test.txt

# Read it back
Get-Content Z:\client-write-test.txt

# List again to confirm both files exist
dir Z:\

If you can list, write, and read, the whole stack is working end to end.

To disconnect when done:

powershellnet use Z: /delete

Common errors

System error 53: network path not found

The most common cause is UDP 443 not actually reachable from the client. Either the server firewall rule didn't apply, the upstream firewall (your VPS provider's network ACL) blocks UDP 443, or there's a NAT issue at the client end. Test by running Test-NetConnection -ComputerName your-fqdn -Port 443 from the client. TCP 443 will fail (we never opened it), but DNS should resolve and ping should succeed. If ping fails, it's a network reachability problem, not a SMB problem.

System error 86: the specified network password is not correct

Three different things can cause this. Read the diagnostic event log on the server (in the Security log, look for event ID 4625) to figure out which:

powershellGet-WinEvent -FilterHashtable @{LogName='Security'; Id=4625; StartTime=(Get-Date).AddMinutes(-5)} -MaxEvents 3 | Format-List TimeCreated, Message

Look at the Status code in the event:

  • 0xC000006A = password is actually wrong. Reset with Set-LocalUser -Name <user> -Password (ConvertTo-SecureString '<newpass>' -AsPlainText -Force).
  • 0xC000006D with Sub Status 0x0 = NTLM loopback check. This happens when you connect from the server to itself via an FQDN that's different from the server's NetBIOS name. Windows blocks this by default. You only hit this when testing on the server itself; real remote clients won't see it. Fix: connect from a different machine, or whitelist the FQDN with New-ItemProperty -Path "HKLM:\SYSTEM\CurrentControlSet\Control\Lsa\MSV1_0" -Name "BackConnectionHostNames" -Value "your-fqdn" -PropertyType MultiString -Force followed by Restart-Service LanmanServer -Force.
  • 0xC0000234 = account is locked out by the rate limiter. Wait two minutes, then try again with the correct password.

Cert chain not trusted on the client

If net use fails with a TLS-related error rather than a network or auth error, the client cannot validate the Let's Encrypt certificate chain. Modern Windows 10 and 11 builds include the ISRG Root X1 root certificate in the trusted store by default, so this is rare. If you do hit it, run on the client:

powershellGet-ChildItem Cert:\LocalMachine\Root | Where-Object { $_.Subject -like "*ISRG*" }

If nothing comes back, the client is missing the Let's Encrypt root. Update Windows fully (Settings > Windows Update) and the root store will refresh.

Cert SAN doesn't match the FQDN

If you issued the certificate for files.example.com but you're connecting via the server's IP (23.26.4.223) or a different alias (backup.example.com), the TLS handshake fails because the SAN doesn't match what the client requested. Always connect using the exact FQDN in the certificate's Subject Alternative Name. To check what SAN your cert has:

powershell$cert = Get-ChildItem Cert:\LocalMachine\My | Where-Object { $_.Subject -like "*your-fqdn*" }
$cert.Extensions | Where-Object { $_.Oid.FriendlyName -eq "Subject Alternative Name" } | ForEach-Object { $_.Format($true) }

Port 80 blocked during cert issuance

Let's Encrypt's HTTP-01 challenge needs to reach port 80 on your server. If TCP 80 is blocked at any layer (server firewall, VPS provider firewall, upstream NAT), the challenge fails and win-acme prints an authorization error. Confirm port 80 is reachable from outside by running Test-NetConnection -ComputerName your-fqdn -Port 80 from a different machine before running win-acme.

Reboot on Server 2025 broke SMB over QUIC

If SMB over QUIC stops working after a reboot, check that the certificate mapping is still active:

powershellGet-SmbServerCertificateMapping

If empty, the mapping was lost (rare, but it can happen on certain Server 2025 update paths). Re-run the New-SmbServerCertificateMapping command from Step 4. The certificate itself is still in LocalMachine\My; you just need to re-bind it to SMB.

Adding more shares

The single certificate is bound to one FQDN at the SMB layer. You can have as many shares as you want on that FQDN, all served over the same QUIC connection. Just create them with New-SmbShare:

powershellNew-Item -Path "C:\Projects" -ItemType Directory -Force
New-SmbShare -Name "Projects" -Path "C:\Projects" -FullAccess "raffsmbuser"

Connect from the client:

powershellnet use P: \\quic-test.raffusercloud.com\Projects /TRANSPORT:QUIC /USER:raffsmbuser RaffQuicTest2026

Same FQDN, different share name, no extra certificate work.

If you want to serve shares for multiple FQDNs from the same server (e.g., files.example.com and backup.example.com), you have two options:

  1. Issue separate Let's Encrypt certs for each FQDN with separate win-acme runs, then bind each one with New-SmbServerCertificateMapping.
  2. Issue one SAN cert that lists multiple FQDNs in its Subject Alternative Name field, then bind that single cert multiple times (once per FQDN) with New-SmbServerCertificateMapping. Win-acme supports multi-domain certs; in Step 3, choose the multi-domain source instead of "Manual input" with a single host.

Client compatibility matrix

Client OS / EditionSMB over QUIC client supported?
Windows 11 24H2 or newer (any edition: Home, Pro, Enterprise, Education)Yes
Windows 11 23H2 (Enterprise, Education, Pro for Workstations only)Yes, but only those editions
Windows 11 22H2 (Enterprise, Education only)Yes, limited editions
Windows 10 (any edition, any version)No. Microsoft has stated SMB over QUIC will not back-port to Windows 10.
Windows Server 2025 (any edition, as a client)Yes
Windows Server 2022 (any edition, as a client)Yes
macOSNo native client at the time of writing. Some third-party SMB clients are exploring it.
Linux (Samba 4.23 or newer)Yes
iOS / AndroidNo native client. Third-party file managers may offer it.

The honest summary: if your remote users are on Windows 11 24H2+, you have full support. If you have mixed fleets with macOS or Linux users, plan accordingly; Samba 4.23 on Linux is the most production-ready non-Windows client today.

Renewing the certificate

Win-acme registered a scheduled task during issuance:

powershellGet-ScheduledTask -TaskName "win-acme renew (acme-v02.api.letsencrypt.org)" | Format-List TaskName, State, LastRunTime, NextRunTime

This task runs daily at 09:00 with a 4-hour random delay window. It checks whether any of your win-acme-managed certs are within 30 days of expiry, and if so, renews them. The renewal happens silently, in the background, with no manual intervention.

Two things worth knowing:

The renewal still needs port 80 open. Win-acme's default HTTP-01 self-hosting plugin requires port 80 reachable from Let's Encrypt's validator. If you closed port 80 after the initial issuance, renewals will fail. Either keep TCP 80 open permanently (it's an inbound rule on your file server, not generally risky), or switch to DNS-01 validation for renewal, which doesn't need port 80 but requires your DNS provider's API credentials saved on the server. For most small deployments, leaving TCP 80 open is the simpler call.

After renewal, the SMB cert mapping does NOT auto-update. This is the gotcha that bites people. Win-acme installs the new cert in LocalMachine\My (replacing or supplementing the old one), but the New-SmbServerCertificateMapping entry still points at the OLD thumbprint. You need to remove and re-add the mapping with the new thumbprint after each renewal.

The cleanest fix is to add a post-renewal script. Create C:\Tools\win-acme\post-renew-smb.ps1:

powershell# Find the most recently issued cert for our SMB FQDN
$fqdn = "quic-test.raffusercloud.com"
$newCert = Get-ChildItem Cert:\LocalMachine\My |
    Where-Object { $_.Subject -like "*$fqdn*" } |
    Sort-Object NotBefore -Descending |
    Select-Object -First 1

if (-not $newCert) {
    Write-Error "No certificate found for $fqdn"
    exit 1
}

# Remove old SMB mappings for this FQDN
Get-SmbServerCertificateMapping |
    Where-Object { $_.Name -eq $fqdn } |
    Remove-SmbServerCertificateMapping -Force

# Add the new one
New-SmbServerCertificateMapping `
    -Name $fqdn `
    -Thumbprint $newCert.Thumbprint `
    -StoreName "My" `
    -Type QUIC `
    -Flags None

Write-Output "SMB cert mapping updated to thumbprint $($newCert.Thumbprint)"

Then tell win-acme to run this after every renewal. Re-run wacs.exe, choose Manage renewals from the main menu, pick your cert, and edit the renewal to add a PowerShell script installation step pointing at post-renew-smb.ps1. The wizard walks you through it.

Tested on Raff

Tested on: Windows Server 2025 Standard Evaluation, build 26100, on a Raff Windows Server, Production plan, 4 vCPU / 8 GB RAM / 120 GB NVMe, Vint Hill, Virginia datacenter, with public IPv4 address 23.26.4.223 and FQDN quic-test.raffusercloud.com, on May 23, 2026, by Serdar Tekin. End-to-end verified on a fresh VM: File Server role installed via Install-WindowsFeature with RestartNeeded: No; EnableSMBQUIC: True confirmed as Server 2025 default; UDP 443 + TCP 80 firewall rules created via New-NetFirewallRule; win-acme v2.2.9.1701 downloaded from official GitHub releases (42.6 MB binary, build date May 22, 2024); Let's Encrypt certificate issued for quic-test.raffusercloud.com via HTTP-01 self-hosting validation, leaf cert installed in LocalMachine\My and R13 intermediate in LocalMachine\CA, renewal scheduled for July 17, 2026 via Task Scheduler entry win-acme renew (acme-v02.api.letsencrypt.org); certificate bound to SMB via New-SmbServerCertificateMapping -Type QUIC, confirmed with Get-SmbServerCertificateMapping; local user raffsmbuser created and added to local Users group; SMB share QuicShare created with FullAccess for raffsmbuser; client connection successful from a separate Windows machine via net use Z: \\quic-test.raffusercloud.com\QuicShare /TRANSPORT:QUIC; transport confirmed as QUIC via Get-SmbMultichannelConnection showing QuicConnectionCount=1, TcpConnectionCount=0, Selected=True, Dialect=3.1.1; read and write of test files on the mapped drive confirmed end-to-end functionality.

What's next

Sources


Microsoft, Windows Server, Windows 11, SMB, and Windows Admin Center are trademarks of Microsoft Corporation. Let's Encrypt is a service mark of the Internet Security Research Group. win-acme is open-source software released under the Apache License 2.0. Raff Technologies is an independent infrastructure provider and is not affiliated with, sponsored by, or endorsed by Microsoft Corporation or the Internet Security Research Group.

Published May 23, 2026 · Last updated May 23, 2026