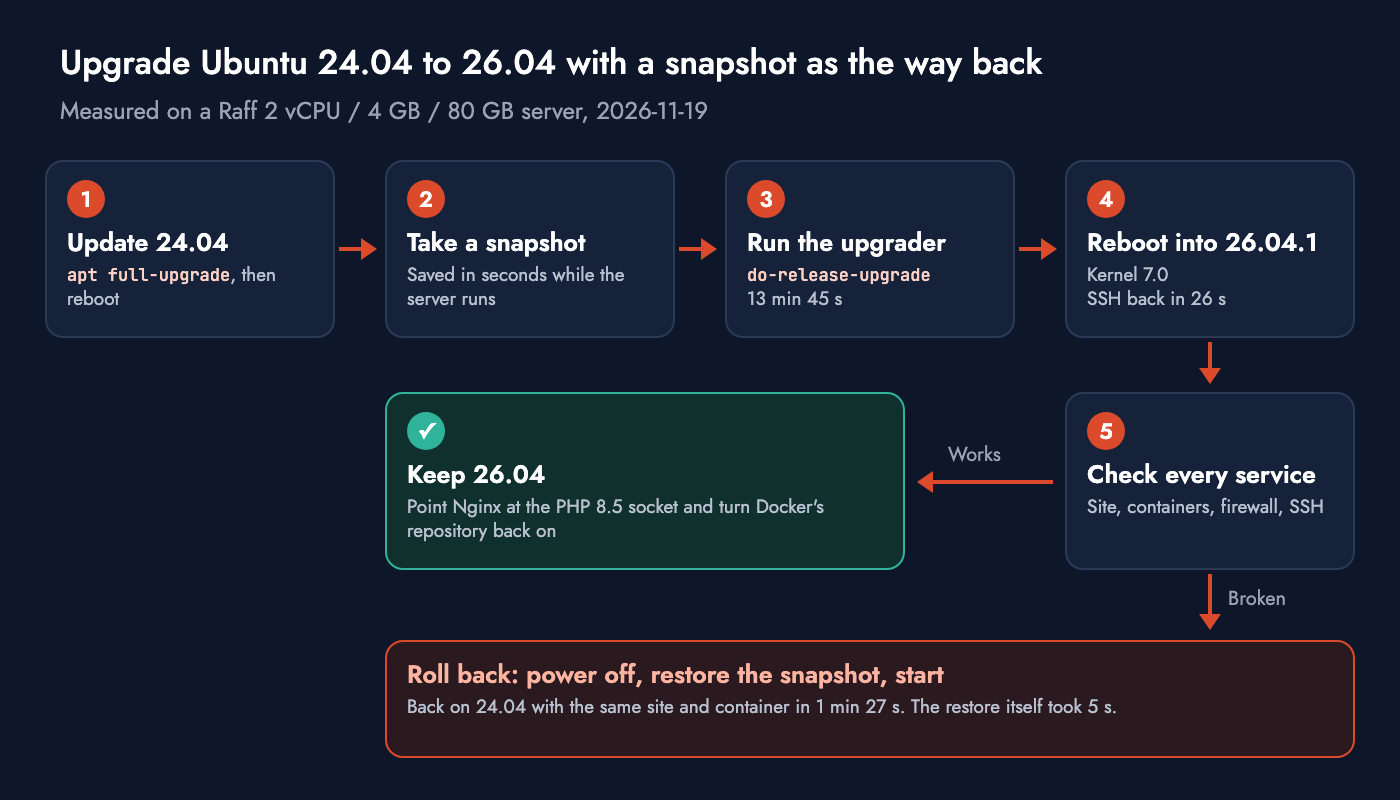
In this tutorial, you'll upgrade a Raff server from Ubuntu 24.04 LTS to Ubuntu 26.04 LTS with do-release-upgrade, with a snapshot ready to put the server back if anything breaks.
Ubuntu 26.04 LTS ("Resolute Raccoon") is supported until April 2031. Canonical opened the upgrade path from 24.04 on September 29, 2026, with the 26.04.1 point release. An in-place upgrade keeps your files, users and settings, but it replaces the kernel, PHP, OpenSSH, sudo and several hundred other packages, and it switches off third-party repositories such as Docker's. This tutorial walks through a full run on a real server, the two things that broke, how to fix them, and how to roll back in under two minutes. Raff runs 15,000+ VMs for 3,000+ customers.
Prerequisites:
- A Raff Linux VM running Ubuntu 24.04 LTS, with no scheduled backups on it (a server that uses backups cannot take snapshots, see Step 3)
- SSH access as root or as a user with sudo
- At least 5 GB of free disk space on
/(the test server downloaded 1,286 MB and used 1.2 GB more after the upgrade) - About 30 minutes, including about 14 minutes for the upgrade itself
This tutorial was tested on 2026-11-19 on a Raff VM with 2 vCPU, 4 GB RAM, and 80 GB NVMe storage, upgrading Ubuntu 24.04.5 LTS to Ubuntu 26.04.1 LTS. The server ran Nginx with PHP-FPM, Docker CE from Docker's own repository, and UFW, like a typical small production server.
Step 1 — Check the Release and Free Disk Space
Confirm the server runs Ubuntu 24.04 and has room for the upgrade:
lsb_release -d
df -h /
Expected output on the test server:
Description:	Ubuntu 24.04.5 LTS
Filesystem      Size  Used Avail Use% Mounted on
/dev/vda1        77G  2.8G   74G   4% /
The upgrade only goes one LTS at a time. A server on Ubuntu 22.04 must upgrade to 24.04 first.
Save the list of running services so you can compare it after the upgrade:
systemctl list-units --type=service --state=running --no-legend | awk '{print $1}' > ~/services-before-upgrade.txt
ls /etc/apt/sources.list.d/
The second command lists your repositories. Anything other than ubuntu.sources is a third-party repository that the upgrader will switch off. On the test server, that was docker.sources.
Step 2 — Update Ubuntu 24.04 and Reboot
The upgrader expects a fully updated system. Install all pending updates:
sudo apt update
sudo apt full-upgrade -y
If the updates installed a new kernel, the file /var/run/reboot-required exists. Reboot when it does:
[ -f /var/run/reboot-required ] && sudo reboot
Reconnect and verify:
lsb_release -d
uname -r
On the test server, this step moved it from 24.04.4 to Ubuntu 24.04.5 LTS with kernel 6.8.0-149-generic.
Step 3 — Take a Snapshot of the Server
A snapshot saves the whole disk as it is now. If the upgrade goes wrong, restoring it puts the server back exactly as it was.
- In the Raff dashboard, open your server and go to the Snapshots tab.
- Click Take snapshot.
- Replace the suggested name with one you will recognize, such as
before-2604-upgrade. Names can contain only letters, numbers and hyphens, sobefore-26.04-upgradeis rejected. - Click Create Snapshot.
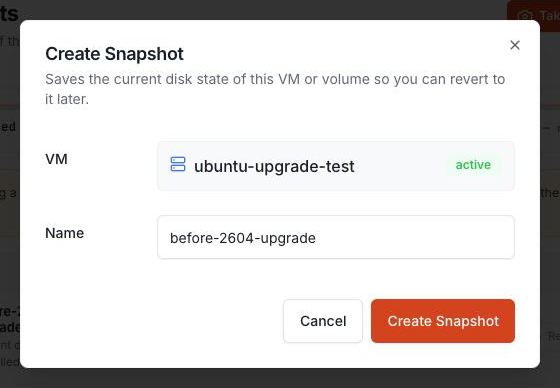
The snapshot is taken while the server keeps running. The new snapshot appears in the list on the Snapshots tab.
📌 Note: A server with scheduled backups cannot take snapshots. The Snapshots tab then shows "Snapshots are not available while this VM uses backups". Take a fresh backup from the Backups tab instead and use it as your restore point. See Cloud Snapshots vs Backups for the difference.
Step 4 — Prepare SSH Access for the Upgrade
When you run the upgrader over SSH, it asks before it continues and starts a spare SSH server on port 1022, so you can still get in if the main one fails during the upgrade. If UFW is active, it blocks that port. Open it for the duration of the upgrade:
sudo ufw allow 1022/tcp
If a Raff cloud firewall is attached to the server, allow TCP 1022 there too. The Raff browser console in the dashboard is a second way in that does not depend on SSH.
The upgrader also runs inside GNU screen. If your connection drops, reconnect and run sudo do-release-upgrade again: it reattaches to the running upgrade instead of starting a new one.
On the test server, the spare SSH server answered on port 1022 from outside as soon as the upgrader started it, and it was gone after the final reboot.
Step 5 — Run the Upgrade with do-release-upgrade
Start the upgrade:
sudo do-release-upgrade
These are the questions the upgrader asked on the test server, in order:
- The release notes screen. Answer
yto continue. - "Continue running under SSH?" Answer
y. The upgrader starts the spare SSH server on port 1022, explains it, and asks you to press Enter. - The upgrade summary. On the test server: "9 packages are going to be removed. 122 new packages are going to be installed. 656 packages are going to be upgraded. You have to download a total of 1286 M." Answer
yto start. Once the download finishes, the upgrade cannot be cancelled. - "Configuring openssh-server". A dialog says that
/etc/ssh/sshd_confighas been locally modified. Choose keep the local version currently installed, which is already selected, and press Enter. Raff servers setPermitRootLogin yesin this file. The package maintainer's version drops that line, which blocks root sign-in with a password after the reboot. - "Configuring grub-pc". A second dialog asks the same about
/etc/default/grub. Keep the local version here too. On the test server the two files differed only in theGRUB_DISTRIBUTORline, so the server boots either way. - "Remove obsolete packages?" The test server had 71. Answer
y. - "System upgrade is complete. Restart required." Answer
yto reboot.
The upgrader also switches off third-party repositories, such as Docker's, without asking. You turn them back on in Step 8.
The upgrade itself took about 14 minutes on the test server, plus the time you spend answering the two dialogs.
Step 6 — Reboot and Confirm Ubuntu 26.04.1
After the restart, reconnect and check the new release:
lsb_release -d
uname -r
systemctl is-system-running
systemctl --failed
Expected output on the test server:
Description:	Ubuntu 26.04.1 LTS
7.0.0-43-generic
running
  UNIT LOAD ACTIVE SUB DESCRIPTION
0 loaded units listed.
If systemctl is-system-running says starting, services are still coming up: wait a minute and run it again. The test server was reachable over SSH 26 seconds after the reboot. Compare the running services with the list from Step 1:
systemctl list-units --type=service --state=running --no-legend | awk '{print $1}' > ~/services-after-upgrade.txt
diff ~/services-before-upgrade.txt ~/services-after-upgrade.txt
A service that appears only in the first list stopped running and needs a look. On the test server, the only difference was PHP-FPM:
13c13
< php8.3-fpm.service
---
> php8.5-fpm.service
That change breaks PHP sites, covered in the next step. Docker's repository, switched off by the upgrader, is covered in Step 8.
Step 7 — Fix PHP-FPM Sites That Point at the Old Socket
Ubuntu 26.04 replaces PHP 8.3 with PHP 8.5. The upgrade removes the php8.3-fpm service, so an Nginx site that points at /run/php/php8.3-fpm.sock returns 502 Bad Gateway. The Nginx error log shows the cause:
connect() to unix:/run/php/php8.3-fpm.sock failed (2: No such file or directory)
Find every site that still uses the old socket:
sudo grep -rl "php8.3-fpm.sock" /etc/nginx/
Point them at /run/php/php-fpm.sock. That path always leads to the installed PHP version, so the next PHP upgrade will not break the site again:
sudo sed -i 's#unix:/run/php/php8.3-fpm.sock#unix:/run/php/php-fpm.sock#' /etc/nginx/sites-available/default
sudo nginx -t
sudo systemctl reload nginx
Replace /etc/nginx/sites-available/default with each file the grep command found. Verify the site:
curl -s http://127.0.0.1/
The test site printed PHP 8.5.4 on 7.0.0-43-generic.
If you changed settings in /etc/php/8.3/fpm/php.ini or in a pool file under /etc/php/8.3/fpm/pool.d/, copy those changes into the matching files under /etc/php/8.5/ and restart php8.5-fpm.
Step 8 — Turn Docker's Repository Back On
The upgrader switches off third-party repositories and leaves them on the old release. Docker's file looks like this after the upgrade:
cat /etc/apt/sources.list.d/docker.sources
Types: deb
URIs: https://download.docker.com/linux/ubuntu
Suites: noble
Components: stable
Signed-By: /etc/apt/keyrings/docker.asc
Enabled: no
Your containers keep running, but Docker no longer gets updates. Point the file at resolute, the 26.04 release name, and remove the Enabled: no line:
sudo sed -i -e 's/^Suites: noble$/Suites: resolute/' -e '/^Enabled: no$/d' /etc/apt/sources.list.d/docker.sources
sudo apt update
apt-cache policy docker-ce | head -3
The candidate version now ends in ubuntu.26.04~resolute:
docker-ce:
  Installed: 5:29.10.0-1~ubuntu.24.04~noble
  Candidate: 5:29.10.0-1~ubuntu.26.04~resolute
Install the 26.04 build and check your containers:
sudo apt install --only-upgrade -y docker-ce docker-ce-cli containerd.io docker-compose-plugin
sudo docker ps
Docker restarts during the package update, and containers with a restart policy come back by themselves. Repeat this for every other file the upgrader switched off in /etc/apt/sources.list.d/, after checking that the vendor publishes packages for resolute.
Step 9 — Switch Time Sync to Chrony (Optional)
New Ubuntu 26.04 installs use Chrony with Network Time Security (NTS) for time sync. An upgraded server keeps systemd-timesyncd. To match a new install:
sudo apt-mark auto systemd-timesyncd
sudo apt install -y chrony
chronyc -N authdata
On a Raff server, apt-mark may answer that systemd-timesyncd is already set to automatically installed, which is fine. The Mode column shows NTS for Ubuntu's time servers:
Name/IP address             Mode KeyID Type KLen Last Atmp  NAK Cook CLen
=========================================================================
1.ntp.ubuntu.com             NTS     1   30  128   11    0    0    8   64
2.ntp.ubuntu.com             NTS     1   30  128   10    0    0    8   64
3.ntp.ubuntu.com             NTS     1   30  128   10    0    0    8   64
4.ntp.ubuntu.com             NTS     1   30  128   11    0    0    8   64
ntp-bootstrap.ubuntu.com     NTS     1   30  128   10    0    0    8   64
Step 10 — Roll Back with the Snapshot If Something Breaks
If the upgraded server has a problem you cannot fix, restore the snapshot. Everything written to the disk after the snapshot is lost, so copy out any new data first.
- Power off the server from the dashboard. A snapshot can only be restored on a stopped server, so the Restore button stays disabled until it is off.
- On the Snapshots tab, click Restore on
before-2604-upgrade. - Check that the dialog shows the right snapshot and server, with the status
passive(powered off), then click Restore Snapshot. - Start the server.
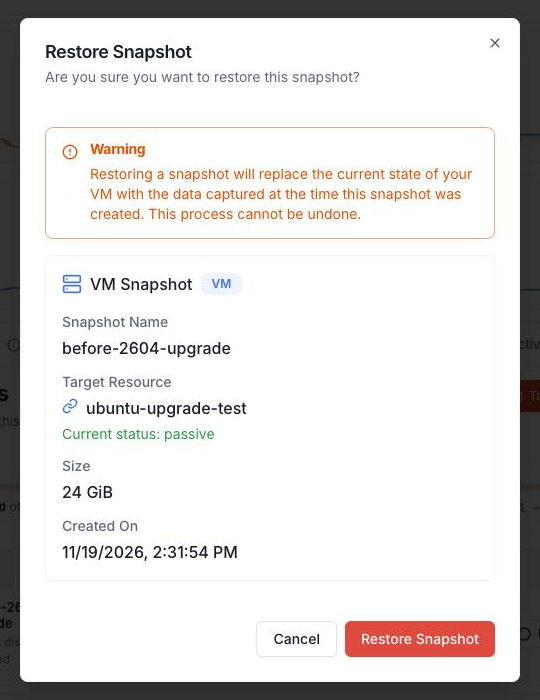
On the test server, the restore itself took 5 to 8 seconds. From power-off to a working SSH login on Ubuntu 24.04.5 took 1 minute 27 seconds in one test and 1 minute 16 seconds in another, with the same PHP 8.3 site and the same running container. Verify after a rollback:
lsb_release -d
curl -s http://127.0.0.1/
Description:	Ubuntu 24.04.5 LTS
PHP 8.3.6 on 6.8.0-149-generic
Step 11 — Verify the Upgraded Server End to End
On the upgraded server, confirm the release, the site, the containers, the firewall and the new defaults in one pass:
lsb_release -d
curl -s http://127.0.0.1/
sudo docker ps --format '{{.Names}} {{.Status}}'
sudo ufw status | head -1
sudo --version | head -1
systemctl is-system-running
Expected output on the test server:
Description:	Ubuntu 26.04.1 LTS
PHP 8.5.4 on 7.0.0-43-generic
hello Up 6 seconds
Status: active
sudo-rs 0.2.13-0ubuntu1.2
running
The sudo command is now sudo-rs, the Rust rewrite that 26.04 uses by default, and commands like ls come from the Rust coreutils. Day-to-day commands work the same. The table shows what changed on the test server:
| Component | Before (24.04.5) | After (26.04.1) |
|---|---|---|
| Kernel | 6.8.0-149 | 7.0.0-43 |
| PHP | 8.3.6 | 8.5.4 |
| Nginx | 1.24.0 | 1.28.3 |
| OpenSSH | 9.6p1 | 10.2p1 |
| sudo | sudo 1.9.15p5 | sudo-rs 0.2.13 |