
In short
Remote Desktop Services configuration on Windows Server 2025 starts with a domain-backed session deployment: add RD Connection Broker, RD Web Access, and RD Session Host, then configure licensing, create a session collection, restrict it to the correct Active Directory group, and decide how user profiles will persist. On Raff, treat the 120-day RDS grace period as deployment time, not a production licensing plan.
This tutorial is for administrators building a classic Windows Server RDS environment for multiple users. It assumes Windows Server is already deployed and patched. If you are still deciding whether you need RDS at all, read Multi-User RDP: 2 Admin Sessions vs RDS Session Host first.
Raff has deployed 15,000+ VMs for 3,000+ customers; this tutorial focuses on the configuration decisions that matter after Windows Server is running.
This tutorial owns the RDS configuration workflow
This page covers one specific path:
Windows Server 2025
→ Active Directory domain membership
→ Standard session-based RDS deployment
→ RD Connection Broker
→ RD Web Access
→ RD Session Host
→ RD Licensing
→ Session collection
→ User group assignment
→ User profile strategy
→ End-to-end verification
It does not duplicate the deeper decisions already covered elsewhere:
- RDS CAL Licensing on Windows Server owns Per User vs Per Device, BYOL, and Raff SPLA licensing decisions.
- Remote Desktop Gateway vs Direct RDP owns the external-access architecture.
- RDP Performance Tuning owns session performance.
- Windows Server Licensing on Raff owns Windows Server Evaluation, SPLA, and BYOL.
- Windows VPS for Remote Desktop owns the broader buyer/use-case decision.
Microsoft's Standard Deployment wizard can place the main RDS roles on separate servers or combine roles for a smaller environment. This tutorial uses a domain-joined Standard Deployment because it gives you Connection Broker, collections, centralized licensing configuration, and a clean path to add Session Hosts later.
Remote Desktop Services configuration starts with the right architecture
A small RDS environment still has separate responsibilities even when several roles share one VM.
| RDS component | What it does | Required in this tutorial |
|---|---|---|
| RD Session Host | Runs multi-user desktops and RemoteApp programs | Yes |
| RD Connection Broker | Tracks sessions, reconnects users, and manages collections | Yes |
| RD Web Access | Publishes desktops and RemoteApp resources to authorized users | Yes |
| RD Licensing | Manages the Windows RDS licensing configuration | Yes |
| RD Gateway | Provides controlled external RDP access over HTTPS | No — configure separately before public rollout |
For a lab or a very small deployment, you can combine Connection Broker, Web Access, Licensing, and Session Host roles. For production, decide whether role separation is justified by user count, maintenance windows, recovery requirements, and the need to scale Session Hosts independently.
Microsoft recommends keeping all RD Session Hosts inside one collection at the same Windows Server version. A Windows Server 2025 collection should therefore not mix 2025 and 2022 Session Hosts.
The prerequisites should be complete before you install RDS
Do not begin the RDS wizard until identity, DNS, patching, and recovery are in a known state.
Use this checklist:
- Windows Server 2025 is installed, patched, and has a stable hostname.
- The server is joined to the Active Directory domain used for RDS users.
- Forward and reverse DNS resolution works between the RDS servers and domain controllers.
- You have a domain account with the administrative rights needed to add and configure RDS roles.
- The intended RDS user group already exists, or you have a naming plan for it.
- You have decided whether users receive a full desktop, RemoteApp programs, or both.
- You have decided which licensing entitlement applies: customer-owned RDS CALs or Raff-provided SPLA RDS SALs.
- You have a backup or snapshot before major role changes.
- You know whether users will connect only over a private path or need RD Gateway for internet access.
- If you will use User Profile Disks, you have a central SMB share plan and backup plan for that share.
For a new Raff VM, complete the Windows Server initial setup before adding RDS roles.
Compatible with Raff: A prior Raff lab on May 24, 2026 used Windows Server 2025 Datacenter Evaluation, build 26100, and verified the main RDS role components could be installed and detected after restart. The complete workflow in this draft still requires a fresh end-to-end test before publication.
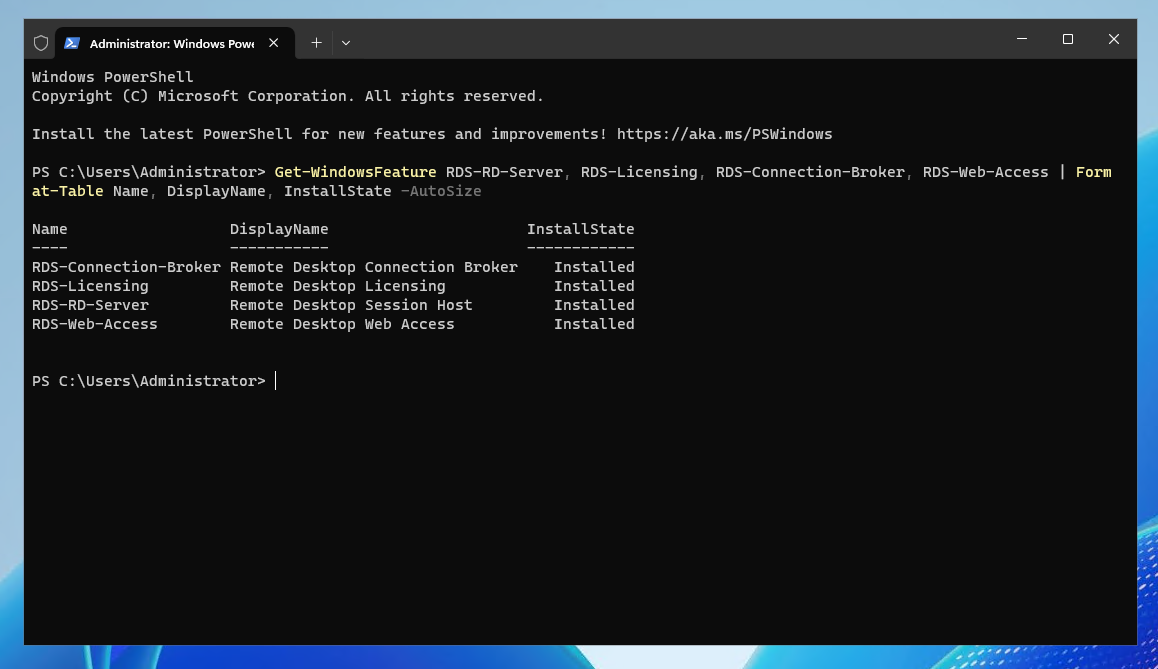
The prior lab gives us a real baseline for role availability. It does not justify claiming that the complete deployment, licensing, collection, profile, and user-access workflow below has been freshly tested.
Step 1 — Add the RDS servers to Server Manager
Open Server Manager on the server that will manage the deployment.
Go to:
Manage
→ Add Servers
→ Find Now
Add every Windows Server that will hold an RDS role.
For a small deployment, your inventory might look like this:
| Example server | Planned role |
|---|---|
RDS-CB01.corp.example | RD Connection Broker + RD Web Access + RD Licensing |
RDS-SH01.corp.example | RD Session Host |
For a single-server lab, one domain-joined Windows Server can hold several roles. Keep the role names distinct in your documentation even when they live on the same VM.
Before continuing, confirm that Server Manager shows the target servers as Online and that there are no unresolved manageability errors.
Verification: Server Manager can discover and manage every server that will participate in the RDS deployment.
Step 2 — Create a Standard session-based RDS deployment
In Server Manager, go to:
Manage
→ Add Roles and Features
→ Remote Desktop Services installation
→ Standard Deployment
→ Session-based desktop deployment
Do not choose Quick Start for this article. Quick Start is useful for a lab, but Standard Deployment makes the role assignment explicit and maps better to a production design.
Assign the roles:
- Select the server that will run RD Connection Broker.
- Select the server that will run RD Web Access.
- Select the server that will run RD Session Host.
- Allow automatic restart if your maintenance window permits it.
- Review the role mapping.
- Start the deployment.
- Wait for Server Manager to report a successful deployment.
After the required restart, sign back in with the same administrative account.
Run this PowerShell check from the Connection Broker:
Import-Module RemoteDesktop
Get-RDServer
Microsoft documents Get-RDServer as the cmdlet for listing RDS servers and their roles in a Remote Desktop deployment.
Expected result: The output lists the servers participating in the deployment and the RDS roles assigned to them.
<!-- SCREENSHOT REQUIRED BEFORE PUBLISH: Server Manager -> Remote Desktop Services -> Overview after Standard Deployment. Show the Connection Broker, Web Access, and Session Host role mapping. Use a documentation environment; do not expose customer domains or credentials. -->Step 3 — Add RD Licensing without treating the grace period as production licensing
Open:
Server Manager
→ Remote Desktop Services
→ Overview
→ + RD Licensing
Select the server that will hold the RD Licensing role and complete the wizard.
Then open Remote Desktop Licensing Manager from the RDS server list or Server Manager tools.
The commercial entitlement path matters here:
| Licensing path | What you should have before production |
|---|---|
| Customer-owned / BYOL RDS | Valid RDS CAL entitlement for the Windows Server version and chosen Per User or Per Device mode |
| Raff-provided SPLA RDS | The applicable Raff RDS SAL entitlement and activation/onboarding details for the hosted service |
Do not invent or reuse a license-pack key from another environment. The technical configuration must match the entitlement actually assigned to this deployment.
Microsoft documents a 120-day licensing grace period for a newly created RD Session Host. That window exists so you can deploy and configure RDS; it is not a reason to postpone the production licensing decision.
On the Connection Broker, open:
Remote Desktop Services
→ Overview
→ Tasks
→ Edit Deployment Properties
→ RD Licensing
Choose the licensing mode that matches the deployment.
For customer-owned RDS CALs:
- domain-joined RDS deployments can use Per User or Per Device;
- workgroup RDS deployments must use Per Device.
Specify the RD Licensing server and save the deployment properties.
Then verify the effective configuration:
Import-Module RemoteDesktop
Get-RDLicenseConfiguration
If you are running the command from another server, specify the broker explicitly:
Get-RDLicenseConfiguration -ConnectionBroker 'RDS-CB01.corp.example'
Verification: PowerShell returns the intended licensing mode and the RD Licensing server for the deployment.
Step 4 — Create an Active Directory group for RDS access
Do not leave a production collection open to every domain user just because the wizard makes broad access convenient.
Create a dedicated Active Directory security group for the people who should receive the desktop or application.
Example:
RDS-Office-Users
Add only approved users to that group.
A simple access model is:
User account
→ RDS-Office-Users
→ Session collection
→ RD Session Host
This keeps RDS authorization separate from local administrator rights and makes onboarding/offboarding easier to audit.
Microsoft's collection-management guidance uses Active Directory groups as the authorization source for RDS collections. It also warns that the collection's user-group list cannot be empty: add the narrow group first, then remove a broad group such as Domain Users.
Verification: The intended test user is a member of the dedicated RDS security group and is not being granted desktop access through an unrelated administrator group.